

- working knowledge of Windows, developer tools, Refinitiv RT-SDK and basic Linux + Windows command line usage
- some experience of developing with Refinitiv Streaming APIs such as EMA, ETA, Websocket API
Introduction
The Refinitiv Real-Time SDK, consisting of the high-level Enterprise Message API and lower-level Enterprise Transport API is recommended for developers writing or migrating a real-time streaming data Consumer or Provider application in Java or C++.
Testing your code
Under normal circumstances, developers can test their:
- EMA + ETA Consumer applications easily by connecting to a live feed:
- over the internet (Real-Time Optimised),
- via a deployed Refinitiv Real-Time Distribution System (RTDS)
- or the Refinitiv Real-Time Connector (RTC).
- Provider type applications generally require an RTDS to publish the data to and for a test Consumer to consume the published data from.
- Contributor (Posting) applications require access to either
- Refinitiv Contributions Channel (for external contributions)
- RTDS (+ Contribution gateway - for external contributions)
However, there can be scenarios where you as a developer may want to test your code without a live feed or access to an RTDS - for example:
- no access to an internet connection
- no credentials or user ID required to consume data
- test with a specific payload/content set
- no access to your corporate network
- your market Data team has not yet configured your RTDS system to receive data from your Provider
- you want to test a Provider or Posting application with different payloads etc without causing any issue on the RTDS system
- and so on...
In my previous article - Testing EMA Consumer and Provider Applications, I covered a few different options such as
– direct connect between Provider and Consumer
– capture and playback of data
– playback of canned data
– using the Refinitiv Real-Time Connector (formerly known as ADS POP)
Of the above, I would say my favourite is probably using the Refinitiv Real-Time Connector. A simplistic way of describing RTC is ‘a cut down RTDS in a single application’ – a description which no doubt undersells RTC - but from a developer’s perspective, it provides what I need to test my applications without accessing (or disturbing) a real RTDS deployment. You may already be aware of the similar ADS POP application – which is essentially the precursor to RTC.
Why do I prefer using RTC to the other methods – because it allows greater flexibility in my testing e.g.:
· some control over the ADS/ADH type functionality e.g., drop a service, log out a user etc.
· to Post (contribute) data to a Cache service that I define on the RTC
· connect + test my Interactive and Non-Interactive providers without a dependency on the Market Data team
Do you have access to an RTC?
As mentioned in the above article, RTC is a licenced product – so may not be an option for all developers. However, many of our client organisations have the required licences which allow them access to RTC – so please check with your Market Data team or your Refinitiv Account team.
If you plan to attempt the following steps, you will need a valid Licence file for RTC in order to successfully complete the process.
If you do have an RTC licence available to you, in this article I am going to show how you can use RTC installed deployed in a Docker Desktop to test your Consumer, Provider and Contributor applications on your localhost Windows PC. If you are a competent Linux user, you should be able to adapt the notes below and achieve the same on your Linux device as well.
NOTE: Before proceeding, please be aware of the two key points:
· Refinitiv does not officially support RTC running in a (Windows) Docker Desktop instance – official support is available with a standard Linux Docker deployment. However, I have found the above to be quite stable and given the next point – this should not be a major issue ….
· Whilst RTC is very convenient for local testing during the development phase, you are strongly advised to test all applications within the appropriate ‘real’ UAT environment before moving to UAT and Production stage. The live system will almost certainly be configured/optimised differently from the RTC container instance we are about to create.
Two-part article
Due to the detailed nature of this article, it has been split into two parts
- This 1st part covers Basic installation and configuration to get an instance of RTC running inside a Docker container - supporting Consumer functionality
- The 2nd part details the additional configuration of RTC to support Providers and Posting (contributions) - as well as a brief look at the RTC monitoring tool
Deploying RTC inside Docker
Firstly, you need to ensure you have the Docker Desktop installed on your host PC. If you have not already done so, you can follow the official guides on the Docker website e.g. Install Docker Desktop on Windows – guides for other OSs are available on the same website.
Assuming you have obtained an RTC Licence file from your Market Data team or Refinitiv Account team, you can then deploy an RTC Docker image and build the Docker container as follows.
Local config, log and licence files
Firstly, I am going to create a localhost directory structure, where I store and access my RTC config, log files and licence file – outside of the Docker container.
I do this so that these files persist outside of the RTC container – allowing me to
· deploy the licence file, edit the config file, view the log files easily from Windows.
· rebuild the docker container (e.g. when a new version is released) easily
So, for example, I created the following structure:
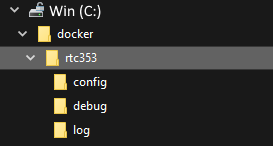
where the
· config folder contains my RTC config file and licence file
· the debug folder is where any RTC debug will be stored
· and log folder will contain the RTC log files
The above folders are on my localhost (Windows) drive, However, the RTC container also needs to access the config files and output debug and log files. Therefore, I will need to define some bind mounts, to mount the above directories into my RTC container.
Why am I creating bind mounts? Docker does not store persistent data inside containers and files written to a container's storage won’t be accessible once the container is stopped. Also, accessing files inside a container’s storage even while it's running is not easy. By using bind mounts, we can ensure these files persist outside the container and are easily accessible using the standard host’s file system tools.
In the config folder, I will place the
· RTC config file – rtc.cnf (see later for details)
· RTC License file – REFINITIV_LICENSE (you should have already obtained)
My Docker Compose file
The bind mounts and other docker operations & config can be performed on the command line using docker commands. However, I prefer to use a docker-compose.yml file which will allow me to put my related config in one place and do the following with a single docker command:
· specify and pull my RTC image
· define my ports
· define my bind mounts
· compose my container
I created a docker-compose.yml file that looks like this:
version: "3"
services:
rtc:
container_name: rtc
hostname: rtc
restart: "always"
image: refinitivrealtime/rtc:3.5.3.L1
ports:
- 14002:14002
- 14003:14003
- 14005:14005
- 15000:15000
- 8101:8101
volumes:
- "c:/docker/rtc353/config:/opt/distribution/config"
- "c:/docker/rtc353/debug:/opt/distribution/debug"
- "c:/docker/rtc353/log:/opt/distribution/log"
For now, I copied the above docker-compose.yml file into my c:\docker\rtc353 folder – and I will come back to this later.
Let’s breakdown of the above in a bit more detail:
1. set the service, container and host name all to rtc
2. set to restart policy to automatically restart the container if it stops (unless manually stopped) – full details at Start containers automatically | Docker Documentation
3. specify the docker image to pull from the Docker Hub – at the time of writing that was version 3.5.3.L1
4. publish the ports for the RTC container that I want to interact with from my PC:
· 14002: RSSL Consumer connecting to RTC
· 14003: Non-interactive provider connecting to RTC
· 14005: Interactive provider to listen for RTC connection (non-default value)
· 15000: WebSocket Consumer to RTC
· 8101: Legacy MarketFeed SSL subscriber to RTC
5. specify my bind mounts e.g., c:/docker/rtc353/config:/opt/distribution/config
· Where c:/docker/rtc353/config is my local host path and
· Where /opt/distribution/config is the RTC docker container path
By default, an Interactive Provider and the RTC would communicate on port 14002 – however, since I may want to run both Consumer and IProvider on my host PC, I have changed the IProvider port to 14005 (I will come back to this in part 2).
Before I can create my RTC container, I need to configure my RTC as per my requirements.
For my usage scenarios, I want to configure my RTC to:
· Connect to a Refinitiv Real-Time Optimized (RTO) feed for my live streaming data.
· Define a cache service so that I can test Contributions code by Posting data to the cache
· Configure at least one Interactive and one Non-Interactive service
Initial RTC Configuration
For the initial phase, I configured only the basics required to get an instance of RTC up and connected to RTO. If you don’t have access to RTO and want to use your own internal RTDS feeds – speak to your Market Data team for the necessary config parameters.
I am not an RTDS or RTC expert, so I took a vanilla rtc.cnf file from an RTC package and just ‘hacked’ it to meet my above requirements. I have included a vanilla rtc.cnf for your reference.
I have also provided a copy of my modified rtc.cnf file – minus my credentials. So, in theory, you could just add your credentials/connectivity params and run.
However, I think it would be useful to look at the key changes I made – to provide some understanding for when want to customise RTC more to your needs.
Just to be clear, whichever file you use - will need to be renamed to rtc.cnf
If you have an internal Market Data team – they should be able to help you configure your RTC as per your needs.
NOTE: for some of the following rtc.cnf entries, you will be updating existing entries – for others, you will be adding new entries – so note the wording I use.
Connect to an RTO feed
This step is only required if you are using Refinitiv Real-Time Optimised – if you are sourcing your real-time data from an internal ADS, speak to your Market Data team – they should be able to help you configure your RTC appropriately.
Most of the RTO related changes I made were based on my colleague’s excellent article - Configuring adspop docker to connect to Refinitiv Real-Time Optimized (adspop is the precursor to RTC)
In the rtc.cnf, update the routeList configuration to cloud so it will connect to the Refinitiv Real-Time Optimized.
*rtc*routeList : cloud
Next, I need to provide my RTO MachineID and Password – however, the password needs to be obfuscated first
To obfuscate my password, I used the dacsObfuscatePassword tool that comes with the RTC package – which your Market Data team should be able to supply you with.
If not, you can download the same tool from our Developer Portal’s RT-SDK Tools Downloads page - Refinitiv Real-Time SDK - Tools. On that page, you will note there is a Windows and Linux version of ‘RCC - Dacs Obfuscate Login Tool’.
Once you unpack the above zip file, you will find the dacsObfuscatePassword tool which you can run as follow:
C:> DacsObfuscateLogin -e '<your MachineID password>'
Or
#./dacsObfuscatePassword -e '<your MachineID password>'
Note: Please be sure to enclose your password in single quotes ' – to avoid any issues with special characters.
To generate an obfuscated version of your password.
And then update the userName and obfuscated userPassword entries in the rtc.cnf as follows:
*rtc*cloud.route*userName : <your RTO machine ID>
*rtc*cloud.route*userPassword : <your obfuscated password>
You can also update your location entry – so that RTO will connect to the closest endpoints – the default is us-east. However, as I am based in the UK, I updated mine to:
*rtc*cloud.route*location : eu-west
If you are in APAC, you could update it to:
*rtc*cloud.route*location : ap-southeast
Note: Whilst the RTC container is running, it will be logged into RTO using the above MachineID. So, if you need to use the same MachineID in another application – you can stop the RTC container, to avoid any login conflicts.
Licence File
I also updated the location of my licence file to match the folder I defined in my docker-compose.yml file:
*rtc*licenseFile : /opt/distribution/config/REFINITIV_LICENSE
For reference, the licence file you have been provided should look something like this:
{
LICENSEID = <xxx>
KEY = <license >
LICENSEE = <your details>
NODEID = * (for temp licence)
EXPIRATION = <Date>
LICENSETYPE = <Type>
PRODUCT = RTC
VERSION = 3.5
…
…
}
Dictionary + Logfile folders
I also updated the log file path to match the container folder defined in my docker-compose.yml file:
*rtc*logger*file : /opt/distribution/log/rtc.log
RTC needs dictionary files to decode the data - a set of which are included in the RTC docker image. When the container is created, it places them in the container’s /opt/distribution/etc folder.
However, a default rtc.cnf is looking elsewhere, so I updated the location as below:
*fieldDictionary : /opt/distribution/etc/RDMFieldDictionary
*enumFile : /opt/distribution/etc/enumtype.def
Deploy and run the RTC container – finally(!)
Once I copied the updated rtc.cnf and REFINITIV_LICENSE files into my config folder, I then proceeded to build and run my RTC container.
If you recall, earlier on I copied by docker-compose.yml file into my c:\docker\rtc353 folder – which I then ‘run’ using the following command.
c:\docker\rtc353> docker-compose up -d
The above command creates and starts my RTC instance in detached mode – i.e., runs the container in the background. The first time you run the above, the output should look something like this:
[+] Running 16/16
- rtc Pulled 16.1s
- 1e7cdd8e55f9 Pull complete 9.4s
- ac8f959ec7d9 Pull complete 9.5s
- fd08f01e9913 Pull complete 9.8s
- db7070756e15 Pull complete 9.8s
- 491754c3df24 Pull complete 9.9s
- 97edfd880226 Pull complete 9.9s
- 6334591e144e Pull complete 10.0s
- 4a0d7610dbad Pull complete 10.0s
- 61fa6819281f Pull complete 10.1s
- 28ebdd3b2b7c Pull complete 10.2s
- 7d59bce42f1c Pull complete 11.5s
- 6e0927527697 Pull complete 11.6s
- 2596cef2f39d Pull complete 11.7s
- b2240f2b1c86 Pull complete 13.1s
- f75501f123b7 Pull complete 13.1s
[+] Running 1/1
- Container rtc Started 1.7s
To confirm the RTC container is running, you can execute:
C:>docker inspect -f {{.State.Running}} rtc
which should return true.
You could also use the Docker Desktop Dashboard to check the status:

If the RTC fails to start, then you can check the log folder e.g., c:\docker\rtc353\log for the rtc.log file. If the content of the log file does not help you identify the issue, please speak to you Market Data team or raise a support ticket on My.Refinitiv for the Refinitiv Real-Time Distribution System product.
Using VS Code to interact with Docker
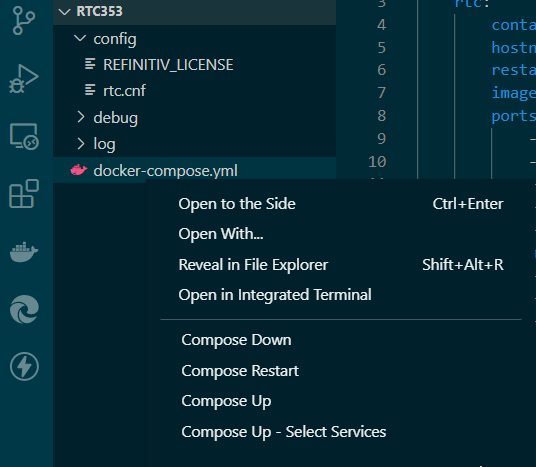
I should mention here that if like me, you are a fan of Visual Studio Code, you can also use that to deploy Docker Containers and interact with them – by installing the various Docker related extensions for VS Code e.g. Docker - Visual Studio Marketplace
For example, if I open the folder containing my docker-compose.yml file inside VS code, I can then right-click the yml file and run Compose Up / Down / Restart etc.
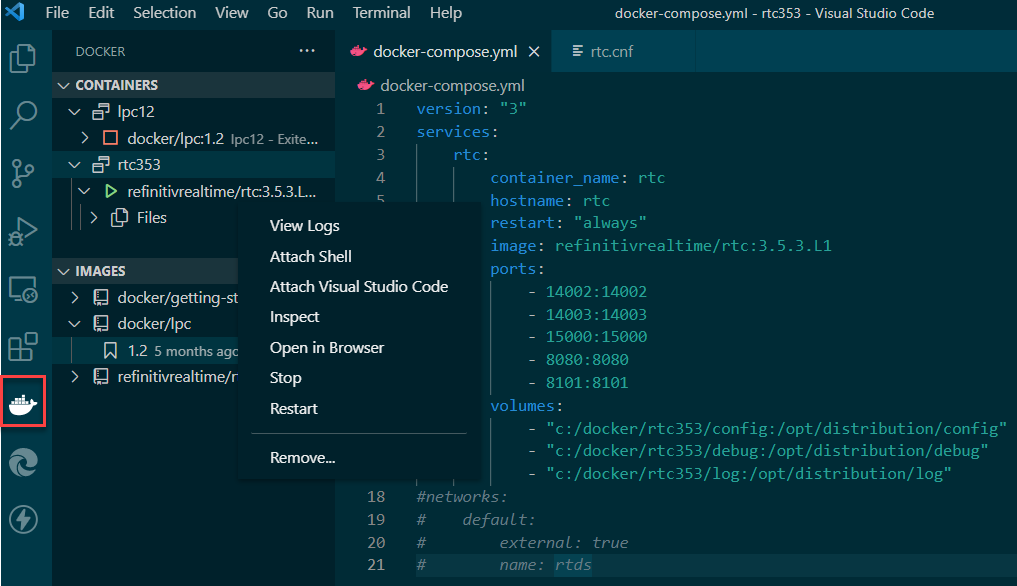
I can also inspect the Docker Containers and Images from within VS Code as well restart/stop a container or delete an Image/Container and so on:
Assuming the RTC container started up and RTC is running, you can then connect a Websocket API or RT-SDK consumer example to consume some data from RTC using localhost:14002 (for RSSL connection) or localhost:15000 (for Websocket connection).
For instance, I can test it with any Consumer example such as 100_MP_Streaming that is supplied with EMA Java or C++.
I just need to ensure I have
· changed the code to consume data from the ELEKTRON_DD service
· and the host is set to localhost:14002
OmmConsumer consumer( OmmConsumerConfig().host( "localhost:14002" ).username( "user" ));
consumer.registerClient( ReqMsg().serviceName( "ELEKTRON_DD" ).name( "IBM.N" ), client );
When I run the Consumer example it will connect to the RTC instance on port 14002 and request some data from the ELKTRON_DD service.
If you are using the Websocket API for your consumer and used to requesting data without specifying a service name e.g.:
{
"ID": 2,
"Key": {
"Name": "TRI.N"
}
}
there is one more change you will need to make to the rtc.cnf file – i.e., specifying a default service for WebSocket requests - see towards the end of part 2 of this article for details.
Configure RTC for Providers and Posting
Once I had the basic Docker install, deployment and RTC configuration out of the way, I moved onto the focus of these articles – i.e., configuring the RTC to allow me to:
· Post data to a cache,
· test both Interactive and Non-Interactive Providers more easily,
· access some functionality normally only available to the MDS admin team
For details on how I achieved the above, please move on to PART 2 of this article
Documentation/Articles referenced:
- PART 2 of this article - configuring RTC for Provider and Posting
- Install Docker Desktop on Windows
- Start containers automatically | Docker Documentation
- Testing EMA Consumer and Provider Applications
- Docker Container Networking
- Configuring 'adspop' docker to connect to Refinitiv Real-Time Optimized
- Docker - Visual Studio Marketplace
- Real-Time Connector System Admin manual
- A vanilla rtc.cnf - for you to modify as you work through the article
- My modified rtc.cnf (in case you don't!) - just fill in your credentials
NOTE: As mentioned before, I am NOT an RTDS/RTC expert by a long shot - the above is based on my experimentation and pulling materials from various Refinitiv sources - feel free to contact me with corrections/improvements.
You can find additional links to related articles and the official Developer Portal pages for the RT-SDK etc in the right-hand panel at the top of this article.