
Authors:


Overview
This article is a part of the project we have introduced in the article Building a proprietary web application with Workspace SDK: Options RIC search use case, and the second in the series. The project is build using Node.js in the backend and React.js in the front end. We are using MongoDB to store reconstructed options RICs and metadata. We also use the our Data Library for Typescript with an enterprise license to retrieve options data in the back-end.
In this article, we will show how to build the back end of our app using Node.js with the Express.js framework, and Mongoose, a library for MongoDB interaction. The article focuses on various aspects of web application development, including setting up the server, defining routes, implementing data validation, handling errors, and performing CRUD (Create, Read, Update, Delete) operations on a MongoDB database.
So let’s start by configuring the web server in app.ts file accessible in the GitHub repo of the project.
Section 1: Configuring the web server
To begin, ensure you have Node.js and MongoDB installed on your system. You can install Node.js from the official website (https://nodejs.org/) and MongoDB from MongoDB's official website (https://www.mongodb.com/try/download/community).
To start building our app.ts file we provide initial imports and setups which are essential for getting our Node.js, Express, and Mongoose web application up and running with the necessary middleware and libraries.
const cors = require('cors')
const mongoose = require('mongoose');
const session = require('express-session');
const bodyParser = require('body-parser');
const ExpressError = require('./utils/ExpressError');
Below we provide the high-level description of the libraries and their main purpose in the web app:
- express: a popular Node.js web application framework used for building web applications, including APIs and web services.
- mongoose: a MongoDB object modeling library for Node.js. It provides a structured way to interact with MongoDB databases, making it easier to work with MongoDB in a Node.js application.
- cors: it enables Cross-Origin Resource Sharing (CORS) in the application. CORS is essential when the web application needs to make requests to different domains or ports.
- session: to set up sessions in our application.
- bodyParser: to handle parsing of incoming request bodies in the application.
After we have the necessary libraries in place, we then establish a connection to our MongoDB database when our Node.js application will start. In it we also handle potential connection errors and print them in the terminal.
mongoose.connect('mongodb://local host/options');
const db = mongoose.connection;
db.on("error", console.error.bind(console, "connection error:"));
db.once("open", () => {
console.log("Database connected");
});
app.use('/findingRICs', findingRICs)
app.get('/', (req: any, res: any) => {
res.render('home')
});
While we define the findingRICs route here, we will be using a separate module for handling the requests for this route which will be introduced in the upcoming section.
In the final part of our app.ts code, we configure our application to listen on port 4000, and log a message to indicate that the server is up and running.
app.listen(4000, () => {
console.log('Serving on port 4000')
})
With our app.ts server configuration file ready we can Initialize the backend. To do that we navigate to root/backend/src folder (assuming you have cloned the project GitHub repo to your local environment) in the command prompt and run npx nodemon app.ts.
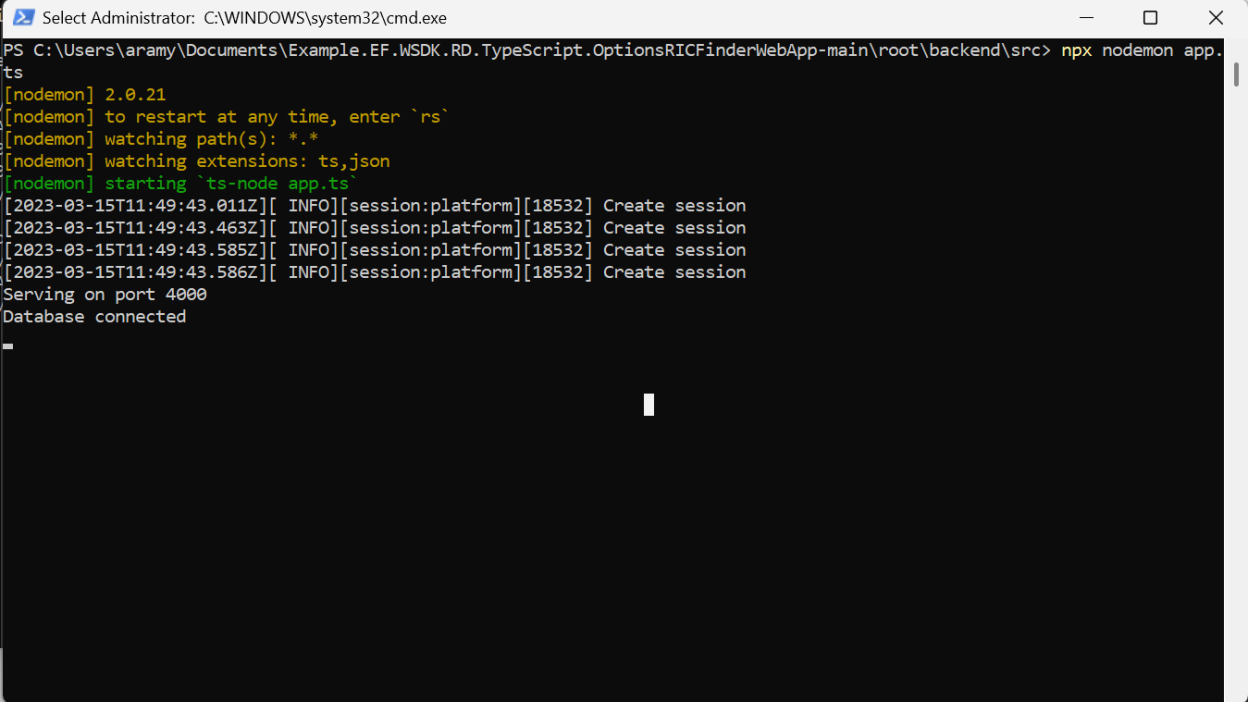
As a result, we start an HTTP server using Express. After we configured our server, we need to further create the routes to handle user requests and render the application pages. It should be noted though, that in the scope of this article, we define only the routes, whereas the actual pages which is going to be rendered will be introduced in our next article of the series dedicated fully in describing the front-end building in React JS.
Section 2: Creating web application routes
In the previous section we defined our home page and the main findingRICs route. Here, let’s define the HTTP endpoints of the rest of the application pages which, in fact, mostly go through the findingRICs route.
We start by defining the GET routes which direct to our web application pages by rendering its content.
Below, we present the route for rendering RIC construction request page, which is going to be a form gathering the parameters of the RIC search.
router.get('/constructRIC', validateRICRequest, async (req: any, res: any) => {
res.render('findingRICs/constructRIC')
});
As we can see from the code above, while handing the GET request to the /constructRIC path, the request first goes through the validateRICRequest middleware for request validation. This is to make sure that the user provides all the required information for RIC search request. Below is the validateRICRequest function which checks if the request body satisfies the predefined RIC schema. If the validation fails the function throws an ExpressError with a 400 error code. In case of success, the function calls next() to pass the control to the next route handler of express application.
const validateRICRequest = (req: any, res: any, next: any) => {
const { error } = findRICSchema.validate(req.body);
if (error) {
const msg = error.details.map((el: { message: any; }) => el.message).join(',')
throw new ExpressError(msg, 400)
} else {
next();
}
}
As it comes to the Schema itself, we use Joi – an object schema validation library, which allows us to define whether the field in our form is required or not and what would be the format type of the form field input. Below we introduce the schema.
const Joi = require('joi');
module.exports.findRICSchema = Joi.object({
asset: Joi.string().required(),
maturity: Joi.string().required(),
strike: Joi.number().required(),
optionType: Joi.string().required()
});
According to the schema above we have asset, maturity and option type as string and the strike as number, all required.
Next, we define the /showRIC route which will handle the incoming requests to that path responsible for rendering user searched RICs with the option details.
router.get('/showRIC', async (req: any, res: any) => {
const allricPrices = await ricPrices.find({}).sort({ createdDate: -1 });
res.setHeader('Content-Type', 'application/json');
res.end(JSON.stringify(allricPrices));
});
This route handler is an asynchronous function which triggers an asynchronous operation to query all items stored in ricPrices MongoDB collection, sorts that in descending order based on the createdDate and sends the stringified JSON response to the client.
The final GET route of our application handles the requests coming from /pricesChart/:id responsible for producing the price chart of the requested option.
router.get('/pricesChart/:id', catchAsync(async (req: any, res: any) => {
const result = await ricPrices.findById(req.params.id)
res.setHeader('Content-Type', 'application/json');
res.end(JSON.stringify(result));
}));
Here again, inside the route we call an asynchronous operation which now finds a specific item from the ricPrices collection. The important part to highlight here is that the specific item is coming from the “:id” part of the path which indicates a route parameter and holds a dynamic value accessible as “req.params.id”. After fetching the specific ric document from the MongoDB collection based on the provided ID, we format it to JSON and send the stringified JSON data as response. The response is then handled from the front-end which we will present in our next article.
Moving to the next type of the request – a POST request – used in our application, below, we define a request which handles requests to the /constructRIC path.
router.post('/constructRIC', catchAsync(async (req: any, res: any) => {
const response = await ricPrices.find({
"asset": req.body.asset.toString(),
"strike": req.body.strike.toString(),
"maturity": { $regex: req.body.maturity.toString().slice(0, 7) },
"optionType": req.body.optionType.toString()
})
if (response.length > 0) {
res.end(JSON.stringify(response));
}
else {
res.end(JSON.stringify(await constructRIC(req)));
}
}))
The handler is responsible for construction of the RICs by calling the constructRIC function introduced in the end of our previous article of the series . However, before calling the RIC constructor function, we first check if a RIC with requested parameters already exists in our database. If it does, we show it to the user, otherwise call the constructRIC function by passing the request parameters.
Finally, we define DELETE route which deletes a specific document from our database.
router.delete('/showRIC/:id', catchAsync(async (req: any, res: any) => {
await ricPrices.findByIdAndDelete(req.params.id);
const allricPrices = await ricPrices.find({}).sort({ createdDate: -1 });
res.setHeader('Content-Type', 'application/json');
res.end(JSON.stringify(allricPrices));
}))
Here again, the “:id” is a dynamic route parameter representing the unique identifier of the ric document which comes from the user request assessable in “req.params.id”. We use that id to call “findByIdAndDelete” method on our collection to delete the document with the requested id. Apart from deleting the document, this handler retrieves and sends the updated ric price documents to be rendered for the user.
Conclusion
The article explored building proprietary web applications using Node.js, Express, and Mongoose. It covered server configuration, route handling, data validation, error management, and MongoDB operations. The process begun with establishing a MongoDB connection and configuring essential middleware. Then, we defined the application routes, which handle various HTTP requests, and data validations to ensure input integrity. We also introduced an error-handling middleware which catches and responds to errors. Additionally, we demonstrated several MongoDB operations, including CRUD actions. The article provides code examples, making it accessible for developers aiming to create web apps using these technologies, offering a comprehensive overview of web development with Node.js, Express, and Mongoose.
References
For further details, please check out the following resources:
- Developer Article: Building a proprietary web application with Workspace SDK: Options RIC search use case
- Developer Article: Streamlining historical options data retrieval and storage with RD libraries and MongoDB
- Refinitiv Data Library for Typescript
- Developer Article: Functions to find Option RICs traded on different exchanges
For any questions related to this article or the used APIs, please use the Developer Community Q&A Forum.
- Register or Log in to applaud this article
- Let the author know how much this article helped you