

Introduction
The Fetch API provides an interface for fetching resources asynchronously across the network using Promise. The Fetch API is wildly used by the frontend web developers for a while, but the Node.js just added this API as an experimental feature with Node version 17.5.0 in February 2022 for the backend developers.
This example project shows how to use the Node.js experimental native Fetch API with the Refinitiv Data Platform (RDP) APIs as the example HTTP REST APIs. The application source codes are implemented in the TypeScript language, and then run the application in a controlled environment such as Docker and devcontainer using the Node Docker Image. This helps to avoid mess-up your local development environment when experimenting with this feature.
Note: Please be informed that this demo project aims for Development and POC purposes only. The native Fetch API is still an experimental feature (As of April 2022) and is not recommended for Production use.
Node native Fetch API Overview
The JavaScript Fetch API is the modern successor of the XMLHttpRequest API for performing asynchronous HTTP requests. The API is supported by most modern web browsers today. It lets developers implement the HTTP request code using JavaScript Promise which is much simpler than the XMLHttpRequest's callback hell. The example codes are as follows:
Fetch API Promise example code:
fetch('http://example.com')
.then(response => response.json())
.then(data => console.log(data));
Fetch API async/await syntax example code:
async function getData() {
const response = await fetch('http://example.com')
const data = await response.json()
console.log(data)
}
While the frontend JavaScript web developers have been using the Fetch API since 2015, the API has not been included in the Node.js runtime environment. The backend JavaScript developers need to use the other libraries such as the deprecated request module, postman-request, Axios, Node Fetch module, etc to make the HTTP request with Promise on the Node server environment.
Introduction in Node version 17.5.0, the native Fetch API is now available as an experimental feature (thanks to Undici). The Node version 18.0.0 also enables this experimental fetch API on the global scope by default. The backend JavaScript developers do not need to install extra fetch-like modules anymore. The frontend developers will be familiar with the server-side HTTP request code in Node.js.
Example code from Node official page:
const res = await fetch('https://nodejs.org/api/documentation.json');
if (res.ok) {
const data = await res.json();
console.log(data);
}
To run this built-in API, you can run the native Fetch code as the following examples:
Node version 18.0.0:
$> node app.js
Node versions 17.5.0 - 17.9.X:
$> node --experimental-fetch app.js
This example project is focusing on Node version 18.0.0.
What are Refinitiv Data Platform (RDP) APIs?
The Refinitiv Data Platform (RDP) APIs provide various Refinitiv data and content for developers via an easy-to-use Web-based API.
RDP APIs give developers seamless and holistic access to all of the Refinitiv content such as Historical Pricing, Environmental Social and Governance (ESG), News, Research, etc, and commingled with their content, enriching, integrating, and distributing the data through a single interface, delivered wherever they need it. The RDP APIs delivery mechanisms are the following:
- Request - Response: RESTful web service (HTTP GET, POST, PUT or DELETE)
- Alert: delivery is a mechanism to receive asynchronous updates (alerts) to a subscription.
- Bulks: deliver substantial payloads, like the end-of-day pricing data for the whole venue.
- Streaming: deliver real-time delivery of messages.
This example project is focusing on the Request-Response: RESTful web service delivery method only.
For more detail regarding the Refinitiv Data Platform, please see the following APIs resources:
- Quick Start page.
- Tutorials page.
- RDP APIs: Introduction to the Request-Response API page.
- RDP APIs: Authorization - All about tokens page.
Prerequisite
This demo project requires the following dependencies software.
- RDP Access credentials.
- Visual Studio Code editor.
- Docker Desktop/Engine application.
- VS Code - Remote Development extension pack
- Internet connection.
Please contact your Refinitiv representative to help you to access the RDP account and services. You can find more detail regarding the RDP access credentials set up from the lease see the Getting Started for User ID section of the Getting Start with Refinitiv Data Platform article.
Example Development Detail
The example application source codes are separated into 2 TypeScript files:
- The main file rdp_nodefetch.ts: The file contains the application main and connection logic.
- The Type Aliases file rdp_types.ts: This file contains all Type Aliases for the RDP Auth, News, and Discovery Symbology services JSON messages.
Example Code Type Aliases
Type Aliases is one of TypeScript Object Types that helps developers type-checking their variables and data in the implementation time to avoid data type errors in a final JavaScript application.
This example project defines all Type Aliases for the RDP API's JSON request messages (for Auth and Symbology Discover services) and objects used by the application in the rdp_types.ts file.
//rdp_types.ts
// Type for RDP Auth Token (v1) request message
export type RDP_AuthToken_Type = {
username: string
password?: string
grant_type: 'password' | 'refresh_token'
takeExclusiveSignOnControl: any
scope?: string
client_id: string
refresh_token?: string
}
// Type for RDP Symbology Lookup request message
export type PDP_Symbology_Req_Type = {
from: RDP_Symbology_From_Type[]
to: RDP_Symbology_To_Type[]
reference: string[]
type: string
}
...
RDP APIs Application Workflow
Refinitiv Data Platform entitlement check is based on OAuth 2.0 specification. The first step of an application workflow is to get a token from RDP Auth Service, which will allow access to the protected resource, i.e. data REST API's.
The API requires the following access credential information:
- Username: The username.
- Password: Password associated with the username.
- Client ID: This is also known as AppKey, and it is generated using an App key Generator. This unique identifier is defined for the user or application and is deemed confidential (not shared between users). The client_id parameter can be passed in the request body or as an “Authorization” request header that is encoded as base64.
Next, after the application received the Access Token (and authorization token) from RDP Auth Service, all subsequent REST API calls will use this token to get the data. Please find more detail regarding RDP APIs workflow in the following resources:
- RDP APIs: Introduction to the Request-Response API page.
- RDP APIs: Authorization - All about tokens page.
RDP APIs Authentication
RDP APIs Authentication Type Aliases
Firstly, we import and crate all necessary types, objects, and variables for the API endpoints and credentials in the main application rdp_nodefetch.ts file.
//rdp_nodefetch.ts
// Importing Types
import { RDP_AuthToken_Type} from './rdp_types'
// RDP APIs endpoints
const rdpServer: string = process.env.RDP_BASE_URL || ''
const rdpAuthURL: string = process.env.RDP_AUTH_URL || ''
// RDP Credentials
const username: string = process.env.RDP_USERNAME || ''
const password: string = process.env.RDP_PASSWORD || ''
const client_id: string = process.env.RDP_APP_KEY || ''
const scope: string = 'trapi'
const takeExclusiveSignOnControl: boolean = true
// Access Token Information
let access_token: string = ''
let refresh_token: string = ''
let expires_in: string = ''
// ---------------- Main Function ---------------------------------------- //
const main = async () => {
}
// Running the application
main()
Please note that the API endpoints and credentials will be assigned to the application at run time with the environment variable.
Sending Authentication Request with the Fetch API
Then we create a function named authenRDP to send a login request message to the RDP Auth Token service. The function creates the JSON request message from the RDP_AuthToken_Type Type and then sends it to the RDP via Node native Fetch API as an HTTP POST message.
//rdp_nodefetch.ts
// Send HTTP Post request to get Access Token (Password Grant and Refresh Grant) from RDP Auth Service
const authenRDP = async (_username: string, _password: string, _clientid: string, _refresh_token: string) => {
const authenURL: string = `${rdpServer}${rdpAuthURL}`
//Init Authentication Request Message and First Login scenario
let authReq: RDP_AuthToken_Type = {
'username': _username,
'client_id': _clientid,
'password': _password,
'scope': scope,
'grant_type': 'password',
takeExclusiveSignOnControl
}
// Send HTTP Request
const response: Response = await fetch(authenURL, {
method: 'POST',
headers: {
'Content-Type': 'application/x-www-form-urlencoded'
},
body: new URLSearchParams(authReq)
})
if (!response.ok) {
console.log('Authentication Failed')
const statusText: string = await response.text()
throw new Error(`HTTP error!: ${response.status} ${statusText}`);
}
console.log('Authentication Granted')
//Parse response to JSON
const authResponse = await response.json()
//Set Token Information
access_token = authResponse.access_token
refresh_token = authResponse.refresh_token
expires_in = authResponse.expires_in
}
const main = async () => {
console.log(`Running RDP Node.js example application`)
try {
//Send authentication request
await authenRDP(username, password, client_id, refresh_token)
if(access_token.length === 0 && refresh_token.length === 0 ){
console.log('Error, exit the application')
process.exit();
}
} catch (error) {
console.log(error)
process.exit();
}
}
// Running the application
main()
Once the authentication success, the function gets the RDP Auth service response message and keeps the following RDP token information in the variables.
- access_token: The token used to invoke REST data API calls as described above. The application must keep this credential for further RDP APIs requests.
- refresh_token: Refresh token to be used for obtaining an updated access token before expiration. The application must keep this credential for access token renewal.
- expires_in: Access token validity time in seconds.
Please note that Node.js may show the ExperimentalWarning: The Fetch API is an experimental feature. This feature could change at any time warning message because the application is currently using the experimental feature.

RDP tokens renewal
Before the session expires, the application needs to send a Refresh Grant request message to get a new access token. Let' us modify the authenRDP() function to support the Refresh Grant request too.
//rdp_nodefetch.ts
// Send HTTP Post request to get Access Token (Password Grant and Refresh Grant) from RDP Auth Service
const authenRDP = async (_username: string, _password: string, _clientid: string, _refresh_token: string) => {
const authenURL: string = `${rdpServer}${rdpAuthURL}`
//Init Authentication Request Message and First Login scenario
let authReq: RDP_AuthToken_Type = {
...
}
//For the Refresh_Token scenario
if (_refresh_token.length !== 0) {
authReq['refresh_token'] = _refresh_token,
authReq['grant_type'] = 'refresh_token'
delete authReq['scope']
delete authReq['password']
}
// Send HTTP Request
...
// Define the timer to refresh our token
setRefreshTimer()
}
//Send a Refresh Grant message before Access Token's expires (expires_in time)
const setRefreshTime = () => {
const millis: number = (parseInt(expires_in) * 0.90) * 1000
setInterval(async () => {
try {
await authenRDP(username, password, client_id, refresh_token)
} catch (error) {
console.log(error)
}
}, millis)
}
Now the example application supports both the Password Grant and Refresh Grant scenarios for the RDP APIs with a single authenRDP() function. You can find more detail about the Password and Refresh grants limitation in the following article.
That covers the authentication part.
Requesting RDP APIs Data
That brings us to requesting the RDP APIs data. All subsequent REST API calls use the Access Token via the Authorization HTTP request message header as shown below to get the data.
- Header:
- Authorization = Bearer <RDP Access Token>
Please notice the space between the Bearer and RDP Access Token values.
The application then creates a request message in a JSON message format or URL query parameter based on the interested service and sends it as an HTTP request message to the Service Endpoint. Developers can get RDP APIs the Service Endpoint, HTTP operations, and parameters from Refinitiv Data Platform's API Playground page - which is an interactive documentation site developers can access once they have a valid Refinitiv Data Platform account.
This project covers the following the RDP APIs Services:
- Discovery Symbology Service /lookup endpoint that navigates between identifiers.
- News Service /headlines operation.
RDP APIs Symbology Discovery Service
Sending Symbology Request with the Fetch API
This example converts a symbol from the RIC Code identifier to ISIN, LEI, and ExchangeTicker identifiers using the RDP the Discovery Symbology Service. I will begin by importing the PDP_Symbology_Req_Type Type Aliases for the Symbology JSON request message, and creating a function named requestSymbol() in the main rdp_nodefetch.ts file. This function creates the JSON request message, sends it to RDP via Node native Fetch API, and then returns a response data in JSON message format.
//rdp_nodefetch.ts
// Importing Types
import { PDP_Symbology_Req_Type} from './rdp_types'
// RDP APIs endpoints
const rdpSymbologyURL: string = process.env.RDP_SYMBOLOGY_URL || ''
// Request Symbology Lookup Data from RDP Symbology Lookup Service
const requestSymbol = async (symbol: string, access_token: string) => {
const symbologyURL: string = `${rdpServer}${rdpSymbologyURL}`
console.log(`Requesting Symbology data from ${symbologyURL}`)
// Create POST request message
const reqSymbolObj: PDP_Symbology_Req_Type = {
'from': [{
'identifierTypes': ['RIC'],
'values': [symbol]
}],
'to': [{
'identifierTypes': ['ISIN', 'LEI', 'ExchangeTicker']
}],
'reference': ['name', 'status', 'classification'],
'type': 'auto'
}
// Send HTTP Request
const response: Response = await fetch(symbologyURL, {
method: 'POST',
headers: {
'Content-Type': 'application/json',
'Authorization': `Bearer ${access_token}`
},
body: JSON.stringify(reqSymbolObj)
})
if (!response.ok) {
const statusText: string = await response.text()
throw new Error(`Get Symbology HTTP error!: ${response.status} ${statusText}`);
}
console.log('Get Symbology data success.')
//Parse response to JSON
return await response.json()
}
const main = async () => {
// Authentication
...
const symbologyData = await requestSymbol(symbol, access_token)
//console.log(JSON.stringify(symbologyData))
}
// Running the application
main()
Displaying Symbology Data
The next step is displaying incoming Symbology data in a readable format. The application uses the console.table() function to print data to a console in a tabular format.
Let's start by creating the new Type Aliases for the Symbology table object named symbologyTable. This object keeps the necessary output data which are identifierType, value, name, and status fields from the response JSON message.
//rdp_types.ts
// Type for RDP Symbology Table data
export type RDP_Symbology_Table_Type = {
data: RDP_Symbology_Data_Type[]
}
// sub-Type for RDP Symbology Table data
export type RDP_Symbology_Data_Type = {
identifierType: string
value: string
name: string
status: string
}
Finally, we create a displaySymbology() function to construct the symbologyTable object and then passes it to the console.table() function.
//rdp_nodefetch.ts
// Importing Types
import { RDP_Symbology_Table_Type } from './rdp_types'
...
// Convert Symbology JSON data to be a table
const displaySymbology = (symbologyJSON:any) => {
const symbologyData: any = symbologyJSON['data']
const symbologyOutput: any = symbologyData[0]['output']
const symbologyTable: RDP_Symbology_Table_Type = { data: [] }
symbologyOutput.forEach(({identifierType,value, name, status }:any)=>{
symbologyTable['data'].push({
identifierType,
value,
name,
status
})
})
...
console.table(symbologyTable['data'])
}
// Request Symbology Lookup Data from RDP Symbology Lookup Service
const requestSymbol = async (symbol: string, access_token: string) => {
// Getting Symbology Data
...
}
const main = async () => {
// Authentication
...
const symbologyData = await requestSymbol(symbol, access_token)
//console.log(JSON.stringify(symbologyData))
displaySymbology(symbologyData)
}
// Running the application
main()
The console.table() result with the symbologyTable object is as follows:
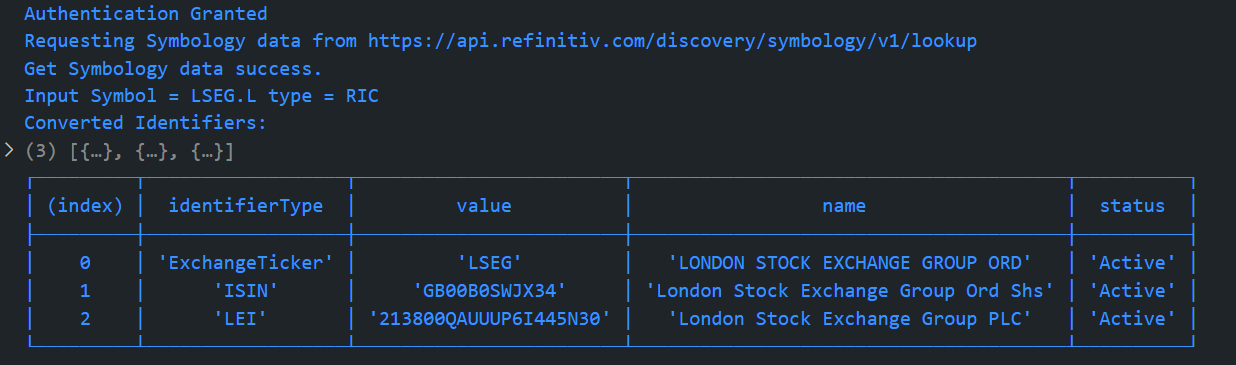
That covers the Symbology data conversion part.
RDP APIs News Service
Sending News Request with the Fetch API
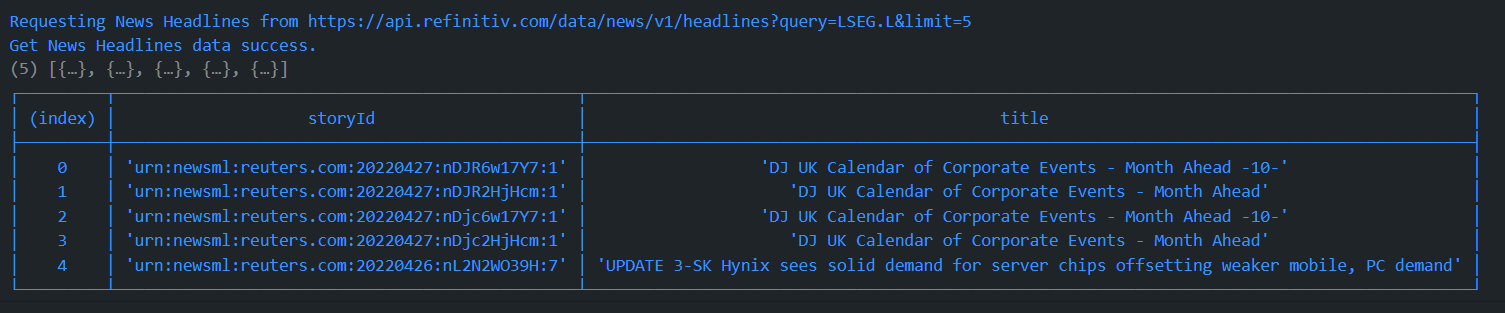
Now we come to the RDP News Service code. Let me start by creating a function named getNewsHeadlines to send the HTTP GET request message to RDP News Service with the native Fetch API. Once the function received response data from RDP, it returns that data in JSON message format.
//rdp_nodefetch.ts
// Request News Headlines Data from RDP News Service
const getNewsHeadlines = async (symbol: string, access_token: string, limit: number = 10) =>{
const newsURL: string = `${rdpServer}${rdpNewsURL}?query=${symbol}&limit=${limit}`
console.log(`Requesting News Headlines from ${newsURL}`)
// Send HTTP Request
const response: Response = await fetch(newsURL, {
method: 'GET',
headers: {
'Content-Type': 'application/json',
'Authorization': `Bearer ${access_token}`
}
})
if (!response.ok) {
const statusText: string = await response.text()
throw new Error(`Get News Headlines HTTP error!: ${response.status} ${statusText}`);
}
console.log('Get News Headlines data success.')
//Parse response to JSON
return await response.json()
}
const main = async () => {
// Authentication
...
const newsHeadlineData = await getNewsHeadlines(symbol, access_token, newsLimit)
console.log(JSON.stringify(newsHeadlineData))
}
// Running the application
main()
Displaying News Headline Data
Turning to display incoming news headline data in a readable-tabular format. I will begin by creating the new Type Aliases for the news headline table object named newsHeadlinesTable. This object keeps the necessary output data which are storyId, and title (headline text) fields from the response JSON message.
//rdp_types.ts
// Type for RDP News Headline Table data
export type RDP_NewsHeadlines_Table_Type = {
data: RDP_NewsHeadlines_Data_Type[]
}
// sub-Type for RDP News Headline Table data
export type RDP_NewsHeadlines_Data_Type = {
storyId: string
title: string
}
Finally, we create a displayNewsHeadlines() function to construct the newsHeadlinesTable object and then passes it to the console.table() function.
//rdp_nodefetch.ts
// Importing Types
import { RDP_NewsHeadlines_Table_Type } from './rdp_types'
...
// Convert News Headline JSON data to be a table
const displayNewsHeadlines = (newsJSON:any) => {
const newsData: any = newsJSON['data']
let newsItem:any = undefined
...
const newsHeadlinesTable: RDP_NewsHeadlines_Table_Type = { data: [] }
newsData.forEach((headline:any) => {
newsItem = headline['newsItem']
newsHeadlinesTable['data'].push({
'storyId': headline['storyId'],
'title': newsItem['itemMeta']['title'][0]['$']
})
})
console.table(newsHeadlinesTable['data'])
}
// Request News Headlines Data from RDP News Service
const getNewsHeadlines = async (symbol: string, access_token: string, limit: number = 10) =>{
// Getting News Headline Data
...
}
const main = async () => {
// Authentication
...
const newsHeadlineData = await getNewsHeadlines(symbol, access_token, newsLimit)
//console.log(JSON.stringify(newsHeadlineData))
displayNewsHeadlines(newsHeadlineData)
}
// Running the application
main()
The console.table() result with the newsHeadlineData object is as follows:
That covers all the Node native Fetch API with RDP HTTP REST APIs application development using TypeScript.
How to run the Examples
The first step is to unzip or download the example project folder from the GitHub repository into a directory of your choice, then follow the steps below.
Running as VS Code DevContainer
Firstly, go to the project's .devcontainer folder and create a file name .env.devcontainer with the following content.
RDP_BASE_URL=https://api.refinitiv.com
RDP_AUTH_URL=/auth/oauth2/v1/token
RDP_AUTH_REVOKE_URL=/auth/oauth2/v1/revoke
RDP_SYMBOLOGY_URL=/discovery/symbology/v1/lookup
RDP_USERNAME=<RDP UserName>
RDP_PASSWORD=<RDP Password>
RDP_APP_KEY=<RDP Client_ID>
Next, Start a Docker desktop or Docker engine on your machine.
Moving on to the next step, install the VS Code - Remote Development extension pack.
Then open the project folder with VS Code, and press the F1 key to select the Remote-Containers: Reopen in Container command.
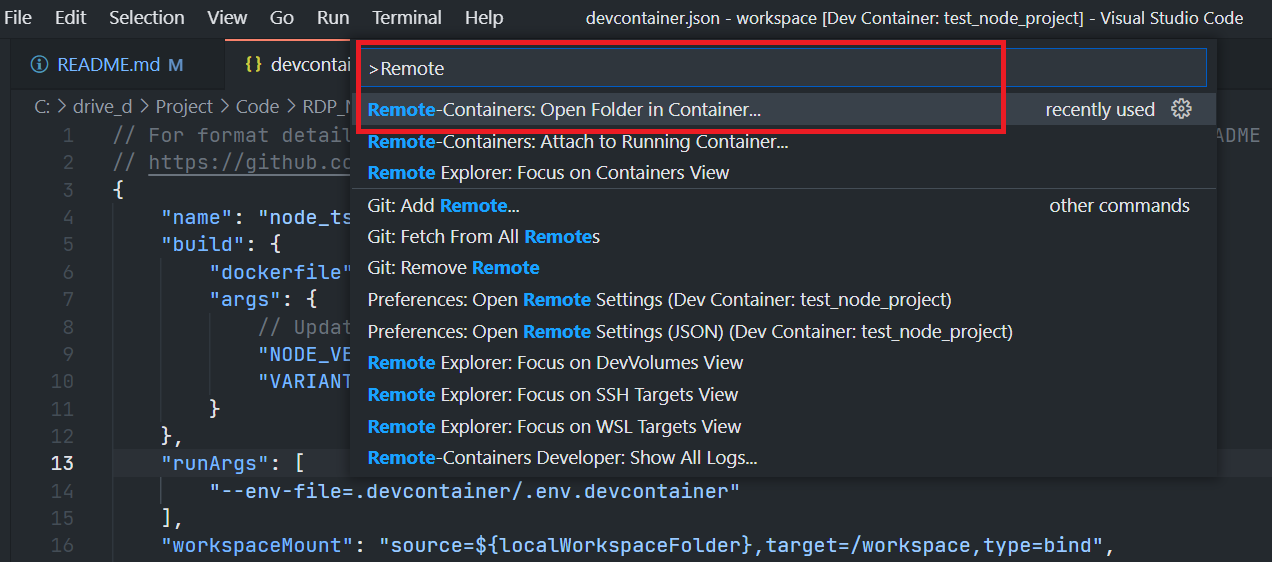
Once this build completes, VS Code automatically connects to the container, and automatics initializes the project for developers.
Now VS Code is ready for the RDP-TypeScript native Fetch API example inside this devcontainer. Developers can build and run the example by pressing the F5 button or selecting the Run then Start Debugging option from VS Code menu.
If you want to run the example with a Docker container manually, please follow the steps on the GitHub repository.
Summary
The coming of the native Fetch API on Node.js is good news for all developers. This built-in API improves cross-platform familiarity for JavaScript/TypeScript developers, they do need to use a different approach for the frontend (web browsers) and backend (Node.js) HTTP request code anymore. This helps simplify the project and reduce the complexity of managing the 3rd party HTTP Request/Fetch modules.
At the same time, the Refinitiv Data Platform (RDP) APIs provide various Refinitiv data and content for developers via an easy-to-use Web-based API. The APIs are easy to integrate into any application and platform that supports the HTTP protocol and JSON message format.
Let me remind you again, this demo projects aim for Development and POC purposes only. The native Fetch API is still an experimental feature (As of April 2022) and is not recommended for Production use.
References
For further details, please check out the following resources:
- Refinitiv Data Platform APIs page on the Refinitiv Developer Community website.
- Refinitiv Data Platform APIs Playground page.
- Refinitiv Data Platform APIs: Introduction to the Request-Response API.
- Refinitiv Data Platform APIs: Authorization - All about tokens.
- Limitations and Guidelines for the RDP Authentication Service article.
- Getting Started with Refinitiv Data Platform article.
- Node version 18.0.0 page.
- Typescript TSC page.
- TypeScript Handbook page.
- The Fetch API is finally coming to Node.js blog post.
- Node.js 18 available with Fetch API enabled by default news.
- VS Code: Developing inside a Container page.
- VS Code: Remote development in Containers tutorial page.
For any questions related to Refinitiv Data Platform APIs, please use the RDP APIs Forum on the Developers Community Q&A page.