

Overview
Last Update February 2022
The Refinitiv Data Platform (RDP) APIs provide various Refinitiv data and content for developers via easy-to-use Web-based API. The developers which are data scientists, financial coders, or traders can use any programming languages that support HTTP request-response and JSON messages to retrieve content from the RDP in a straightforward way on any platform.
However, if you are a web developer, your JavaScript application cannot connect to the RDP directly because of the Same-origin policy. All web browsers enforce this policy to prevent browsers access different domain/server resources. And of cause, your web server/web application domain is always different from the RDP because they are hosted on different sites.
This example project shows how to use a reverse proxy to make the JavaScript on a web browser can connect and consume data from the RDP endpoints. It utilizes
the http-proxy module and Express.js web framework for the webserver and reverse proxy functionalities.
Note: Please be informed that this article and example projects aim for Development and POC purposes only. This kind of reverse proxy implementation is not recommended for Production use. You may use a de-facto server like Nginx for the reverse proxy in your environment. Alternatively, you may use the RDP Implicit Grant.
Why do we need a Reverse Proxy?
Let's get back to the first question, why the web browsers cannot connect to the RDP APIs directly? Typically, the web browsers do not allow your JavaScript code to calls a 3rd party Web API that locates on a different server (cross-domain request). Browsers allow only the HTTP response has a Control-Allow-Origin (Cross-Origin Resource Sharing - CORS) header with a * value or your client's domain. Please see the following scenario as an example.
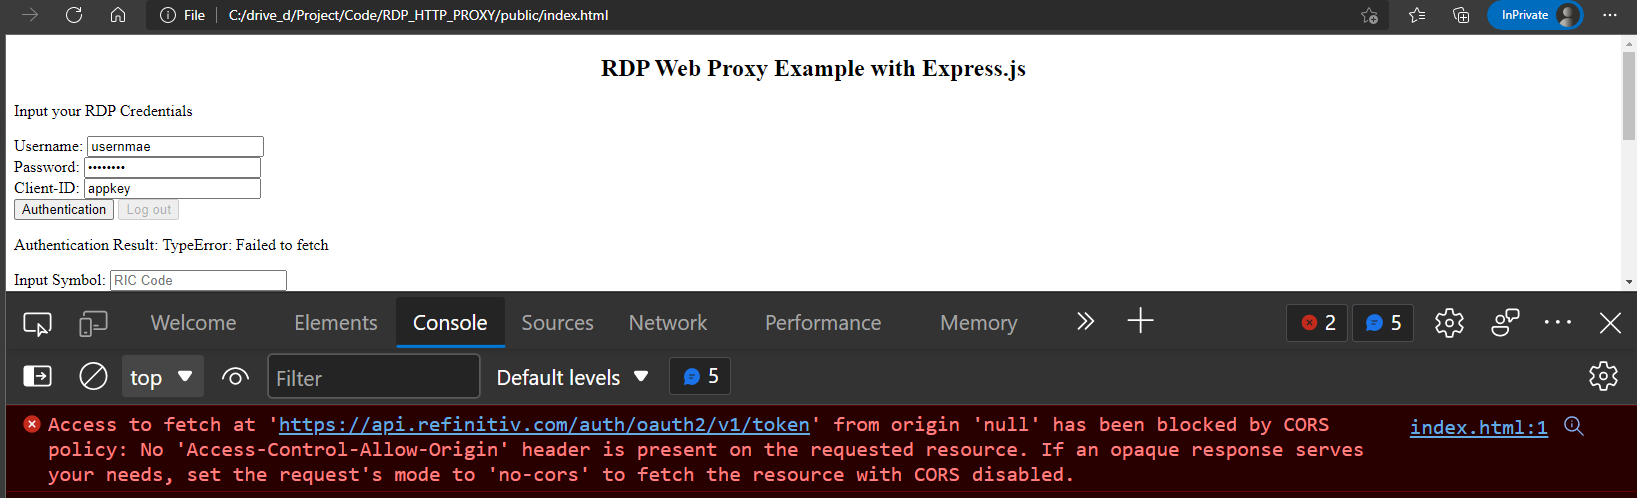
The above scenario is the browser opens the file from a local file file:///C:/drive_d/Project/Code/RDP_HTTP_PROXY/public/index.html location.
- It means the domain of this web is on a local machine (file:///C).
- JavaScript application sends the authentication request message to the RDP Authentication service at https://api.refinitiv.com URL which is on a different domain.
- The browser blocks the request and throws an error message about CORS (Cross-Origin Resource Sharing).
- JavaScript gets an error message, not the RDP Tokens, so it cannot continue requesting data with other RDP endpoints.
This browser's behavior can be illustrated with the following diagram.
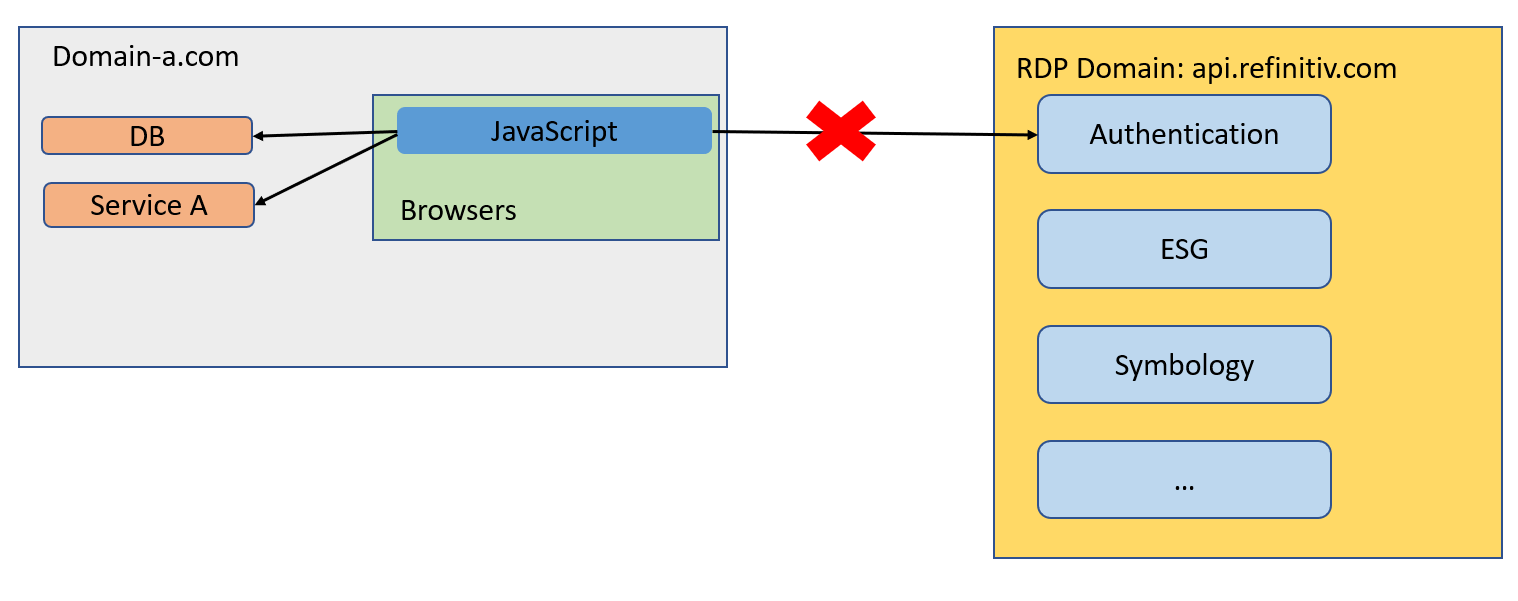
The 3rd Party Web APIs do not need to be the RDP specifically, it can be your microservice that is hosted on a different domain too. So, how can we handle this? You can build the API Gateway as a reverse proxy to redirect traffic to the different services according to the URL of the request.
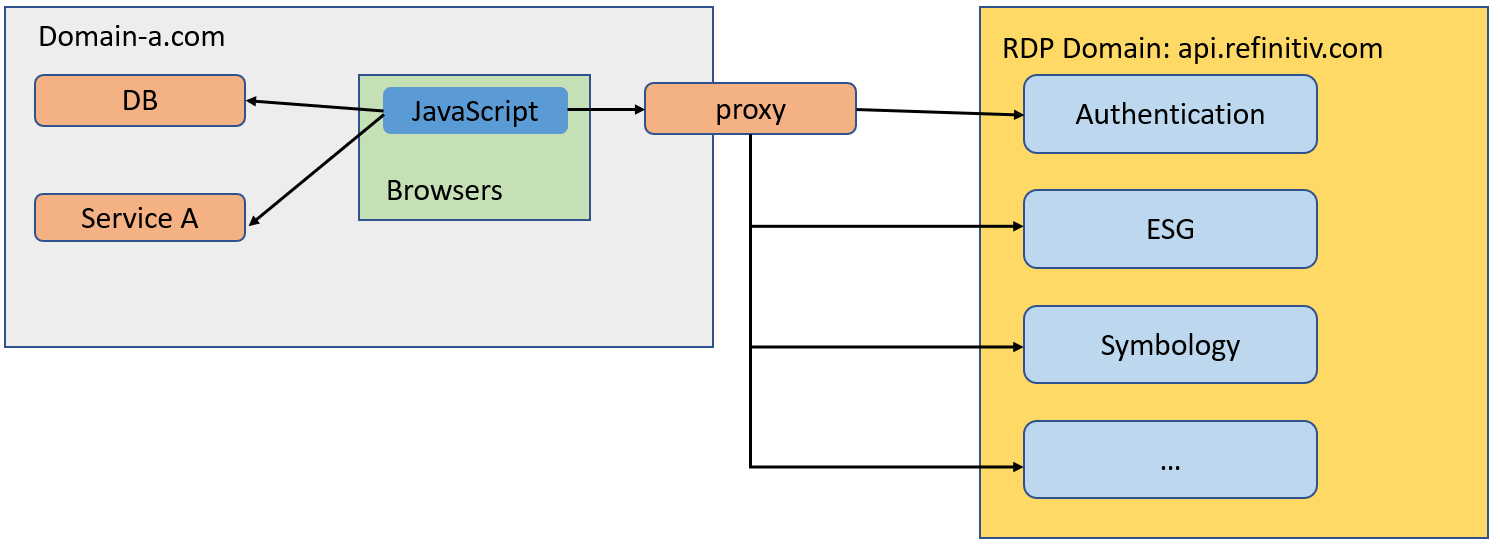
As of February 2022: Some RDP services like the Environmental - Social - and Governance (ESG), News, Symbology, etc support the cross-domain Control-Allow-Origin. You can call them directly from the web browsers (if you already have the access token). However, I am going to apply those calls with the proxy for easy management and prevent any future changes.
You can use other libraries/tools to do proxy work for you like this Refinitiv-API-Samples/Example.RDPAPI.TypeScript.AngularESGWebapp project that uses Angular platform as a proxy on the client-side.
Note: Let me remind you again, this proxy implementation aims for Development and POC purposes only. It is not recommended for Production use. You may use a de-facto server like Nginx for the reverse proxy in your environment. Alternatively, you may use the RDP Implicit Grant.
Express.js with HTTP-Proxy
Let’s start with the server-side application. This example uses the Node.js with Express.js frameworks.
Set Up Express.js web-server
Firstly, create a web-server with Express.js to serve the static contents (available in the folder named public). The server file named is server.js.
//server.js
const path = require('path')
const express = require('express')
const app = express()
const port = process.env.PORT || 8080 //Support both local environment and deployed location
const publicDirectoryPath = path.join(__dirname, './public')
app.set('x-powered-by' , 'Express.js')
// Setup static directory to serve
app.use(express.static(publicDirectoryPath))
//Start the server
app.listen(port, () => {
console.log(`Server is up on port ${port}.`)
})
Set Up HTTP-Proxy for the RDP Authentication reverse proxy
Next, create a proxy object as the apiProxy object with the http-proxy module in the server.js file.
//server.js
const httpProxy = require('http-proxy'); //Import the HTTP-Proxy module
//Use this options for creating a reverse proxy to other domains.
const options = {
changeOrigin: true,
target: {
https: true
}
}
//Create a reverse proxy server
const apiProxy = httpProxy.createProxyServer(options);
Then, apply the RDP API URL https://api.refinitiv.com to the apiProxy and Express.js /auth/oauth2/<version>/* route.
//server.js
const rdpServer = process.env.RDP_BASE_URL || 'https://api.refinitiv.com'
const rdpAuthVersion = process.env.RDP_AUTH_VERSION || 'v1'
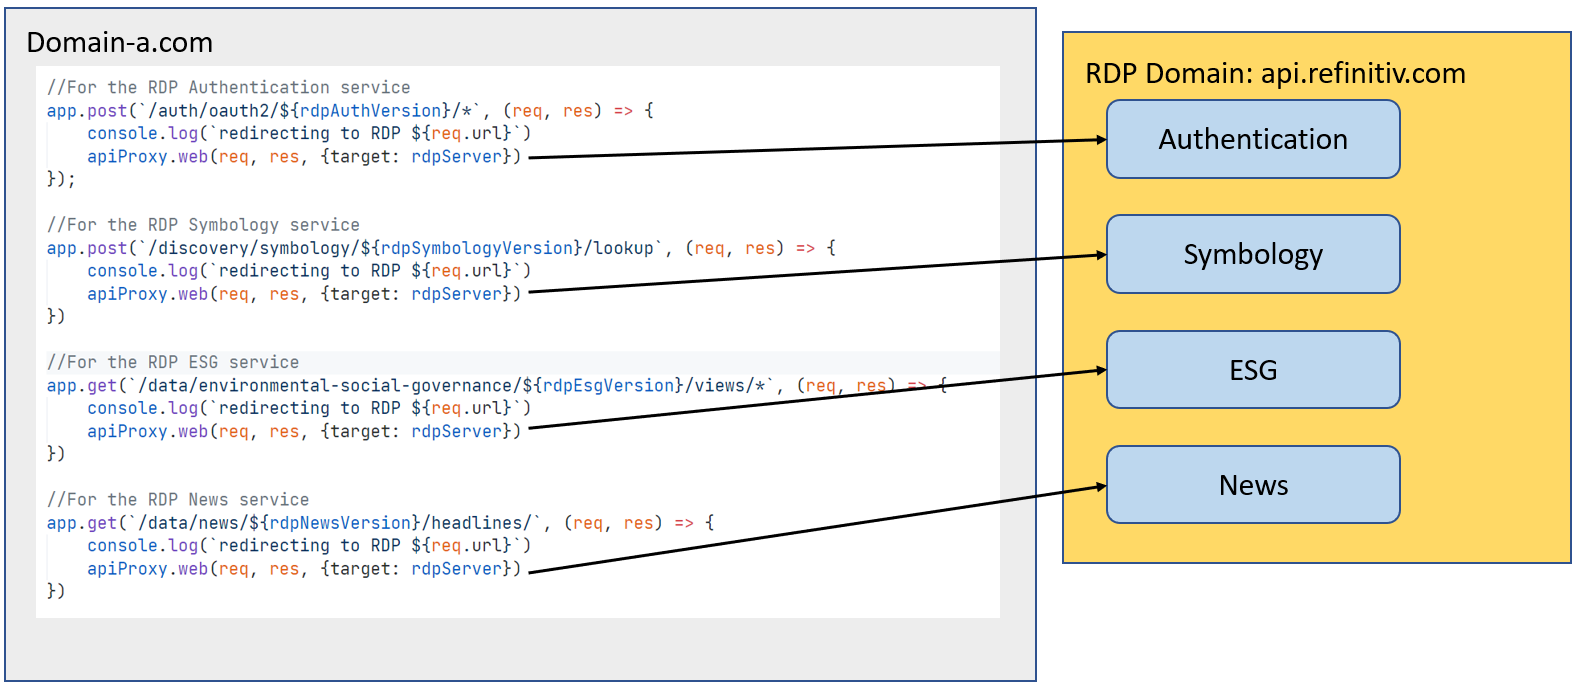
//For the RDP Authentication service
app.post(`/auth/oauth2/${rdpAuthVersion}/*`, (req, res) => {
console.log(`redirecting to RDP ${req.url}`)
apiProxy.web(req, res, {target: rdpServer})
})
The code above handles HTTP Post for the /auth/oauth2/<version>/* operation route, then uses the http-proxy web() function to redirect incoming HTTP request message (request body, request headers, request auth, etc) to the target RDP API server as follows:
- Redirect incoming HTTP Post request message for /auth/oauth2/v1/ to the RDP https://api.refinitiv.com/auth/oauth2/v1/token endpoint.
- Redirect incoming HTTP Post request message for /auth/oauth2/v1/revoke to the RDP https://api.refinitiv.com/auth/oauth2/v1/revoke endpoint.
Please noticed that I store all RDP endpoint versions in the Environment variable, so if there is any version update, I do not need to change the source code.
Example of Environment variables (or .env file):
RDP_BASE_URL=https://api.refinitiv.com
RDP_AUTH_VERSION=v1
RDP_ESG_VERSION=v2
RDP_SYMBOLOGY_VERSION=v1
RDP_NEWS_VERSION=v1
Set Up Reverse Proxy for other endpoints
Next, add more HTTP route handlers for the ESG, News, and Symbology services.
//server.js
const rdpEsgVersion = process.env.RDP_ESG_VERSION || 'v2'
const rdpNewsVersion = process.env.RDP_NEWS_VERSION || 'v1'
const rdpSymbologyVersion = process.env.RDP_SYMBOLOGY_VERSION || 'v1'
//For the RDP Symbology service
app.post(`/discovery/symbology/${rdpSymbologyVersion}/lookup`, (req, res) => {
console.log(`redirecting to RDP ${req.url}`)
apiProxy.web(req, res, {target: rdpServer})
})
//For the RDP ESG service
app.get(`/data/environmental-social-governance/${rdpEsgVersion}/views/*`, (req, res) => {
console.log(`redirecting to RDP ${req.url}`)
apiProxy.web(req, res, {target: rdpServer})
})
//For the RDP News service
app.get(`/data/news/${rdpNewsVersion}/headlines/`, (req, res) => {
console.log(`redirecting to RDP ${req.url}`)
apiProxy.web(req, res, {target: rdpServer})
})
//Start the server
app.listen(port, () => {
console.log(`Server is up on port ${port}.`)
})
The code above handles HTTP operations for the RDP request messages, then redirect incoming HTTP request message (request body, request headers, request auth, etc) to the target RDP API server with http-proxy web() function as follows:
- Redirect incoming HTTP Post request message for /discovery/symbology/v1/lookup to the RDP https://api.refinitiv.com/discovery/symbology/v1/lookup endpoint.
- Redirect incoming HTTP Get request message for /data/environmental-social-governance/v2/views/* to the RDP https://api.refinitiv.com/data/environmental-social-governance/v2/views/* endpoint.
- Redirect incoming HTTP Get request message for /data/news/v1/headlines/ to the RDP https://api.refinitiv.com/data/news/v1/headlines/ endpoint.
Now the server.js web-server application is ready to serve static contents and does a reverse-proxy of the RDP operations.
Client-Side JavaScript
Moving on to the client-side JavaScript on the web browsers. This example uses Vanilla JavaScript (aka pure JavaScript), so the same concept can be applied to any JavaScript framework too. The client-side JavaScript application file named is app.js.
Authorization for the RDP tokens
RDP APIs entitlement check is based on OAuth 2.0 specification. The first step of an application workflow is to get a token, which will allow access to the protected resource, i.e. data REST APIs. The API requires the following access credential information:
- Username: The username.
- Password: Password associated with the username.
- Client ID: This is also known as AppKey, and it is generated using an Appkey Generator. This unique identifier is defined for the user or application and is deemed confidential (not shared between users). The client_id parameter can be passed in the request body or as an “Authorization” request header that is encoded as base64.
The application needs to send an HTTP Post message with the access credentials to the RDP Auth Service endpoint. However, the RDP Auth Service does not support CORS, so the client-side application sends the authentication request message to a proxy server (server.js) /auth/oauth2/v1/token endpoint instead. The server.js just redirects our HTTP Post message to the RDP server, and redirects RDP's response message back to the app.js.
//app.js
const authenRDP = async (opt) => {
const authenURL = `/auth/oauth2/${rdpAuthVersion}/token`
let authReq = {
'username': opt['username'],
'client_id': opt['client_id'],
takeExclusiveSignOnControl
}
//First Login
if (opt['refresh_token'].length === 0) {
authReq['password'] = opt['password']
authReq['grant_type'] = 'password'
authReq['scope'] = scope
}
// Send HTTP Request
const response = await fetch(authenURL, {
method: 'POST',
headers: {
'Content-Type': 'application/x-www-form-urlencoded'
},
body: new URLSearchParams(authReq)
})
if (!response.ok) {
const statusText = await response.text()
throw new Error(`HTTP error!: ${response.status} ${statusText}`);
}
//Parse response to JSON
authResponse = await response.json()
//Set Token information to variables
access_token = authResponse.access_token
refresh_token = authResponse.refresh_token
expires_in = authResponse.expires_in
console.log('Authentication Granted')
}
The authenRDP() function uses the Fetch API to send HTTP request messages for both first login (authReq['grant_type'] = 'password') and refresh token (authReq['grant_type'] = 'refresh_token') scenarios to the RDP Auth service (via server.js).
Once the authentication success, the function gets the RDP Auth service response message (via server.js), and keeps the following RDP token information in the client-side variables.
- access_token: The token used to invoke REST data API calls as described above. The application must keep this credential for further RDP/Refinitiv Real-Time - Optimized requests.
- refresh_token: Refresh token to be used for obtaining an updated access token before expiration. The application must keep this credential for access token renewal.
- expires_in: Access token validity time in seconds.
For the full detail and explanation of the RDP Authentication process application workflow, please refer to the following RDP APIS tutorials:
- Introduction to the Request-Response API.
- Authorization - All about tokens.
- Authorization in Python.
RDP tokens renewal
Before the session expires, the application needs to send a Refresh Grant request message to get a new access token. Let' us modify the authenRDP() function to support the Refresh Grant request too.
//app.js
const authenRDP = async (opt) => {
const authenURL = `/auth/oauth2/${rdpAuthVersion}/token`
let authReq = {
'username': opt['username'],
'client_id': opt['client_id'],
takeExclusiveSignOnControl
}
//First Login
if (opt['refresh_token'].length === 0) {
authReq['password'] = opt['password']
authReq['grant_type'] = 'password'
authReq['scope'] = scope
} else { //Refresh Token
authReq['refresh_token'] = opt['refresh_token']
authReq['grant_type'] = 'refresh_token'
}
// Send HTTP Request
...
// Define the timer to refresh our token
setRefreshTimer()
}
//Send a Refresh Grant message before Access Token's expires (expires_in time)
const setRefreshTimer = () => {
let millis = (parseInt(expires_in) * 0.90) * 1000; //
let intervalID = window.setInterval(async () => {
try {
await authenRDP({
username,
client_id,
refresh_token
})
} catch (error) {
console.log(error)
authenResult.textContent = error
}
}, millis);
}
Now the app.js supports both the Password Grant and Refresh Grant scenarios for the RDP APIs with a single authenRDP() function. That covers the authentication part of the app.js client-side application.
Requesting RDP APIs Data
That brings us to requesting the RDP APIs data. All subsequent REST API calls use the Access Token via Authorization HTTP request message header as shown below to get the data.
- Header:
- Authorization = Bearer <RDP Access Token>
Please notice the space between the Bearer and RDP Access Token values.
The application then creates a request message in a JSON message format or URL query parameter based on the interested service and sends it as an HTTP request message to the Service Endpoint. Developers can get RDP APIs the Service Endpoint, HTTP operations, and parameters from Refinitiv Data Platform's API Playground page - which an interactive documentation site developers can access once they have a valid Refinitiv Data Platform account.
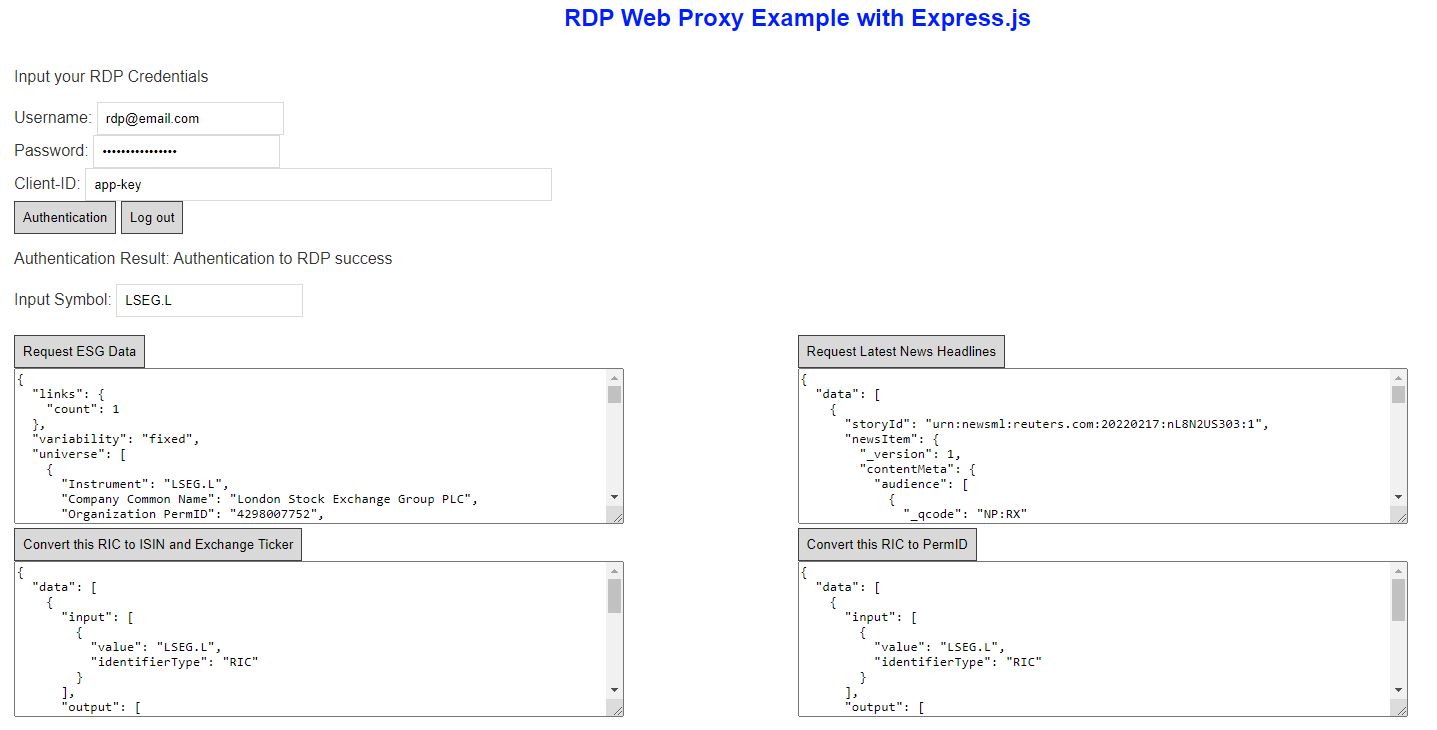
This project demonstrates with the following the RDP Services:
- ESG Service /views/basic operation that provides a basic overview of 6 common ESG Data for consumers.
- News Service /headlines operation.
- Discovery Service /lookup endpoint that navigates between identifiers or map identifiers to PermIDs.
All HTTP request messages from the client-side app.js are sent to the server.js. The http-proxy module redirects the request message to the RDP Service and forwards the response message from the RDP to the client-side.
Note: as of February 2022, the current version of the RDP ESG Service is v2.
//app.js
// Request Environment, Social, and Governance (ESG) Data
const requestESG = async (symbol, accessToken) => {
const esgURL = `/data/environmental-social-governance/${rdpEsgVersion}/views/basic?universe=${symbol}`
// Send HTTP Request
const response = await fetch(esgURL, {
method: 'GET',
headers: {
'Content-Type': 'application/json',
'Authorization': `Bearer ${accessToken}`
}
})
if (!response.ok) {
const statusText = await response.text()
throw new Error(`HTTP error!: ${response.status} ${statusText}`);
}
//Parse response to JSON
return await response.json()
}
// Request News Headlines Data
const getNewsHeadlines = async (symbol, accessToken) => {
const rdpNewsURL = `/data/news/v1/headlines?query=${symbol}`
const response = await fetch(rdpNewsURL, {
method: 'GET',
headers: {
'Content-Type': 'application/json',
'Authorization': `Bearer ${accessToken}`
}
})
if (!response.ok) {
const statusText = await response.text()
throw new Error(`HTTP error!: ${response.status} ${statusText}`);
}
//Parse response to JSON
return await response.json()
}
// RDP Symbology Lookup Data
const getSymbology = async (symbol, reqBody, accessToken) => {
const rdpSymbologyURL = `/discovery/symbology/${rdpSymbologyVersion}/lookup`
const response = await fetch(rdpSymbologyURL, {
method: 'POST',
headers: {
'Content-Type': 'application/json',
'Authorization': `Bearer ${accessToken}`
},
body: JSON.stringify(reqBody)
})
if (!response.ok) {
const statusText = await response.text()
throw new Error(`HTTP error!: ${response.status} ${statusText}`);
}
//Parse response to JSON
return await response.json()
}
The getSymbology() function supports two scenarios, converting the RIC code to ISIN and Exchange Ticker codes, and converting the RIC code to PermID code. The difference is the JSON request body. Users can click the buttons to choose which scenario to perform.
The code below shows how to convert RIC code to ISIN and Exchange Ticker codes.
btnSymbology.addEventListener('click', async () => {
const symbol = inputDataSymbol.value
const reqBody = {
"from": [{
"identifierTypes": [
"RIC"
],
"values": [symbol]
}],
"to": [{
"identifierTypes": [
"ISIN",
"ExchangeTicker"
]
}],
"reference": [
"name",
"status",
"classification"
],
"type": "auto"
}
txtSymbology.value = 'Loading...'
try {
let data = await getSymbology(symbol, reqBody, access_token)
txtSymbology.value = JSON.stringify(data, undefined, 2)
} catch (error) {
console.log(error)
txtSymbology.value = error
}
})
The code below shows how to convert RIC code to PermID Code.
btnRDPPermID.addEventListener('click', async () => {
const symbol = inputDataSymbol.value
const reqBody = {
"from": [{
"identifierTypes": [
"RIC"
],
"values": [symbol]
}],
"to": [{
"objectTypes": [
"organization"
],
"identifierTypes": [
"PermID",
]
}],
"reference": [
"name",
"status",
"classification"
],
"type": "auto"
}
txtRDPPermID.value = 'Loading...'
try {
let data = await getSymbology(symbol, reqBody, access_token)
txtRDPPermID.value = JSON.stringify(data, undefined, 2)
} catch (error) {
console.log(error)
txtRDPPermID.value = error
}
})
That covers the basic HTTP operations workflow of the client-side app.js code. The example web application is now can log in to the RDP, get access token, and request data through the http-proxy.
Prerequisite
This demo project requires the following dependencies software.
- RDP Access credentials.
- Node.js JavaScript runtime.
- Internet connection.
- Docker Desktop/Engine, if you want to run with Docker.
Please contact your Refinitiv's representative to help you to access the RDP account and services. You can find more detail regarding the RDP access credentials set up from the lease see the Getting Started for User ID section of Getting Start with Refinitiv Data Platform article.
How to run the example with Docker
Firstly, Go to the project folder and create a file name .env with the following content.
RDP_BASE_URL=https://api.refinitiv.com
RDP_AUTH_VERSION=v1
RDP_ESG_VERSION=v2
RDP_SYMBOLOGY_VERSION=v1
RDP_NEWS_VERSION=v1
Next, run the $> docker build -t <project tag name> . command in a console to build an image from a Dockerfile.
$> docker build -t rdp-http-proxy .
Once the build is a success, you can create and run the container with the following command
$> docker run --name rdp-http-proxy -it --env-file .env -p 8080:8080 rdp-http-proxy
Open the http://localhost:8080 URL in your web browser to run the example web application.
You can press the Ctrl+C buttons to exit the server application, then stop and remove a container with the following commands.
$> docker stop rdp-http-proxy
$> docker rm rdp-http-proxy
Alternatively, you can set up and run the project manually with the steps in GitHub.
Troubleshooting
Question: I double-click the index.html file to open the example web application, input my RDP credentials, then click the authentication button. The page shows TypeError: Failed to fetch error message.
Answer: You cannot run the example by just double-clicking the index.html file. You need to run the example web-server and open the example web application with http:localhost:8080 URL in the web browser.
Question: I try to start the web-server with the npm start command, but it shows Error: Cannot find module 'express' error message.
Answer: You need to install the project dependencies with the npm install command before running the npm start command.
Question: I do not have the RDP credentials.
Answer: Please contact your Refinitiv's representative to help you to access the RDP account and services.
Question : I got the {"error":"access_denied"} error message when I click the authentication button.
Answer: This error message means your RDP credentials do not have permission to access the API. Please contact your Refinitiv's representative to verify your account permission.
Question : I got the {"error": "access_denied", "error_description": "Invalid username or password."} when I click the authentication button.
Answer: This error message means your RDP credentials are not valid. Please contact your Refinitiv's representative to verify your credentials.
Question: I got the "error 403" message when I click the request RDP data buttons.
Answer: The HTTP 403 (403 Forbidden) means you do not have permission to request data. Please contact your Refinitiv's representative to verify your account permission.
Conclusion
With software development architecture, the application (or service) does not access only servers in its backend anymore. It needs to connect to various service providers across the internet such as Cloud data storage, Web Services, etc. The proxy and reverse proxy servers help the application to integrate with the different services and data providers.
This example project shows how to integrate the web browser application to the different services with the reverse proxy server. The client-side JavaScript application can access data from various services that are hosted on different locations such as the Refinitiv Refinitiv Data Platform, Datastream Web Service, Refinitiv Tick History (RTH) - REST API, etc. However, this example implementation aims for Development and POC purposes only, not for Production use. You may use a de-facto server like Nginx for the reverse proxy in your environment.
At the same time, the Refinitiv Data Platform (RDP) APIs provide various Refinitiv data and content for developers via easy-to-use Web-based API. The APIs are easy to integrate into any application and platform that supports the HTTP protocol and JSON message format.
References
For further details, please check out the following resources:
- Refinitiv Data Platform APIs page on the Refinitiv Developer Community website.
- Refinitiv Data Platform APIs Playground page.
- Refinitiv Data Platform APIs: Introduction to the Request-Response API.
- Refinitiv Data Platform APIs: Authorization - All about tokens.
- RDP APis Tutorial - Authorization for browser based applications.
- Build a Web application to display ESG data using Angular and RDP API - Refinitiv APIs Samples.
- Limitations and Guidelines for the RDP Authentication Service article.
- How to test HTTP REST API easily with Visual Studio Code - Thunder Client extensions article.
- Getting Started with Refinitiv Data Platform article.
- How to test Refinitiv Data Platform REST API easily with Visual Studio Code - REST Client extensions article.
- Using RDP API to request ESG data on Jupyter Notebook article.
- Use Fiddler to Capture RDP Interactions article.
For any questions related to Refinitiv Data Platform APIs, please use the RDP APIs Forum on the Developers Community Q&A page.