

Introduction
As a modern application, your application always deals with credentials, secrets, and configurations to connect to other services like an Authentication service, Database, Cloud services, Microservices, etc. It is not a good idea to keep your username, password and other credentials in your application source code as your credentials may leak when you share or publish the application. You need to delete or remark those credentials before you share the code which adds extra work for you. And eventually, you may forget to do it. You may pass the credentials to the application via the command line arguments, but someone may see those credentials on your screen as well.
The services configurations such as API endpoint, Database URL, etc should not be hard coded in the source code too. The reason is every time you change or update the configurations you need to modify the code which may lead to more errors.
How should we solve this issue?
Store config in the environment
The Twelve-Factor App methodology is one of the most influential patterns to designing scalable software-as-a-service applications. The methodology 3rd factor (aka Config principle) states that configuration information should be kept as environment variables and injected into the application on runtime as the following quotes:
An app’s config is everything that is likely to vary between deploys (staging, production, developer environments, etc). This includes:
- Resource handles to the database, Memcached, and other backing services
- Credentials to external services such as Amazon S3 or Twitter
- Per-deploy values such as the canonical hostname for the deploy
Apps sometimes store config as constants in the code. This is a violation of twelve-factor, which requires strict separation of config from code. Config varies substantially across deploys, code does not.
The twelve-factor app stores config in environment variables (often shortened to env vars or env). Env vars are easy to change between deploys without changing any code; unlike config files, there is little chance of them being checked into the code repo accidentally; and unlike custom config files, or other config mechanisms such as Java system Properties, they are a language- and OS-agnostic standard.
What is Environment Variable?
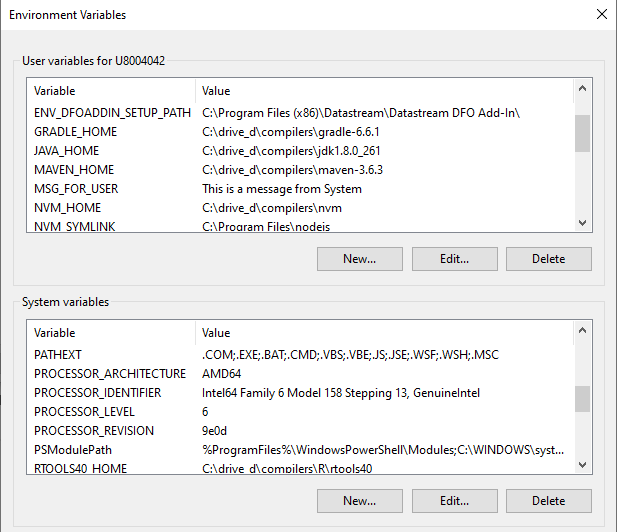
An environment variable is a dynamic-named value that is set through the Operating system, not the program. The variables impact the process the OS and running process. In Windows, you can access the environment variables to view or modify them through This PC --> Properties --> Advanced system settings --> Environment Variables.. menu.
The benefits of storing credentials and configurations in environment variables are the following:
- The credentials and configurations are separated from the code. The project team can change the credentials and configurations based on scenario and environment (Dev, Test, Product, etc) without touching the application source code.
- The sensitive information (username, password, token, etc) is kept and maintained locally. The team can share the code among peers without being worried about information leaks.
- Reduce the possibility of messing up between environments such as configure the Production server address in the Test environment.
However, each OS requires a different way to access and modify the variables. It is not always practical to set environment variables on development machines (as the variables may keep growing) or continuous integration servers where multiple projects are run.
These drawbacks lead to the dotenv method.
Introduction to .env file and dotenv
The dotenv method lets the application loads variables from a .env file into the environment/running process the same way as the application load variables from the system's environment variables. The application can load or modify the environment variables from the OS and .env file with a simple function call.
dotenv is a library that originates from Ruby developers (especially the Ruby on Rails framework) and has been widely adopted and ported to many programming languages such as python-dotenv, dotenv-java, Node.js, etc.
The .env file is a simple text file locates at the root of the project with a key-value pair setting as the following:
# DB
DB_USER=User
DB_PASSWORD=MyPassword
# Cloud
CLOUD_URL=192.168.1.1
Please note that you do not need the "" or '' characters for a string value.
Caution
You should not share this .env file to your peers or commit/push it to the version control. You should add the file to the .gitignore file to avoid adding it to version control or public repository accidentally.
You can create a .env.example file as a template for environment variables and .env file sharing. The file has the same parameters' keys as a .env file but without sensitive values as the following example:
# DB
DB_USER=
DB_PASSWORD=
# Cloud Public URL, not a sensitive information
CLOUD_URL=192.168.1.1
Then you can push this .env.example file to the repository. Developers who got your source code project can create their own .env file from this template .env.example file.
Please note that if the configuration is not sensitive information (such as a public API endpoint URL), you can include it in a .env.example file.
dotenv with Python
Let's demonstrate with the python-dotenv library first. The example console application uses the library to store the Refinitiv Data Platform (RDP) APIs credentials and configurations for the application.
What is Refinitiv Data Platform (RDP) APIs?
The Refinitiv Data Platform (RDP) APIs provide various Refinitiv data and content for developers via easy to use Web-based API.
RDP APIs give developers seamless and holistic access to all of the Refinitiv content such as Historical Pricing, Environmental Social and Governance (ESG), News, Research, etc and commingled with their content, enriching, integrating, and distributing the data through a single interface, delivered wherever they need it. The RDP APIs delivery mechanisms are the following:
- Request - Response: RESTful web service (HTTP GET, POST, PUT or DELETE)
- Alert: delivery is a mechanism to receive asynchronous updates (alerts) to a subscription.
- Bulks: deliver substantial payloads, like the end-of-day pricing data for the whole venue.
- Streaming: deliver real-time delivery of messages.
This example project is focusing on the Request-Response: RESTful web service delivery method only.
For more detail regarding Refinitiv Data Platform, please see the following APIs resources:
- Quick Start page.
- Tutorials page.
- RDP APIs: Introduction to the Request-Response API page.
- RDP APIs: Authorization - All about tokens page.
python-dotenv and .env file set up
You can install the python-dotenv library via the following pip command:
pip install python-dotenv
The create a .env file at the root of the project with the following content
# RDP Core Credentials
RDP_USER=<Your RDP username>
RDP_PASSWORD=<Your RDP password>
RDP_APP_KEY=<Your RDP appkey>
# RDP Core Endpoints
RDP_BASE_URL=https://api.refinitiv.com
RDP_AUTH_URL=/auth/oauth2/v1/token
RDP_ESG_URL=/data/environmental-social-governance/v2/views/scores-full
Using python-dotenv library
To use the python-dotenv library, you just import the library and call the load_dotenv() statement. After that you can access both system environment variables and .env's configurations from the Python os.environ or os.getenv statement.
Please note that the OS/system's environment variables always override .env configurations by default as the following example.
import os
from dotenv import load_dotenv
load_dotenv() # take environment variables from .env.
print('User: ', os.getenv('USERNAME')) # Return your system USERNAME configuration.
The next example code shows how to use get configurations from a .env file to get the RDP APIs Auth service endpoint and user's RDP credentials.
# Get RDP Token service information from Environment Variables
base_URL = os.getenv('RDP_BASE_URL')
auth_endpoint = base_URL + os.getenv('RDP_AUTH_URL')
# Get RDP Credentials information from Environment Variables
username = os.getenv('RDP_USER')
password = os.getenv('RDP_PASSWORD')
app_key = os.getenv('RDP_APP_KEY')
Next, the application creates the RDP Auth service request message and sends it to the RDP APIs endpoint.
import requests
# -- Init and Authenticate Session
auth_request_msg = {
'username': username ,
'password': password ,
'grant_type': "password",
'scope': scope,
'takeExclusiveSignOnControl': "true"
}
# Authentication with RDP Auth Service
try:
response = requests.post(auth_endpoint, headers = {'Accept':'application/json'}, data = auth_request_msg, auth = (app_key, client_secret))
except Exception as exp:
print('Caught exception: %s' % str(exp))
if response.status_code == 200: # HTTP Status 'OK'
print('Authentication success')
auth_obj = response.json()
else:
print('RDP authentication result failure: %s %s' % (response.status_code, response.reason))
print('Text: %s' % (response.text))
The above code shows that you do not need to change the code if the RDP credentials or service endpoint is changed (example: update the API version). We can just update the configurations in a .env file (or system environment variables) and re-run the application.
You may notice that the application gets the item name (aka universe) via a command line argument instead of a .env file. The reason is this parameter is most likely to be different for each run, so we use the command line argument to get the parameter. The information such as credentials and API endpoints are changed only when we change the environment, re-deployment the application, or run a specific scenario. The environment variables are more suitable to store these configurations than the command line arguments.
dotenv with Jupyter Notebook/JupyterLab
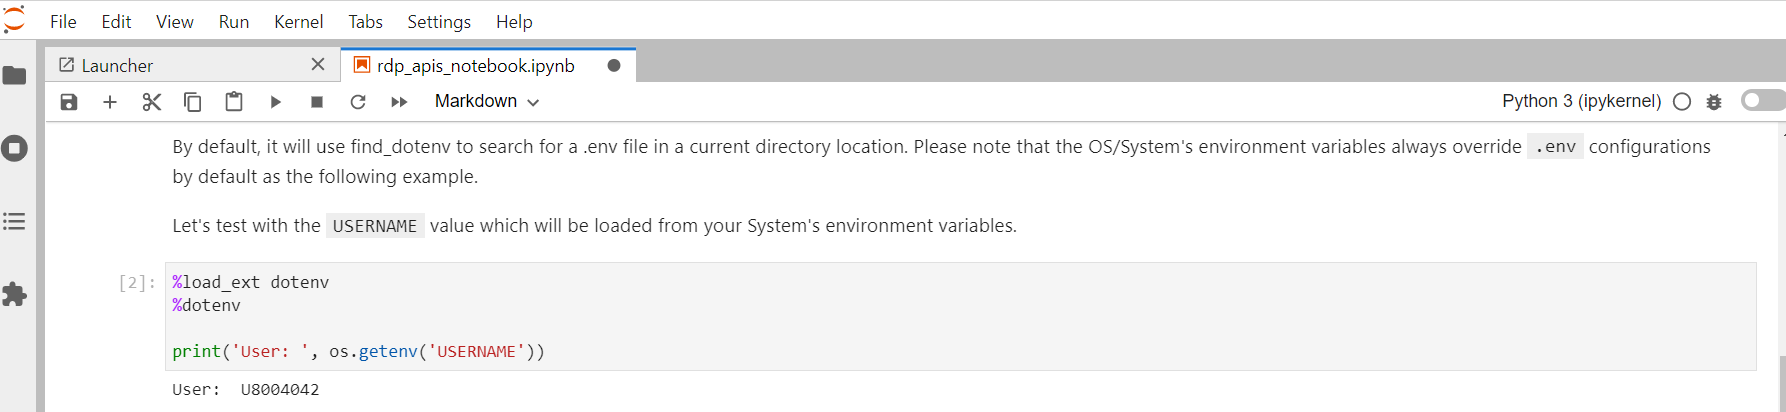
The python-dotenv library also supports the IPython environment such as the classic Jupyter Notebook and JupyterLab applications. The notebook application just needs to import the python-dotenv library and run the following IPython Magic statements.
%load_ext dotenv
# Use find_dotenv to locate the file
%dotenv
By default, it will use find_dotenv to search for a .env file in a current directory location. Please note that the OS/system's environment variables always override .env configurations by default as well.
dotenv with Java
The next section demonstrates the dotenv-java library. The example Java console application uses the library to store the Refinitiv Real-Time - Optimized (RTO) credentials and configurations for the application.
What is Refinitiv Real-Time - Optimized?
As part of the Refinitiv Data Platform, Refinitiv Real-Time - Optimized (formerly known as ERT in Cloud) gives you access to best in class Real-Time market data delivered in the cloud. Refinitiv Real-Time - Optimized is a new delivery mechanism for RDP, using the AWS (Amazon Web Services) cloud. Once a connection to RDP is established using Refinitiv Real-Time - Optimized, data can be retrieved using Websocket API for Pricing Streaming and Real-Time Services aka WebSocket API.
For more detail regarding Refinitiv Real-Time - Optimized, please see the following APIs resources:
- WebSocket API Quick Start page.
- WebSocket API Tutorials page.
- How to Setup Refinitiv's Amazon EC2 Machine Image for Refinitiv Real-Time - Optimized article.
dotenv-java and .env file set up
You can install the dotenv-java library via the following Maven POM.xml file dependency configuration:
<dependency>
<groupId>io.github.cdimascio</groupId>
<artifactId>dotenv-java</artifactId>
<version>2.2.0</version>
</dependency>
Note: the library requires Java 8 or greater.
Then create a .env file at the root of the project with the following content
# RTO Core Credentials
RTO_USER=<Your RTO Machine ID>
RTO_PASSWORD=<Your RTO password>
RTO_APP_KEY=<Your RTO appkey>
# Leave new password as a blank value
RTO_WS_NEW_PASSWORD=
# RDP-RTO Core Endpoints
RDP_BASE_URL=https://api.refinitiv.com
RDP_AUTH_URL=/auth/oauth2/v1/token
RDP_DISCOVERY_URL=/streaming/pricing/v1/
RTO_WS_PORT=443
Using dotenv-java library
To use the dotenv-java library, you just import the io.github.cdimascio.dotenv.Dotenv package and create the Dotenv object via the Dotenv.configure().ignoreIfMissing().ignoreIfMalformed().load() statement to populate configurations. After that you can access both system environment variables and .env's configurations from the dotenv.get("..."); statement.
Please note that the OS/system's environment variables always override .env configurations by default as the following example.
import io.github.cdimascio.dotenv.Dotenv;
Dotenv dotenv = Dotenv.configure().ignoreIfMissing().ignoreIfMalformed().load();
system.out.println(dotenv.get("USERNAME")); // Return your system USERNAME configuration.
Please note that you can create the Dotenv object via Dotenv.configure().load(); statement but the library will always look for a .env file and throws error if the file is not available. With the Dotenv.configure().ignoreIfMissing().ignoreIfMalformed().load() statement, the library will continue to retrieve continue to retrieve environment variables that are set in the system if a .env file does not exist.
The next example code shows how to use get configurations from a .env file to get the RDP APIs Auth service endpoint, user's RTO credentials, and RTO port information.
static void readDotENV(){
// Populate configurations from the system environment variables and .env file
Dotenv dotenv = Dotenv.configure().ignoreIfMissing().ignoreIfMalformed().load();
System.out.println(dotenv.get("USERNAME")); //Get system configuration
//Get RTO credentials
user = dotenv.get("RTO_USER");
password = dotenv.get("RTO_PASSWORD");
clientid = dotenv.get("RTO_APP_KEY");
newPassword = dotenv.get("RTO_WS_NEW_PASSWORD");
//Get RTO Endpoints
String baseUrl = dotenv.get("RDP_BASE_URL");
authUrl = baseUrl + dotenv.get("RDP_AUTH_URL");
discoveryUrl = baseUrl + dotenv.get("RDP_DISCOVERY_URL");
port = dotenv.get("RTO_WS_PORT");
}
Next, the application uses those configurations to authenticate with the RDP Auth Service.
public static JSONObject getAuthenticationInfo(JSONObject previousAuthResponseJson) {
String url = authUrl;
return getAuthenticationInfo(previousAuthResponseJson, url);
}
...
public static JSONObject getAuthenticationInfo(JSONObject previousAuthResponseJson, String url) {
...
SSLConnectionSocketFactory sslsf = new SSLConnectionSocketFactory(new SSLContextBuilder().build());
HttpClient httpclient = HttpClients.custom().setSSLSocketFactory(sslsf).build();
HttpPost httppost = new HttpPost(url);
HttpParams httpParams = new BasicHttpParams();
// Set request parameters.
List<NameValuePair> params = new ArrayList<NameValuePair>(2);
params.add(new BasicNameValuePair("client_id", clientid));
params.add(new BasicNameValuePair("username", user));
params.add(new BasicNameValuePair("grant_type", "password"));
params.add(new BasicNameValuePair("password", password));
...
httppost.setEntity(new UrlEncodedFormEntity(params, "UTF-8"));
//Execute and get the response.
HttpResponse response = httpclient.execute(httppost);
...
Once the application got the access token information from the RDP Auth Service, the application gets the RTO WebSocket endpoint dynamically from the Service Discovery. The Service Discovery API endpoint is also loaded from a .env file.
public static JSONObject queryServiceDiscovery() {
String url = discoveryUrl;
return queryServiceDiscovery(url);
}
...
public static JSONObject queryServiceDiscovery( String url ) {
...
SSLConnectionSocketFactory sslsf = new SSLConnectionSocketFactory(new SSLContextBuilder().build());
HttpClient httpclient = HttpClients.custom().setSSLSocketFactory(sslsf).build();
HttpGet httpget = new HttpGet(url + "?transport=websocket");
...
httpget.setHeader("Authorization", "Bearer " + authJson.getString("access_token"));
//Execute and get the response.
HttpResponse response = httpclient.execute(httpget);
...
Once the application gets the RTO WebSocket endpoint, an application can further connect to the WebSocket server to consume the real-time streaming data accordingly.
public WebSocketSession(String name, String host, String authToken) {
_name = name;
_url = String.format("wss://%s/WebSocket", host);
_authToken = authToken;
connect();
}
...
public synchronized void connect() {
...
_websocket = websocketFactory.createSocket(_url)
.addProtocol("tr_json2")
.addListener(new WebSocketAdapter() {
}
Using Environment Variables with Docker
Docker supports the environment variables usage in the Dockerfile, docker run command and Docker compose.
Environment Variables with Dockerfile
Let's demonstrate with the Dockerfile first. You can use the ENV instruction to set the environment variable in the image.
ENV <key>=<value> ...
You can set multiple environment variables in a single ENV instruction as well.
ENV <key>=<value> \
<key>=<value> \
<key>=<value>
The Dockerfile below set both the application and system's configurations in the Dockerfile.
# Update PATH environment variable + set Python buffer to make Docker print every message instantly.
ENV PATH=/root/.local:$PATH \
USERNAME=DOCKER_CONTAINER \
PYTHONUNBUFFERED=1
All containers from the resulting image can access the environment variables set using Dockerfile ENV instruction, unless it is replaced by the Docker run command options.
When you run the Docker containers from the above Docker image setting, the system.out.println(dotenv.get("USERNAME")); (Java) and print('User: ', os.getenv('USERNAME')) (Python) will print the USERNAME information as DOCKER_CONTAINER value.
Environment Variables with Docker Run command
You can use the --env (-e for a shorter syntax) options with the Docker run command to set the environment variable of the container.
docker run --env <key>=<value> IMAGE
Please note that if you want to set multiple environment variables, you need to set --env multiple times. The example with the Python RDP console container is the following:
docker build . -t IMAGE
...
docker run --env USERNAME=DOCKER_CONTAINER_RUN --env RDP_USER=USER1 --env RDP_PASSWORD=PASSWORD --env RDP_APP_KEY=APP_KEY IMAGE
Alternatively, you can use the --env-file option to parse a file of environment variables (.env file) to a Docker container.
docker run --env-file .env IMAGE
Example for the Python RDP application:
docker build . -t python_rdp
...
docker run --env-file .env --name python_console python_rdp
Example for the Java RTO WebSocket application:
docker build . -t java_rto
...
docker run --env-file .env --name java_websocket java_rto
Please note that the ENV instruction, --env and --env-file options support the normal system environment variables too. The dotenv library is not required to be used with Docker.
Caution
You should add .env (and .env.example) file to the .dockerignore file to avoid adding it to a public Docker Hub repository.
Prerequisite
This demo project requires the following dependencies software.
- RDP Access credentials for Python/JupyterLab examples.
- RTO Access credentials for a Java example
- Python Anaconda or MiniConda distribution/package manager.
- Oracle/Open JDK 8 or Oracle JDK 11.
- Apache Maven project management and comprehension tool.
- Internet connection.
Please contact your Refinitiv's representative to help you to access the RDP, RTO account, and services. You can find more detail regarding the RDP and RTO access credentials set up from the Getting Start with Refinitiv Data Platform article article:
- RTO: Please see the Getting Started for Machine ID section.
- RDP: Please see the Getting Started for User ID section.
How to run the Examples
The first step is to unzip or download the example project folder from a GitHub repository into a directory of your choice, then follow the step-by-step guide in the GitHub repository:
Finally, Should I use .env file in the Production environment?
A .env file and the dotenv library are very useful in the local Development and Test environments because they help the teams to isolate sensitive information and configurations from the source code. The teams can share the source code among peers without worry about information leaks. Each team member can change the configurations (on their own .env file or machine system environment variables) based on the deployment scenarios such as switching configurations from Dev to Test, testing a specific use case, etc without touching the source code.
However, it is not recommended to deploy a .env file to the Production environment because the Production's configurations and secrets should be stored directly in an actual server environment by the Production's Administrator team. The team can set the values via the /etc/environment file or the Cloud services' console based on the environment specification.
Additionally, the Cloud service providers also provide secret storage services to store encryption credentials, configuration endpoints for the teams as well. The example secret storage services are AWS systems Manager Parameter Store, Azure Key Vault, or Google Cloud Secret Manager.
References
For further details, please check out the following resources:
- Refinitiv Data Platform APIs page on the Refinitiv Developer Community website.
- Refinitiv Data Platform APIs Playground page.
- Refinitiv Data Platform APIs: Introduction to the Request-Response API.
- Refinitiv Data Platform APIs: Authorization - All about tokens.
- WebSocket API for Pricing Streaming and Real-Time Services page.
- WebSocket API Quick Start - Connecting to Refinitiv Real-Time - Optimized.
- WebSocket API Tutorial - Connecting to Refinitiv Real-Time - Optimized.
- python-dotenv GitHub page.
- dotenv-java GitHub page.
- dotenv - Ruby GitHub page.
- How to NOT embedded credential in Jupyter notebook.
- Using dotenv package to create environment variables.
- Dotenv for Java and JVM languages.
- Having trouble understanding the benefits and point of using an .env file - reddit.
For any questions related to Refinitiv Data Platform or WebSocket API/Refinitiv Real-Time - Optimized, please use the following forums on the Developers Community Q&A page.
GitHub
https://github.com/Refinitiv-API-Samples/Article.RDP.RRTO.Python.Java.DOTENV