

An easy way to edit and test RT-SDK Java examples
According to the Gradle documentation page, it is 'an open-source build automation tool that is designed to be flexible enough to build almost any type of software'
Starting with Refinitiv Real-Time SDK Java v1.2, Refinitiv started using Gradle to build and run the RT-SDK examples. Once you install the Refinitiv Real-Time SDK and refer to the QuickStart page or the Installation guide, they explain how you can use Gradle to build and run the examples.
Generally, these instructions talk about using the command line to initiate the various actions - e.g. to build the jars:
Windows: gradlew.bat jar
Linux: ./gradlew jar
Or to run an RTO example :
Gradlew runconsumer450 --args="-username <Machine ID> -password <password> -clientId <appkey>"
This approach is fine if you prefer the command line and/or are just running some examples without making any code changes.
However, the above is not ideal for the following scenarios:
- If you prefer using IDEs to the command line
- like to learn about an API by exploring the examples - making minor changes and re-running them to observe the impact
- trying to re-create a customer scenario/solution by making lots of small changes to an example and re-running the example after each change
Previously, I would set up an Eclipse project by adding the source code, libraries etc and more recently I experimented with using the Gradle script with Eclipse.
However, as you may have gathered from my other articles, like many of my fellow Dev Advocates and others in the wider developer community, I am trying to standardise all my (non-C++) development using Visual Studio Code. In my role as a Developer Advocate, working with the variety of APIs and Libraries we offer - I have to often switch from Python to Java, to REST APIs several times a day. VS Code with its constantly broadening language support and a plethora of extensions lends itself well to my workflow.
So, as you may imagine I was quite pleased when I read that Microsoft had improved their Gradle support in VS Code.
Adding Gradle support to VS Code
Configuring VS Code to work with Gradle is relatively straighforward.
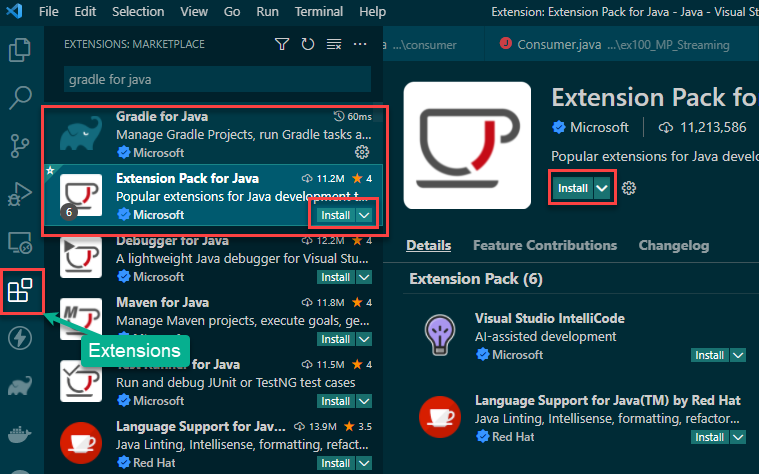
If you have been experimenting with or using Java with VS Code, then you should already have the VS Code Extension Pack for Java installed.
If not, you need to go ahead and install it -
- Click on the Extensions icon on the sidebar or by selecting View->Extensions from the menu.
- Search for 'gradle for java'
- Select 'Extension Pack for Java' from the list and click Install on the Sidebar or the main window
Once Java Extension Pack has been installed, repeat the same steps for the Gradle for Java extension too.
Once you have the Extensions Pack for Java and the Gradle for Java extension installed, we can go ahead and open up the RT-SDK Java Gradle project.
Open the RT-SDK Java Gradle file
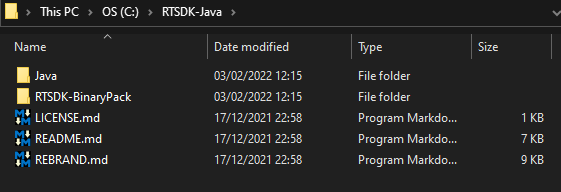
On my PC I have installed the RT-SDK Java in the C:\RTSDK-Java folder.
Therefore, in order to use the Gradle file in VS Code, I had to open the C:\RTSDK-Java\Java folder in VS Code as shown below
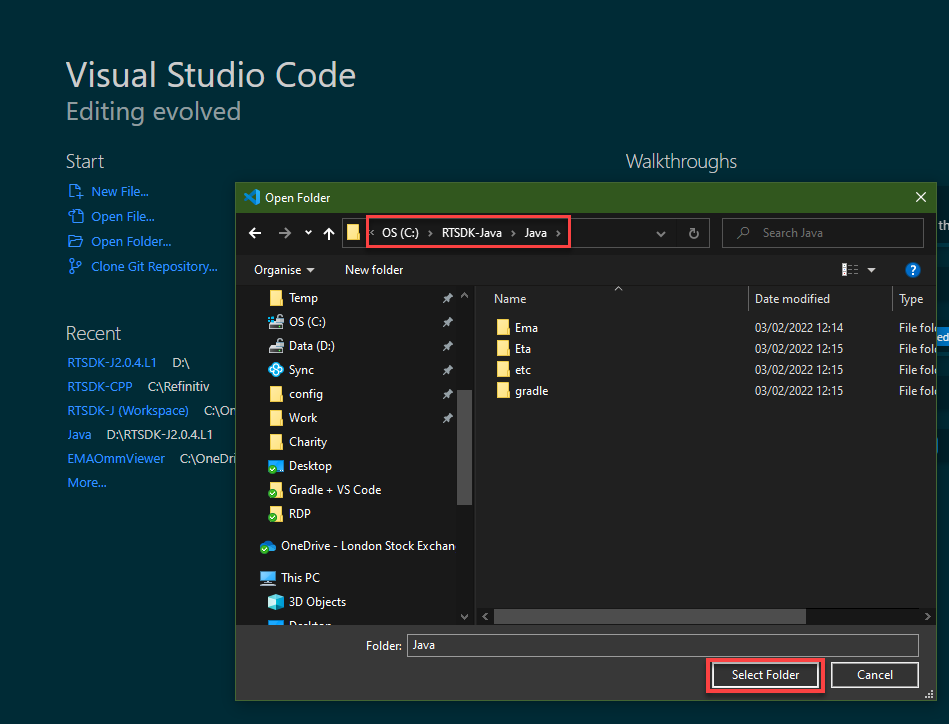
Once you select the folder, VS Code will start importing the RT-SDK Java projects - which can take a few minutes....
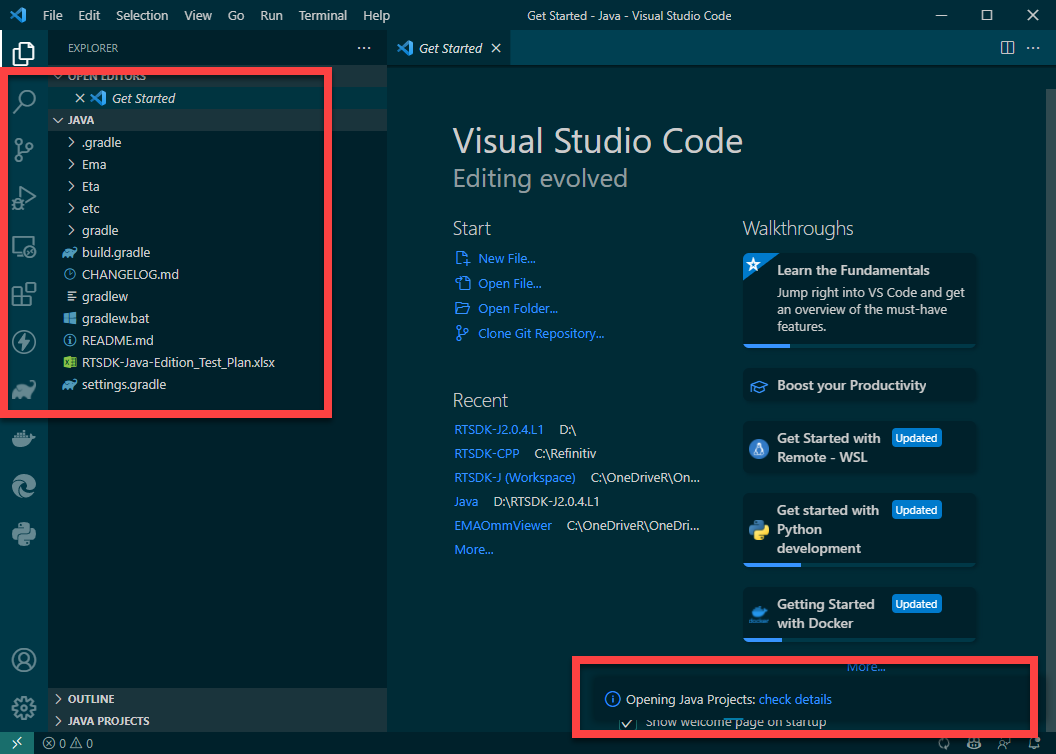
Ignore the Errors!
You will see various project-related errors reported by VS Code including Unresolved Dependencies and Access Restrictions - you can ignore these for now - they should not stop you from running the examples.
Running an example
Once VS Code has finished importing the Gradle projects, we can go ahead and run some code.
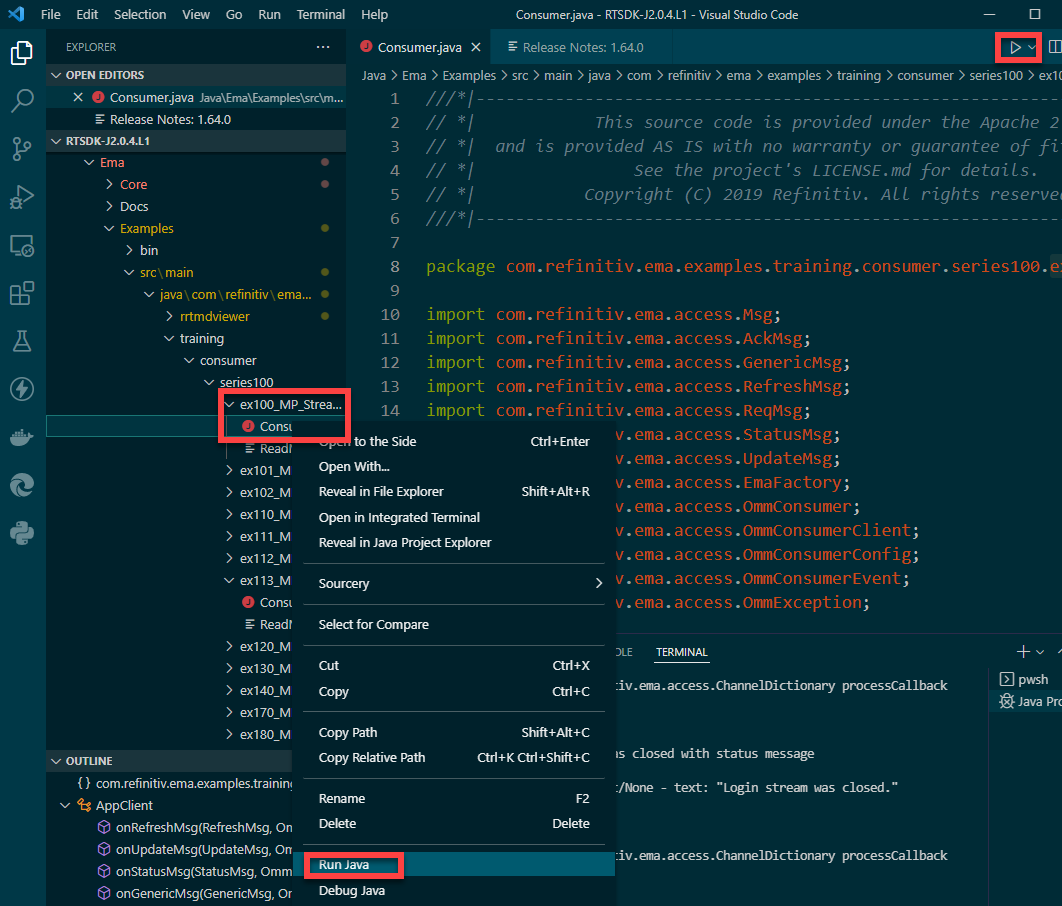
For instance, if I want to run one of the basic examples such as consumer.series100.ex100_MP_Streaming, I just need to navigate to the Java file and select Run Java.
To connect the example to your Deployed RTDS system, you will of course need to change the hostname and service name in the main() method - to match your local values. For my setup, I changed the hostname to myads1 and the servicename to ELEKTRON_DD:
public static void main(String[] args)
{
OmmConsumer consumer = null;
.....
consumer = EmaFactory.createOmmConsumer(config.host("myads1:14002").username("user"));
ReqMsg reqMsg = EmaFactory.createReqMsg();
consumer.registerClient(reqMsg.serviceName("ELEKTRON_DD").name("IBM.N"), appClient);
.....
}
I then select Run Java - either from the java file right-click menu or the top right hand shortcut.
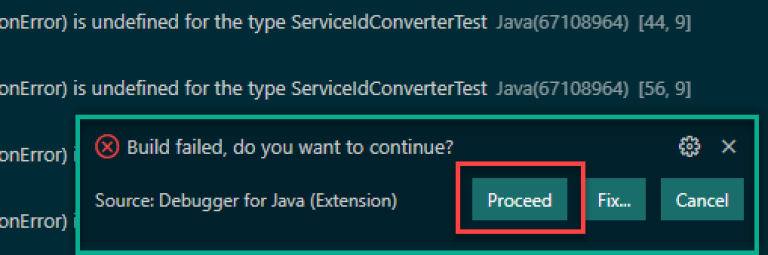
You will once again see an Build Failed, do you want to continue? warning - you can just click the Proceed button to ignore this and continue.
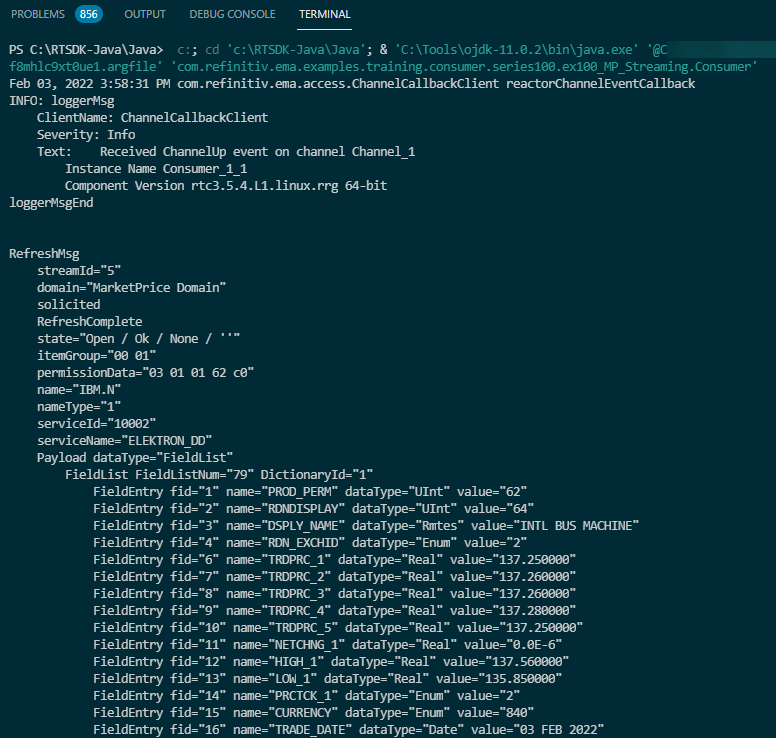
The application should run and you should see output in the Terminal window
Running an example with Command Line Parameters
If you want to run an example such ex113_MP_SessionMgmt that expects parameters on the command line, we can achieve this by adding the parameters to the VS Code Launch Configuration for the example - in the launch.json file.
I tested this article workflow from scratch on 3 separate occasions - on two of those, VS Code created a launch.json file with a Configuration for every single example / Gradle target. However, on 1 occasion, the launch.json file was empty(??)
The easiest way to check is to select the Run->Open Configurations menu option - which should open the launch.json file in the editor.
You should see the file populated with multiple configuration entries:
.....
"version": "0.2.0",
"configurations": [
{
"type": "java",
"name": "Launch Current File",
"request": "launch",
"mainClass": "${file}"
},
{
"type": "java",
"name": "Launch RRTMDViewerDesktopMain",
"request": "launch",
"mainClass": "com.refinitiv.ema.examples.rrtmdviewer.desktop.RRTMDViewerDesktopMain",
"projectName": "RTSDK-Ema-Examples"
},
{
"type": "java",
"name": "Launch Consumer",
"request": "launch",
"mainClass": "com.refinitiv.ema.examples.training.consumer.series100.ex100_MP_Streaming.Consumer",
"projectName": "RTSDK-Ema-Examples"
},
{
"type": "java",
"name": "Launch Consumer(1)",
"request": "launch",
"mainClass": "com.refinitiv.ema.examples.training.consumer.series100.ex101_MP_QosPriority.Consumer",
"projectName": "RTSDK-Ema-Examples"
},
.....
If you don't see the above in your file, you can just add them manually or try running an example - which should force VS Code to create a configuration entry for the example - which we can then go and edit. If not you can always copy and edit one of the configurations above.
Adding run parameters to a Launch Configuration
Two of the more common examples that Refintiiv Real-Time Optimised (RTO) customers typically run and experiment with are ex113_MP_SessionMgmt and ex450_MP_QueryServiceDiscovery - as they both have the necessary parameters and code required to make a connection to the cloud-based RTO service.
However, as mentioned earlier these examples require command line parameters such as username, password and others.
Unlike tools such as Eclipse or Visual Studio which have dedicated dialog boxes for specifying these parameters, in VS Code you can add them to the launch.json file. So, for ex113_MP_SessionMgmt I could change its associated configuration as follows:
{
"type": "java",
"name": "Launch Consumer(6)",
"request": "launch",
"mainClass": "com.refinitiv.ema.examples.training.consumer.series100.ex113_MP_SessionMgmt.Consumer",
"projectName": "RTSDK-Ema-Examples",
"args": ["-username", "${env:RDP_LOGIN}",
"-password", "${env:RDP_PASSWORD}",
"-clientId","${env:APP_KEY}"]
},
In the above, I am referencing some enviromental variables that I have defined locally with my MachineID, password and AppKey (ClientID) - as I don't like hardcoding my credentials all over the place.
Clearly if you are just running a couple of tests, you could go ahead and add them directly to the configuration:
{
"type": "java",
"name": "Launch Consumer(6)",
"request": "launch",
"mainClass": "com.refinitiv.ema.examples.training.consumer.series100.ex113_MP_SessionMgmt.Consumer",
"projectName": "RTSDK-Ema-Examples",
"args": ["-username", "GE-A-1231234-8-1234",
"-password", "notmyrealcredenTIALS1234#",
"-clientId","a7a1234bf2747891234c75f2c5fd123456789f1"]
},
Once I add the above "args" and save the launch.json file. I should be able to run the ex113_MP_SessionMgmt example. However, there is one more step I need to perform.
As you may know, EMA looks for an EMAConfig.xml file in the working directory and if it cannot find one it will use defaults for almost all its config values. Unfortunately, that is not going to work for something like the ex113_MP_SessionMgmt. Looking at the main() method for this example, you will note that it uses a configuration set called Consumer_4 (for a plain RSSL connection) and Consumer_5 (for a Websocket Connection).
So, I have to ensure that a copy of an EMAConfig.xml with those configuration sets is copied into the working directory - which for my installation is C:\RTSDK-Java\Java.
A copy of EMAConfig.xml with the required configuration sets is provided in the RTSDK Java package's Java\Ema folder. So, I just copy the file over:
c:\RTSDK-Java\Java>copy Ema\EmaConfig.xml
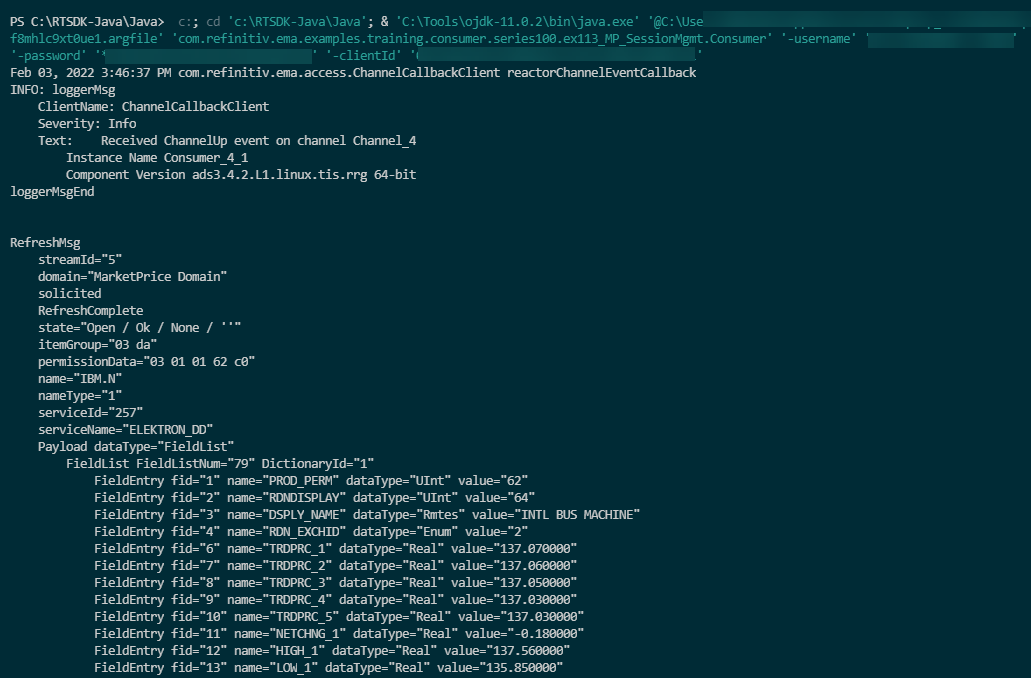
Once the EMAConfig.xml file is in place, I can then select the ex113_MP_SessionMgmt example's Consumer.java file and execute Run Java, which should output something like:
So, there you have it - a relatively painless way to edit and run RT-SDK Java examples using Visual Studio Code without having to resort to using the command line to re-run Gradle Tasks every time you make a change to your java source code file. I certainly find it helpful when trying out or tweaking RT-SDK examples whilst trying to standardise on using VS Code as much as possible.
Running a Gradle Task
I make mention of Gradle Tasks above and those of you who have already used the RT-SDK via the command line will be aware of what this entails; to run an example you need to know its task name e.g. runconsumer100, runconsumer450, runVAConsumer and so on.
To get a list of the various Gradle tasks you can execute one of the following:
ETA Windows: gradlew.bat Eta:Applications:Examples:tasks --all
ETA Linux: ./gradlew Eta:Applications:Examples:tasks --all
EMA Windows: gradlew.bat Ema:Examples:tasks --all
EMA Linux: ./gradlew Ema:Examples:tasks --all
Although using the technique described in the article, avoids the need to do the above, if for some reason you still wanted to run a Gradle task from within VS Code - this is also possible. To run a Gradle Task select the Terminal->Run Task menu option and either type in the task name or search for it:
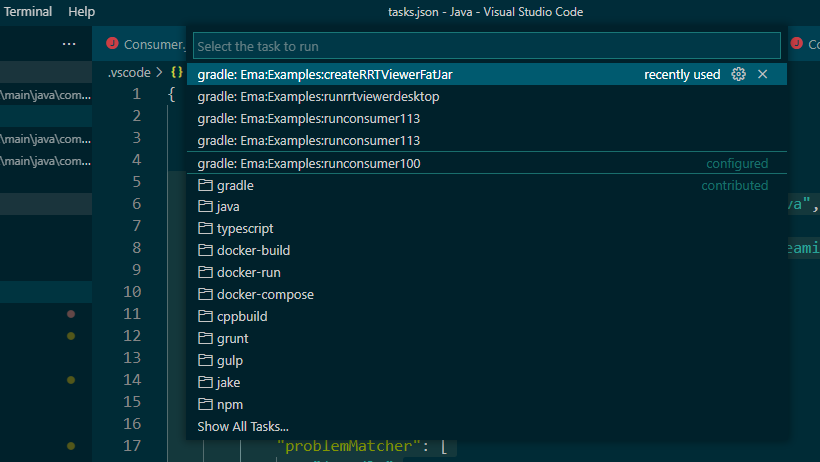
If the example needs command line parameters, then you can click the cogwheel icon and edit the tasks.json file to add the "args" as we did earlier in the launch.json file.
Closing Tip
Before, I finish I would like to share a tip that I find quite useful and hope that you may too.
Different 'size' fonts for VS Code's Editor and Explorer
When using IDEs like Visual Studio C++ and Eclipse, I like the fact that the Solution / Package Explorer elements use a relatively small font. However, for VS Code, I find the Explorer view font much too large - requiring much more scrolling than I would prefer.
The workaround I found is to set the Text Editor Font size to something larger than I would normally use:
- using File->Preferences-Settings, I set the Text Editor->Font Size to 18
- and then View->Appearance->Zoom Out option to shrink the size of the whole VS Code interface.
This allows me to see a much greater selection of examples folders etc - whilst still maintaining a decent font size for my code.
I hope you found this article both useful and interesting - any comments or feedback, please do feel free to get in touch.
I also invite you to check out some of our other articles around VS Code, WSL, Docker and RT-SDK - see the right hand links panel at the start of the article.