

Introduction
Deno is a JavaScript, TypeScript, and WebAssembly runtime based on the V8 JavaScript engine that is written in Rust. It is co-created by Ryan Dahl, who also created Node.js JavaScript runtime.
Deno was announced on 2018 on Ryan's JSConf EU 2018 talk 10 Things I Regret About Node.js admit his initial design decisions with Node.js such as not using promises, the legacy build system, node_modules, package.json, etc which lead to many Node.js drawbacks. In the same talk, Ryan introduced Deno as a new runtime that aims to simplify web platform development with a modern and secure design by default.
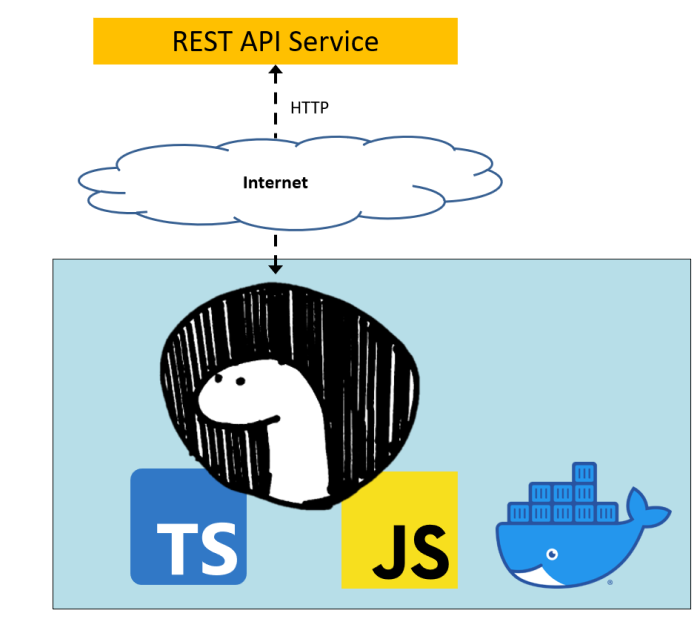
This example project shows how to implement a console TypeScript application to retrieve financial data from HTTP REST API with Deno. The application uses the Refinitiv Data Platform (RDP) APIs as the example HTTP REST APIs to consume Refinitiv data. The project is implemented and run in a controlled environment such as Docker and devcontainer using the Deno Docker Image.
Note: Please be informed that this demo project aims for Development and POC purposes only.
Logos above are from the following sources:
- Deno Artwork: Deno logo
- commons.wikimedia.org: JavaScript logo
- commons.wikimedia.org: TypeScript logo
- Docker media resources
What is Deno?
Deno is a simple, modern, and secure JavaScript, TypeScript, and WebAssembly runtime with web platform APIs for both frontend and backend web developments. Deno emphasizes event-driven architecture and supports non-blocking core I/O same as Node.js. Developers can create web servers, server-side, and web browser applications in with productive and secure development environment than Node.
Difference between Deno and Node.js
Even though both Deno and Node.js are built on Google's V8 JavaScript engine, Deno mainly deviates from Node.js in the following points:
- Secure by default. No file, network, or environment access, unless explicitly enabled at runtime.
- Ships only a single executable file (Deno).
- Deno executable file takes on the role of both runtime and package manager. It supports only URLs for loading local or remote dependencies, similar to browsers, so the package.json file and package manager (like Node.js's npm) is not required.
- Supports TypeScript out of the box.
- Supports Web Fetch API natively.
- Supports only ES Modules (import x from y) like browsers where Node.js supports both ES Modules and CommonJS (require(y)).
- All async actions in Deno return a promise.
- Comes with a set of standard modules such as Base64, command line arguments parsing, JSON, dotenv, file system, HTTP, etc that can be loaded via URLs on the fly.
- Provides built-in development tools such as a code formatter (deno fmt), a linter (deno lint), and a test runner (deno test), etc.
- And much more
Example Deno Code for the HTTP server from Deno official page:
//http-server.ts
import { serve } from "https://deno.land/std@0.140.0/http/server.ts";
function handler(_req: Request): Response {
return new Response("Hello, World!");
}
serve(handler);
Running code using Deno CLI (please noticed --allow-net flag to explicit enable network access):
deno run --allow-net http-server.ts
This example project is focusing on Deno version 1.24.3.
What is Refinitiv Data Platform (RDP) APIs?
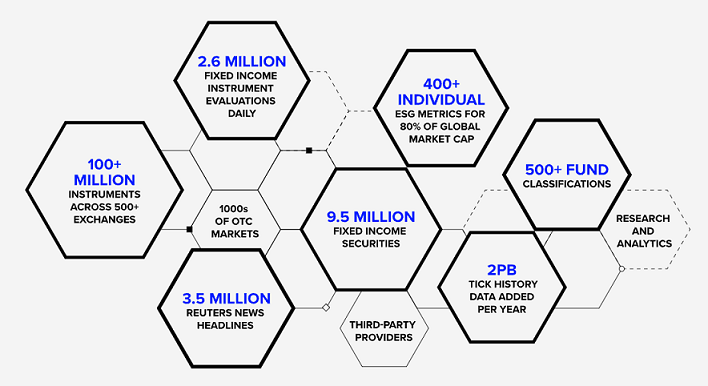
The Refinitiv Data Platform (RDP) APIs provide various Refinitiv data and content for developers via easy-to-use Web-based API.
RDP APIs give developers seamless and holistic access to all of the Refinitiv content such as Environmental Social and Governance (ESG), News, Research, etc, and commingled with their content, enriching, integrating, and distributing the data through a single interface, delivered wherever they need it. The RDP APIs delivery mechanisms are the following:
- Request - Response: RESTful web service (HTTP GET, POST, PUT or DELETE)
- Alert: delivery is a mechanism to receive asynchronous updates (alerts) to a subscription.
- Bulks: deliver substantial payloads, like the end-of-day pricing data for the whole venue.
- Streaming: deliver real-time delivery of messages.
This article is focusing on the Request-Response: RESTful web service delivery method only.
For more detail regarding the Refinitiv Data Platform, please see the following APIs resources:
- Quick Start page.
- Tutorials page.
Prerequisite
This demo project requires the following dependencies.
- RDP Access credentials.
- Visual Studio Code editor.
- Docker Desktop/Engine application.
- VS Code - Remote Development extension pack
- Internet connection.
Please contact your Refinitiv representative to help you to access the RDP account and services. You can find more detail regarding the RDP access credentials set up from the lease see the Getting Started for User ID section of the Getting Start with Refinitiv Data Platform article.
Deno and RDP HTTP Services Implementation Detail
Project Structure Overview
This example project is a TypeScript console application that login to the RDP platform, then requests the Chain data and PermID information from the RDP Pricing-Chain and Symbology services respectively. The project source code is as follows:
- src/main.ts: The main console application class.
- src/rdp_https.ts: The main RDP HTTP operations class.
- src/rdp_types.ts: The Type Aliases file.
Main Application Code Introduction
Let me start by explaining the main.ts file code overview. It is the main application class that receives a user input for RDP credentials and a chain symbol name. Then it authenticates and gets data from the RDP RDP services, and displays that data in a console. The file contains the Application class that manages all application logic such as receiving user input information, format, and display data.
The overview code structure of the file is shown below.
// main.ts
// Deno STD libraries
import { parse } from "https://deno.land/std@0.150.0/flags/mod.ts";
// Import RDPController class for HTTP operations
import { RDPController } from "./rdp_https.ts";
// Importing Types
import {
RDP_AuthToken_Type,
RDP_ResSymbology_Table_Type,
} from "./rdp_types.ts";
// Main Application Logic class
class Application {
//RDP Token Auth object
rdpAuthObj: RDP_AuthToken_Type = {
access_token: "",
refresh_token: "",
expires_in: "",
scope: "",
token_type: "",
};
//RDP HTTP Controller class
rdpHTTPApp: RDPController;
...
constructor(
username: string,
password: string,
clientid: string,
itemName: string,
limit: number
) {
this.username = username;
this.password = password;
this.clientid = clientid;
this.itemName = itemName;
this.limit = limit;
this.rdpHTTPApp = new RDPController();
}
//Main run function
run = async () => {
//Get RDP authentication, get and display data from RDP.
try {
//Send authentication request
this.rdpAuthObj = await this.rdpHTTPApp.authenticationRDP(
this.username,
this.password,
this.clientid,
this.rdpAuthObj.refresh_token,
);
// Get RDP Data
....
} catch (error) {
//console.log(error);
this.logger.error(error);
Deno.exit(1);
}
};
...
};
// ---------------- Main Function ---------------------------------------- //
//Parsing command line arguments
const flags = parse(Deno.args, {
string: ["username", "password", "clientid", "chainric"],
boolean: ["debug"],
default: { chainric: ".AV.O", limit: 10, debug: false },
});
...
const app = new Application(
flags.username,
flags.password,
flags.clientid,
flags.chainric,
flags.limit as number,
flags.debug,
);
// Running the application
app.run();
You may be noticed that the code uses Deno:/flags/mod.ts module for parsing command line arguments to get information from users such as the RDP credentials, chain ric, debug flag, etc. You can find more detail about the Deno command line arguments feature from Deno: Command Line Arguments example page.
RDP HTTP Class Code Introduction
Now let me turn to the rdp_https.ts file which is the main RDP HTTP operations class. It manages all request-response messages between the application and the RDP services (Authentication, Pricing, and Symbology).
The overview code structure of the file is shown below.
// rdp_https.ts
// Importing Types
import {
RDP_AuthToken_Type,
RDP_reqAuthRevoke_Type,
RDP_ReqSymbology_Type,
} from "./rdp_types.ts";
// A Class that handles all HTTP operations.
export class RDPController {
...
// Send HTTP Post request to get Access Token (Password Grant and Refresh Grant) from RDP Auth Service
authenticationRDP = async (...) => {
...
};
// Request Chain Data from RDP Pricing Service
getChain = async (symbol: string, access_token: string) => {
...
};
// Request Symbology Lookup Data from RDP Symbology Lookup Service
getSymbology = async (symbols: string[], access_token: string) => {
...
};
...
};
RDP Type Aliases Code Introduction
Type Aliases is one of TypeScript Object Types that helps developers type-checking their variables and data in the implementation time to avoid data type errors in a final JavaScript application.
This example project defines all Type Aliases for the RDP API's JSON request messages (for Auth and Symbology Discover services) and objects used by the application in the rdp_types.ts file.
//rdp_types.ts
// Types for RDP Authentication (success) response message
export type RDP_AuthToken_Type = {
access_token: string;
refresh_token: string;
expires_in: string;
scope: string;
token_type: string;
};
// Type for RDP Auth Revoke Token (v1) request message
export type RDP_reqAuthRevoke_Type = {
token: string;
};
// Type for RDP Symbology Lookup request message
export type RDP_ReqSymbology_Type = {
from: RDP_Symbology_From_Type[];
to: RDP_Symbology_To_Type[];
reference: string[];
type: string;
};
...
That covers the classes and project structure overview.
RDP APIs Application Workflow
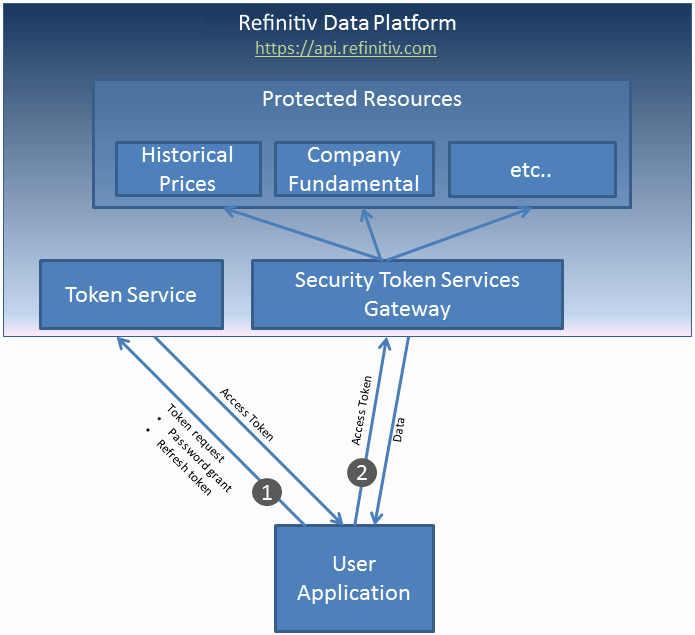
Now, what about the API workflow? Refinitiv Data Platform entitlement check is based on OAuth 2.0 specification. The first step of an application workflow is to get a token from RDP Auth Service, which will allow access to the protected resource, i.e. data REST API.
The API requires the following access credential information:
- Username: The username.
- Password: Password associated with the username.
- Client ID: This is also known as AppKey, and it is generated using an App key Generator. This unique identifier is defined for the user or application and is deemed confidential (not shared between users). The client_id parameter can be passed in the request body or as an “Authorization” request header that is encoded as base64.
Once the authentication success, the function gets the RDP Auth service response message and keeps the following RDP token information in the variables.
- access_token: The token used to invoke REST data API calls as described above. The application must keep this credential for further RDP APIs requests.
- refresh_token: Refresh token to be used for obtaining an updated access token before expiration. The application must keep this credential for access token renewal.
- expires_in: Access token validity time in seconds.
Next, after the application received the Access Token (and authorization token) from RDP Auth Service, all subsequent REST API calls will use this token to get the data.
Please find more detail regarding RDP APIs workflow in the following resources:
- RDP APIs: Introduction to the Request-Response API page.
- RDP APIs: Authorization - All about tokens page.
RDP APIs Authentication
Let’s start with the authentication source code implementation in more detail with Deno. Please note that we are focusing on the rdp_https.ts controller class here.
Initialize Code
Firstly, we import and crate all necessary types, objects, and variables for the API endpoints in the main application files.
// rdp_https.ts
import {
RDP_AuthToken_Type
} from "./rdp_types.ts";
// A Class that handles all HTTP operations.
export class RDPController {
//Set Up HTTP APIs URLs
readonly rdpServer: string = Deno.env.get("RDP_BASE_URL") ||
"https://api.refinitiv.com";
readonly rdpAuthURL: string = Deno.env.get("RDP_AUTH_URL") ||
"/auth/oauth2/v1/token";
constructor() {
}
}
You may be noticed that the code imports Types (and class files) directly from the relative path using ES Modules syntax. Deno supports the absolute path and HTTPS URLs too.
My next point is the environment variable which is used for setting the API endpoints at run time. Deno lets developers access environment variables via the Deno.env object. Please note that access to environment variables is only possible if the Deno process is running with the --allow-env env var permissions flag.
If you run this example code without --allow-env flag, Deno automatics prompt that the code needs environment variables access and asks to confirm if you want to proceed as follows:

You can find more detail about Deno features above from the following resources:
Sending Authentication Request with Fetch API
That brings us to the rdp_https.ts that sends and receives HTTP messages with RDP APIs. We create a function named authenticationRDP in a file to send a login request message to the RDP Auth Token service. The function creates the authentication request message as a form x-www-form-urlencoded format and then sends it to the RDP via native Fetch API as an HTTP POST message.
// rdp_https.ts
import {
RDP_AuthToken_Type
} from "./rdp_types.ts";
// A Class that handles all HTTP operations.
class RDPController {
//Set Up HTTP APIs URLs
readonly rdpServer: string = Deno.env.get("RDP_BASE_URL") ||
"https://api.refinitiv.com";
readonly rdpAuthURL: string = Deno.env.get("RDP_AUTH_URL") ||
"/auth/oauth2/v1/token";
constructor() { }
// Send HTTP Post request to get Access Token (Password Grant and Refresh Grant) from RDP Auth Service
authenticationRDP = async (
username: string,
password: string,
client_id: string,
refresh_token: string
): Promise<RDP_AuthToken_Type> => {
// Set Up RDP Auth Token additional params .
const scope = "trapi";
const takeExclusiveSignOnControl = true;
if (
username.length === 0 || password.length === 0 || client_id.length === 0
) {
throw new Error("Received invalid (None or Empty) arguments");
}
const authenURL = `${this.rdpServer}${this.rdpAuthURL}`;
console.log(`Requesting Authenticaion Token from ${authenURL}`);
let authReqMsg = "";
//Init Authentication Request Message and First Login scenario
authReqMsg = `username=${username}&client_id=${client_id}&password=${password}&scope=${scope}&grant_type=password&takeExclusiveSignOnControl=${takeExclusiveSignOnControl}`;
...
// Send HTTP Request
const response: Response = await fetch(authenURL, {
method: "POST",
headers: {
"Content-Type": "application/x-www-form-urlencoded",
},
body: new URLSearchParams(authReqMsg),
});
if (!response.ok) {
console.log("Authentication Failed");
const statusText: string = await response.text();
throw new Error(`HTTP error!: ${response.status} ${statusText}`);
}
console.log("Authentication Granted");
return await response.json();
};
}
That brings us to other Deno security behaviors, Deno does not let the application access network by default. You need to specifically set the --allow-net permission flag to enable network access. If you run this example code without the --allow-net flag, Deno automatics prompt that the code needs network access and asks to confirm if you want to proceed as follows:

If the authentication is successful, the function returns the authentication information (access token, refresh token, etc.) as a JSON message (with RDP_AuthToken_Type type) to the caller. If the authentication fails, throws the errors as an exception event.

You can find more detail about Deno features above from the following resources:
That’s all I have to say about the authentication part.
Requesting RDP APIs Data
That brings us to requesting the RDP APIs data. All subsequent REST API calls use the Access Token via the Authorization HTTP request message header as shown below to get the data.
- Header:
- Authorization = Bearer <RDP Access Token>
Please notice the space between the Bearer and RDP Access Token values.
The application then creates a request message in a JSON message format or URL query parameter based on the interested service and sends it as an HTTP request message to the Service Endpoint. Developers can get RDP APIs the Service Endpoint, HTTP operations, and parameters from Refinitiv Data Platform's API Playground page - which is an interactive documentation site developers can access once they have a valid Refinitiv Data Platform account.
This project covers the following the RDP APIs Services:
- Pricing Chain /data/pricing/chains/v1 operation.
- Discovery Symbology Service /discovery/symbology/v1/lookup endpoint that navigates between identifiers.
RDP APIs Pricing Chain Service
I will begin with the Chain service. The RDP /data/pricing/chains/ endpoint is an HTTP REST API service that returns all constituents of a Chain symbol.
Sending Chain Request
I will begin by creating a function named getChain() in the HTTP Controller rdp_https.ts file. This function receives a Chain symbol and the access token information to create an HTTP URL with a symbol query parameter as follows
// rdp_https.ts
...
// A Class that handles all HTTP operations.
class RDPController {
//Set Up HTTP APIs URLs
readonly rdpServer: string = Deno.env.get("RDP_BASE_URL") ||
"https://api.refinitiv.com";
readonly rdpChainURL: string = Deno.env.get("RDP_CHAIN_URL") ||
"/data/pricing/chains/v1";
...
// Request Chain Data from RDP Pricing Service
getChain = async (symbol: string, access_token: string) => {
const param = { universe: symbol };
const chainURL = `${this.rdpServer}${this.rdpChainURL}/?${
new URLSearchParams(param).toString()
}`;
console.log(`Requesting Chain Data from ${chainURL}`);
...
};
...
}
Then sends it to the RDP Chain service as an HTTP GET operation.
// rdp_https.ts
...
// A Class that handles all HTTP operations.
class RDPController {
...
// Request Chain Data from RDP Pricing Service
getChain = async (symbol: string, access_token: string) => {
...
// Send HTTP Request
const response: Response = await fetch(chainURL, {
method: "GET",
headers: {
"Content-Type": "application/json",
"Authorization": `Bearer ${access_token}`,
},
});
if (!response.ok) {
const statusText: string = await response.text();
throw new Error(
`Get Chain HTTP error!: ${response.status} ${statusText}`,
);
}
//Parse response to JSON
return await response.json();
};
...
}
If the request is successful, the code sends data back to a caller in a JSON message format. But if the request is failed, it throws an exception with error detail to a caller.
Example Chain response message:
{
"universe": {
"ric": "0#.SETI",
"displayName": "SET INDEX",
"serviceName": "ELEKTRON_DD"
},
"data": {
"constituents": [
"2S.BK",
"3K-BAT.BK",
"7UP.BK",
"A.BK",
"AAV.BK",
...
"ZEN.BK"
]
}
}
That covers the Chain data part.
RDP APIs Symbology Discovery Service
Sending Symbology Request to get PermID
This example converts a symbol from the RIC Code identifier to Permanent Identifiers (PermIDs) using the RDP the Discovery Symbology Service. I will begin by importing the PDP_Symbology_Req_Type Type Aliases for the Symbology JSON request message, and creating a function named getSymbology() in the HTTP Controller rdp_https.ts file.
The steps to create the JSON request message are shown below.
// rdp_https.ts
// Importing Types
import {
RDP_AuthToken_Type,
RDP_reqAuthRevoke_Type,
RDP_ReqSymbology_Type,
} from "./rdp_types.ts";
...
// A Class that handles all HTTP operations.
class RDPController {
...
// Request Symbology Lookup Data from RDP Symbology Lookup Service
getSymbology = async (symbols: string[], access_token: string) => {
...
const symbologyURL = `${this.rdpServer}${this.rdpSymbology}`;
console.log(`Requesting PermID Data from ${symbologyURL}`);
// Create Symbology Request Message
const payload: RDP_ReqSymbology_Type = {
"from": [{
"identifierTypes": [
"RIC",
],
"values": symbols,
}],
"to": [{
"objectTypes": [
"organization",
],
"identifierTypes": [
"PermID",
],
}],
"reference": [
"name",
"status",
"classification",
],
"type": "auto",
};
....
};
...
}
Then sends it to the RDP Chain service as an HTTP POST operation.
// rdp_https.ts
...
// A Class that handles all HTTP operations.
class RDPController {
...
// Request Symbology Lookup Data from RDP Symbology Lookup Service
getSymbology = async (symbols: string[], access_token: string) => {
...
// Send HTTP Request
const response: Response = await fetch(symbologyURL, {
method: "POST",
headers: {
"Content-Type": "application/json",
"Authorization": `Bearer ${access_token}`,
},
body: JSON.stringify(payload),
});
if (!response.ok) {
const statusText: string = await response.text();
throw new Error(
`Get Chain HTTP error!: ${response.status} ${statusText}`,
);
}
console.log("Get Symbology Data success.");
//Parse response to JSON
return await response.json();
};
...
}
That’s all I have to say about PermID data.
Displaying Symbology Data
The next step is displaying PermIDs data in a readable format. The application uses the console.table() function to print data to a console in a tabular format.
Let's start by creating the new Type Aliases for the Symbology table object named RDP_ResSymbology_Table_Type. This object keeps the necessary output data which are RIC, and PermID fields from the response JSON message.
/rdp_types.ts
// Type for RDP Symbology Lookup PermIDs Valid Response message
export type RDP_ResSymbology_Table_Type = {
data: RDP_ResSymbology_PermID_Type[];
};
// sub-Type for RDP Symbology Lookup PermIDs data
type RDP_ResSymbology_PermID_Type = {
RIC: string;
PermID: string;
};
Finally, we create a displayPermID() function in a main.ts file to construct the permIDDataTable object and then passes it to the console.table() function.
// main.ts
// Import RDPController class for HTTP operations
import { RDPController } from "./rdp_https.ts";
// Importing Types
import {
RDP_AuthToken_Type,
RDP_ResSymbology_Table_Type,
} from "./rdp_types.ts";
// Main Application Logic class
class Application {
....
//Main run function
run = async () => {
try {
....
//Send PermIDs data request
const permIDData = await this.rdpHTTPApp.getSymbology(
chainData["data"]["constituents"].slice(0, this.limit),
this.rdpAuthObj.access_token,
);
//Displaying PermIDs data
this.displayPermID(permIDData);
} catch (error) {
console.log(error);
Deno.exit(1);
}
};
// Convert PermIDs JSON data to be a table
displayPermID = (permIDJSON: any) => {
const permIDData = permIDJSON["data"];
const permIDDataTable: RDP_ResSymbology_Table_Type = { data: [] };
let _output: string;
permIDData.forEach((permid: any) => {
if (permid["output"].length !== 0) {
_output = permid["output"][0]["value"];
} else if (permid["errors"]) {
_output = permid["errors"][0];
} else {
_output = "No PermID information";
}
permIDDataTable["data"].push({
RIC: permid["input"][0]["value"],
PermID: _output,
});
});
console.table(permIDDataTable["data"]);
};
}
...
The console.table() result with the permIDDataTable object is as follows:
That covers the Symbology data conversion part.
Using NPM modules with Deno
My next point is using the npm modules with Deno. As I have mentioned earlier, Deno supports the ES Modules system only while Node.js supports both CommonJS and ES Modules. Their internal module systems also work differently. This makes Deno not support the npm package eco-system and its massive libraries as-is. Deno lets developers access some npm packages via the content delivery networks (CDNs) as the remote HTTP modules. The CDNs such as esm.sh, Skypack.dev, and UNPKG provide Deno-friendly npm packages in the ES Module format and support Deno integration. The example usage is as follows:
import React from "https://esm.sh/react";
export default class A extends React.Component {
render() {
return <div></div>;
}
}
Please note that most Node.js and npm packages are still not compatible with Deno even through the CDNs above. Deno team just announced (as of August 2022) that they are working on improving Deno to be more compatible with npm packages.
You can find more detail about Deno and npm packages from the following Deno resources:
- Deno: Using npm/Node.js code document
- Deno: Packages from CDNs document
- Deno: Compatibility with Node and npm announcement
I am demonstrating Deno and npm package integration with the Pino logger library via esm.sh CDN.
Note: Deno version 1.25.0 just has been released with the experimental npm support feature. I did a quick test, and I found this feature needs the project code changed more than I expected. Some packages are still not supported too. In my opinion, this npm integration is still a long way to go.
Integrate Deno with NPM package
Pino is a fast and small logger library for the Node.js application. I am using this library to log debug information such as incoming and outgoing HTTP messages if the user input --debug argument when running the application.
I will begin by importing the Pino library as a remote HTTP module via esm.sh CDN to the *main.ts file. The Application class sets the Pino log level based on the user input debug flag when running the application. If Pino debug level is enabled, the code uses it to print response data from the RDP services.
// main.ts
// NPM library for logging
import pino from "https://esm.sh/pino@8.4.1";
...
// Main Application Logic class
class Application {
logger: any;
constructor(
...
debug: boolean,
) {
...
this.logger = pino({ level: debug ? "debug" : "info" });
this.rdpHTTPApp = new RDPController(this.logger);
}
//Main run function
run = async () => {
try {
//Send authentication request
this.rdpAuthObj = await this.rdpHTTPApp.authenticationRDP(
this.username,
this.password,
this.clientid,
this.rdpAuthObj.refresh_token,
);
this.logger.debug(JSON.stringify(this.rdpAuthObj));
//Send chain data request
const chainData = await this.rdpHTTPApp.getChain(
this.itemName,
this.rdpAuthObj.access_token,
);
this.logger.debug(chainData);
...
}
};
}
On the RDPController class of the rdp_https.ts side, gets a logger object from the main app to print debug data (if enabled).
// rdp_https.ts
// A Class that handles all HTTP operations.
export class RDPController {
//Logger
logger: any;
constructor(logger: any) {
this.logger = logger;
}
// Send HTTP Post request to get Access Token (Password Grant and Refresh Grant) from RDP Auth Service
authenticationRDP = async (
username: string,
password: string,
client_id: string,
refresh_token: string
): Promise<RDP_AuthToken_Type> => {
...
let authReqMsg = "";
//Init Authentication Request Message and First Login scenario
authReqMsg = `username=${username}&client_id=${client_id}&password=${password}&scope=${scope}&grant_type=password&takeExclusiveSignOnControl=${takeExclusiveSignOnControl}`;
this.logger.debug(
`RDPController:authenticationRDP(): Outgoing Request Message = ${authReqMsg}`,
);
...
}
}
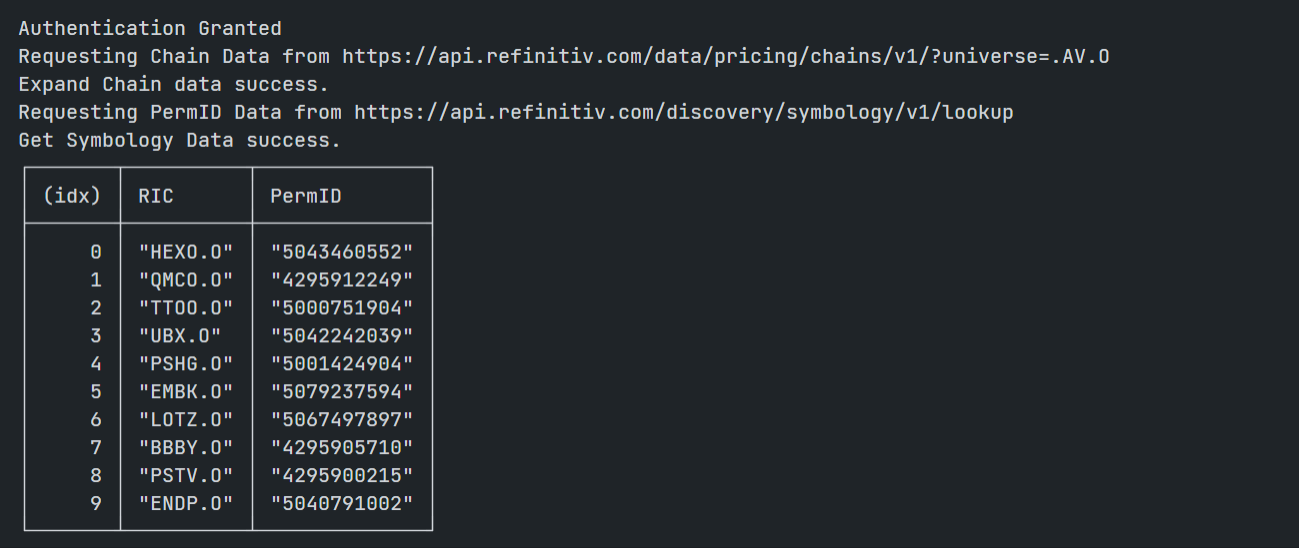
The result of debug log is shown below.
$>deno run --allow-env --allow-net ./src/main.ts --username $RDP_USERNAME --password $RDP_PASSWORD --clientid $RDP_APP_KEY --debug
Requesting Authentication Token from https://api.refinitiv.com/auth/oauth2/v1/token
RDPController:authenticationRDP(): Outgoing Request Message = username=XXX&client_id=XXX&password=XXXX&scope=trapi&grant_type=password&takeExclusiveSignOnControl=true
Authentication Granted
{"access_token":"XXXX","refresh_token":"YYYYYY","expires_in":"600","scope":"ZZZZZ","token_type":"Bearer"}
Requesting Chain Data from https://api.refinitiv.com/data/pricing/chains/v1/?universe=.AV.O
Expand Chain data success.
{
universe: { ric: ".AV.O", displayName: "TOP 25 BY VOLUME", serviceName: "ELEKTRON_DD" },
data: {
constituents: [
"ENDP.O", "BBIG.O", "BBBY.O",
"EAR.O", "CRBP.O", "TTOO.O",
"ATHX.O", "SQQQ.O", "RDHL.O",
"TQQQ.O", "JCSE.O", "HGEN.O",
"FFIE.O", "GOEV.O", "GBOX.O",
"NBEV.O", "PDD.O", "MULN.O",
"NEPT.O", "VS.O", "ITRM.O",
"MEGL.O", "TYDE.O", "QQQ.O",
"GOCO.O"
]
}
}
...
That’s all I have to say about developing HTTP REST API console application with Deno.
How to Run
The first step is to unzip or download the example project folder into a directory of your choice, then set up a devcontainer or Docker environments based on your preference.
Docker Desktop/engine should be running prior to the next step.
Running A Devcontainer with Deno
The main configuration file that tells VS Code how to access (or create) a devcontainer with a well-defined tool and runtime stack is named the devcontainer.json file. The dev container configuration is either located under .devcontainer/devcontainer.json or stored in a file named .devcontainer.json file (note the dot-prefix) in the root of the project.
Note: Make sure to commit a .devcontainer folder to your version control system.
A .devcontainer/devcontainer.json file for Deno development is as follows:
{
"name": "Deno HTTP REST Console",
"image": "denoland/deno:alpine-1.24.3",
"customizations": {
// Configure properties specific to VS Code.
"vscode": {
"settings": {"deno.enable": true},
"extensions": [
"denoland.vscode-deno"
]
}
},
"runArgs": [
"--env-file=.devcontainer/.env.devcontainer"
],
"workspaceMount": "source=${localWorkspaceFolder},target=/workspace,type=bind",
"workspaceFolder": "/workspace",
"shutdownAction":"stopContainer"
}
The configuration file above pulls "denoland/deno:alpine-1.24.3" Docker image from DockerHub https://hub.docker.com/r/denoland/deno URL, installs the Deno extension for Visual Studio Code to a container and enables the extension in VS Code.
Please be noticed that it is configured the --env-file option to set the container's environment variables via a file named .env.devcontainer.
Caution: You should not share this .env.devcontainer file to your peers or commit/push it to the version control. You should add the file to the .gitignore file to avoid adding it to version control or public repository accidentally.
Please find more details about all devcontainer.json configuration parameters on the VS Code - devcontainer.json reference page.
Running as VS Code DevContainer
Firstly to the project's .devcontainer folder and create a file name .env.devcontainer with the following content.
RDP_USERNAME=<RDP UserName>
RDP_PASSWORD=<RDP Password>
RDP_APP_KEY=<RDP Client_ID/App Key>
RDP_BASE_URL=https://api.refinitiv.com
RDP_AUTH_URL=/auth/oauth2/v1/token
RDP_AUTH_REVOKE_URL=/auth/oauth2/v1/revoke
RDP_SYMBOLOGY_URL=/discovery/symbology/v1/lookup
RDP_CHAIN_URL=/data/pricing/chains/v1
Next, start a Docker desktop or Docker engine on your machine. Please do not forget to install the VS Code - Remote Development extension pack in your VS Code too.
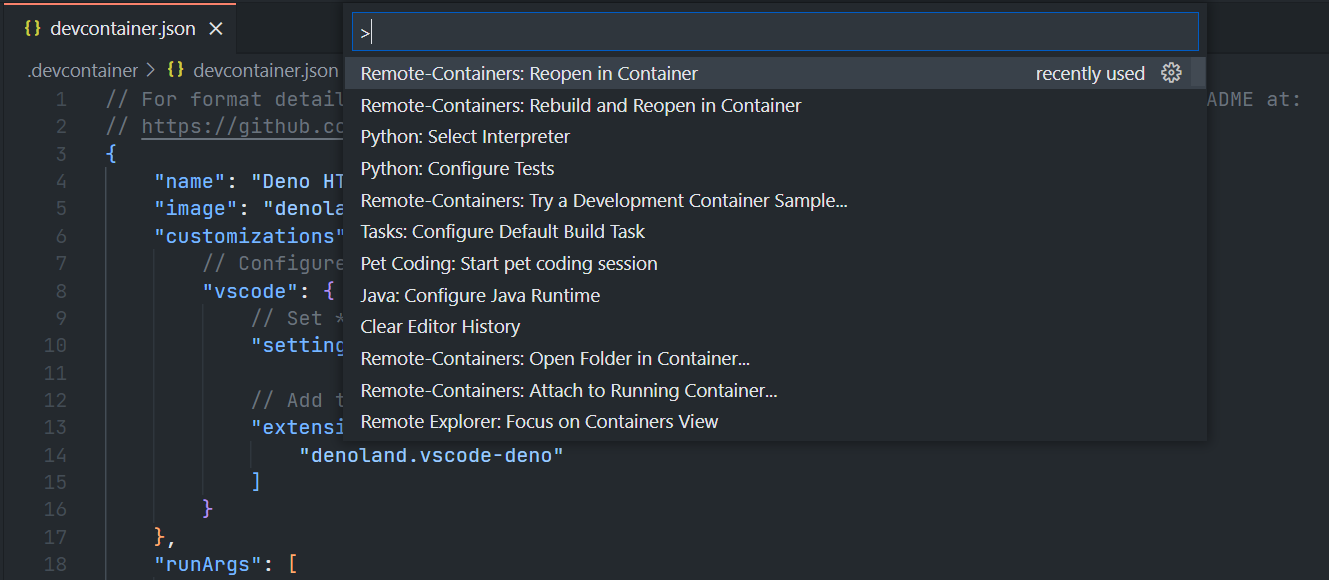
Once the extension installation is successful, open the VS Code Command Palette with the F1 key, and then select the Remote-Containers: Reopen in Container command.
Once this build completes, VS Code automatically connects to the container, and automatics initializes the project for developers.
Now VS Code is ready for the Deno HTTP REST API console example inside this devcontainer. Developers can build and run the example with the following command in the VS Code terminal.
$> deno run --allow-env --allow-net ./src/main.ts --username $RDP_USERNAME --password $RDP_PASSWORD --clientid $RDP_APP_KEY --chainric <Chain RIC> --limit <numbers of RICs to get PermID>

Alternatively, you can edit the running arguments in a vscode/launch.json file, then press F5 key to run the main example.
Conclusion
Deno is a new JavaScript and TypeScript V8 runtime that aims to be a productive and secure development environment. Compared with Node.js, Deno has a simpler and complete toolset out of the box and provides modern Web API for developers such as Promise, Fetch, etc. Deno also offers a restrictive file system, OS, and network access by default to be a secure sandbox development. It has an interesting history and is actively updated for better performance/compatibility.
However, the libraries and development frameworks for Deno are much less than a large ecosystem of Node.js npm packages. Node developers have more choices to choose the packages that match their development requirements. If you are JavaScript/TypeScript developers who are interesting to use Deno, you may need to compare Deno and Node.js in more detail to choose the runtime that is suitable for you.
There is also the new Bun JavaScript/TypeScript runtime that aims for super fast performance with npm package support, but the project is still in the early phase.
The Refinitiv Data Platform (RDP) APIs provide various Refinitiv data and content for developers via an easy-to-use Web-based API. The APIs are easy to integrate into any application and platform that supports the HTTP protocol and JSON message format. The APIs provide a rich API document and swagger for developers via Refinitiv Data Platform APIs Playground page.
Reference
That brings me to the end of my Deno project. For further details, please check out the following resources:
- Refinitiv Data Platform APIs page on the Refinitiv Developer Community website.
- Refinitiv Data Platform APIs Playground page.
- Refinitiv Data Platform APIs: Introduction to the Request-Response API.
- Refinitiv Data Platform APIs: Authorization - All about tokens.
- Limitations and Guidelines for the RDP Authentication Service article.
- Getting Started with Refinitiv Data Platform article.
- Deno official website.
- Deno by example webpage.
- Deno official document page.
- Deno: Permissions document page.
- Deno DockerHub page.
- Running Deno in Docker blog post.
- Deno World blog series.
- Ryan Dahl's 10 Things I Regret About Node.js talk.
For any questions related to Refinitiv Data Platform APIs, please use the RDP APIs Forum on the Developers Community Q&A page.
GitHub
Refinitiv-API-Samples/Article.RDP.TypeScript.Deno.HTTPRestAPI