LSEG Tick History - REST API
| Last update | Dec 2023 |
| Environment | Windows |
| Language | C# |
| Compilers | Microsoft Visual Studio |
| Prerequisites | LSEG DataScope Select login, internet access, Microsoft .Net Framework 4.5+ |
| Source code | Download C# Example Application |
Table of contents
- Quick start purpose
- Additional details on the prerequisites
- The REST API C# example application
- REST API C# example application: installation
- REST API C# example application: configuration
- Running the REST API C# example application
- Entering your DSS credentials
- REST API C# example application: capabilities
- REST API C# example application: usage
- Storing your DSS credentials
- To learn more
Quick start purpose
Relation between the LSEG Tick History REST API and LSEG DataScope Select
Before explaining the purpose of this Quick Start, one important concept must be made clear.
The LSEG Tick History - REST API connects to the same server as the LSEG DataScope Select (DSS) REST API; the server is called the hosted LSEG DataScope Selectserver. Both APIs share some API libraries and mechanisms. This has several consequences:
- Both APIs share a common example application that demonstrates API calls for both APIs; this example application is called the REST API C# example application. It is the main topic of this Quick Start.
- You will find in some cases references to DSS instead of LSEG Tick History (notably in the name of this example application, in the code and the names of libraries). Do not get mislead by this, the API we discuss here is the LSEG Tick History REST API.
- LSEG Tick History customers will be provided a new DSS user ID for the REST API.
Quick start purpose
The purpose of this Quick Start is to get the DSS REST API C# example application to run, and understand how to use it.
This application demonstrates the LSEG Tick History (and DSS) API at a high level, without requiring any coding; it is thus ideal to help you discover the API, hence its use here.
At the same time, it is a very complete learning tool, which complements the tutorials with more code samples and easy views on the requests and responses exchanged between the application and the DSS hosted server.
This application is therefore very useful to all programmers; it is not limited to those who decide to use the .Net SDK and program in C#.
We therefore recommend coming back to it after following the tutorials, once you start coding.
Additional details on the prerequisites
A DSS user account (user name and password) is required for use with the REST API, because this application uses it to authenticate to the LSEG DataScope Select server. This account is the same for the API and the GUI.
An internet connection is required to download the software, and run it, as it connects to the LSEG DataScope Select server.
Microsoft .Net Framework 4.5+ should be pre-installed.
We recommend running the application from Microsoft Visual Studio, but in case of need the application can also be run without Microsoft Visual Studio (instructions below cater for both use cases).
The REST API C# example application
As stated above, the LSEG Tick History REST API shares with the DSS REST API a common example application that demonstrates API calls for both APIs; this example application is called the REST API C# example application.
This application is very useful and powerful:
- It demonstrates the functions of the LSEG Tick History (and DSS) REST API, through use cases illustrated with real functional code.
- It displays the HTTP requests and related responses, so you can see the data formats that are returned, and get a feel of response times.
- It contains code snippets you can copy to use in your own code, to deliver faster results.
We recommend using this C# example application, it will jumpstart your learning and coding.
REST API C# example application: installation
As stated above, the LSEG Tick History REST API shares with the DSS REST API a common example application that demonstrates API calls for both APIs; this example application is called the REST API C# example application.
Let us get the REST API C# example application to run.
We shall start from scratch, by creating a work folder, with a subfolder for software downloads, and another one for this quick start:

You can name all these folders as you like.
Download the C# Example Application, save it in your Downloads folder:

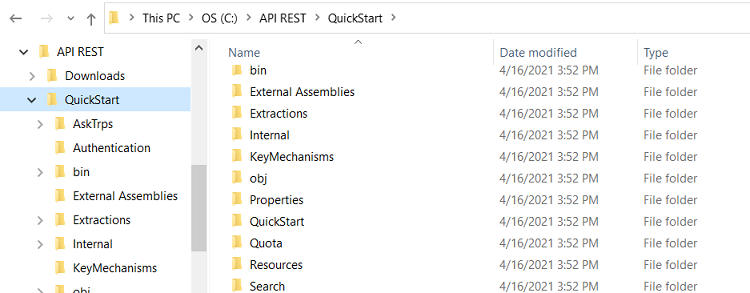
Copy the contents of the zip file into the folder you created for the quick start:
REST API C# example application: configuration
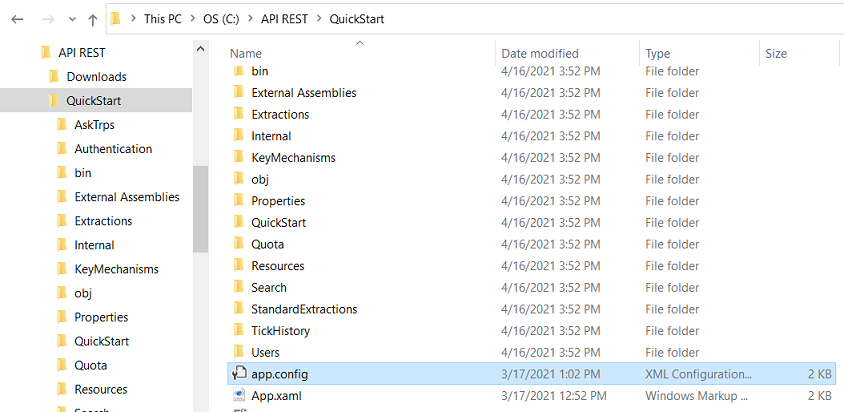
Check the server URI, in the configuration file. The configuration file is not the same one if you are running from Microsoft Visual Studio or directly running the executable program.
The ServiceUri should be https://selectapi.datascope.refinitiv.com/RestApi/v1/.
<setting name="ServiceUri" serializeAs="String">
<value>https://selectapi.datascope.refinitiv.com/RestApi/v1/</value>
</setting>
If you have Microsoft Visual Studio
Edit file QuickStart\app.config:
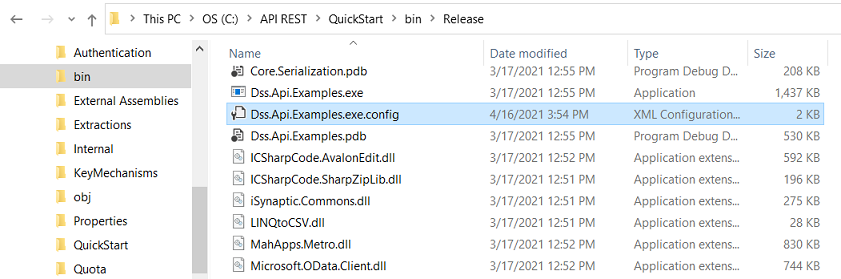
If you don't have Microsoft Visual Studio
Edit file QuickStart\bin\Release\Dss.Api.Examples.exe.config:
Running the REST API C# example application
If you have Microsoft Visual Studio
Double click on QuickStart\Dss.Api.Examples.sln to open the project in Microsoft Visual Studio.
The first time you start the project, NuGet packages are restored, and the project is built.
If you don't have Microsoft Visual Studio
Double click on QuickStart\bin\Release\Dss.Api.Examples.exe to manually run the executable program.
Entering your DSS credentials
The example code prompts for your DSS credentials:
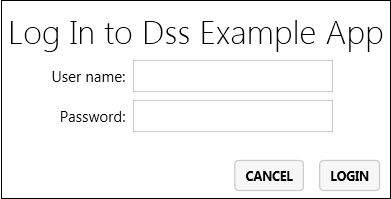
Enter your DSS user name, your password, and then click on the "Login" button.
After that the example application appears:
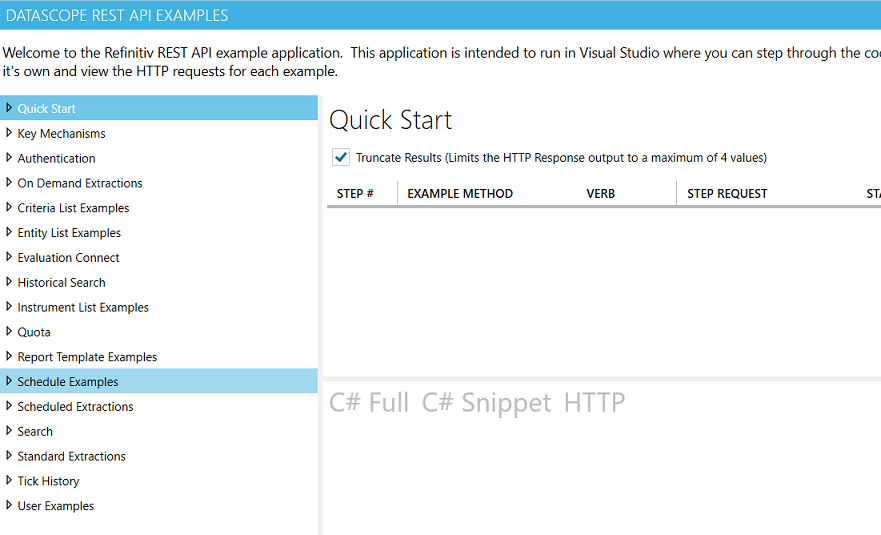
REST API C# example application: capabilities
This example code is very powerful. It gives you a window on all the functionality of the LSEG Tick History (and DSS) REST API.
On the left there is a menu containing several sections, of which the following are of importance for LSEG Tick History:
- User authentication
- Standard extractions
- Tick History
Each of these sections contains one or several examples, covering many use cases:
Authentication
When connecting to the LSEG DataScope Select servers, all applications must submit a user name and password. You entered those when starting this example application. Once authenticated, a session token is associated to the context.
Standard Extractions
These are the calls to:
- List Subscriptions – they should include LSEG Tick History Venue by Day (VBD) data.
- List Packages – for VBD, these are the venues, i.e. exchanges.
- List Package Deliveries – for VBD, these are the actual data files. There are several files per day, each containing different data. Files are kept on the server for 30 days, after which they are no longer available.
Additional calls allow handling of very large lists of packages (paging), and change tracking.
Package Deliveries (VBD data files) can be retrieved using API calls, which will save the files to local hard disk. There is no need to FTP result files. This is demonstrated in the tutorials.
Tick History
These are calls for bespoke extractions:
- Managing lists of instruments and entities.
- Managing report templates.
- Managing schedules to launch data extractions.
- On Demand data extractions
Data can be retrieved directly using API calls, there is no need to FTP result files.
REST API C# example application: usage
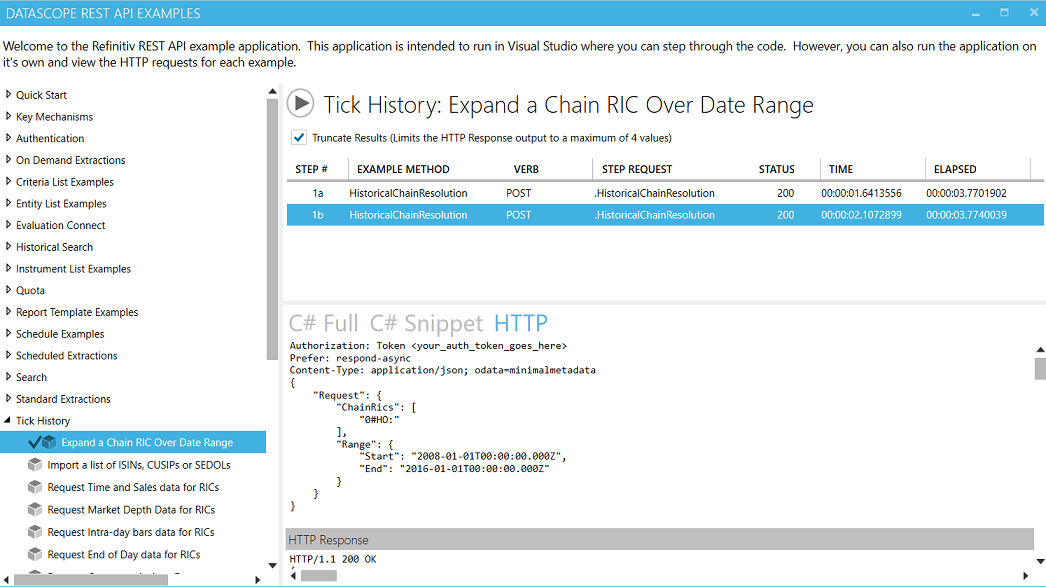
Let us run one of these examples. For instance, in the left menu area, let us click on Tick History to open it up, and then click on Get Expand a Chain RIC Over Date Range:
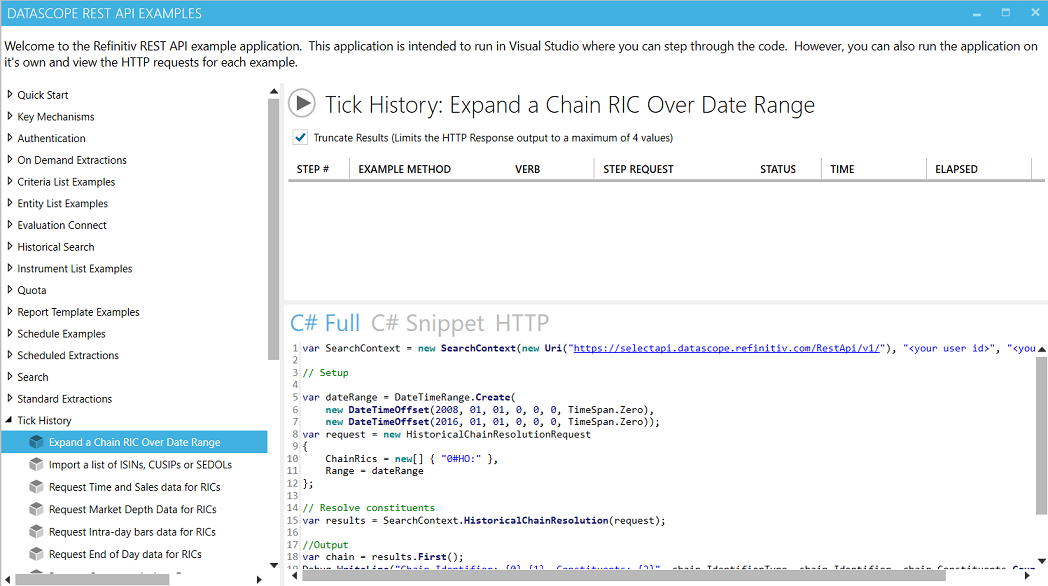
To run the sample, click on the play button:

The full code, with explanatory comments, is displayed in the lower right window. Everything you need is right there; all you need to do is copy/paste code samples into your own projects, as required. We will not attempt to understand the code now; coding details are covered in the comments in the code, and in the tutorials.
The execution time depends on the actions, the amount of data retrieved, and the server load.
Each step of the code appears in the top window, with:
- The elapsed time since run start.
- The method.
- The step number.
- The request.
- Its status.
- If it is a GET or a POST.
- The execution time of the individual step.
Once the sample has run (depending on the sample, run time can be anything from a few seconds to a minute or more), we can select a step in the top window, by clicking on it:
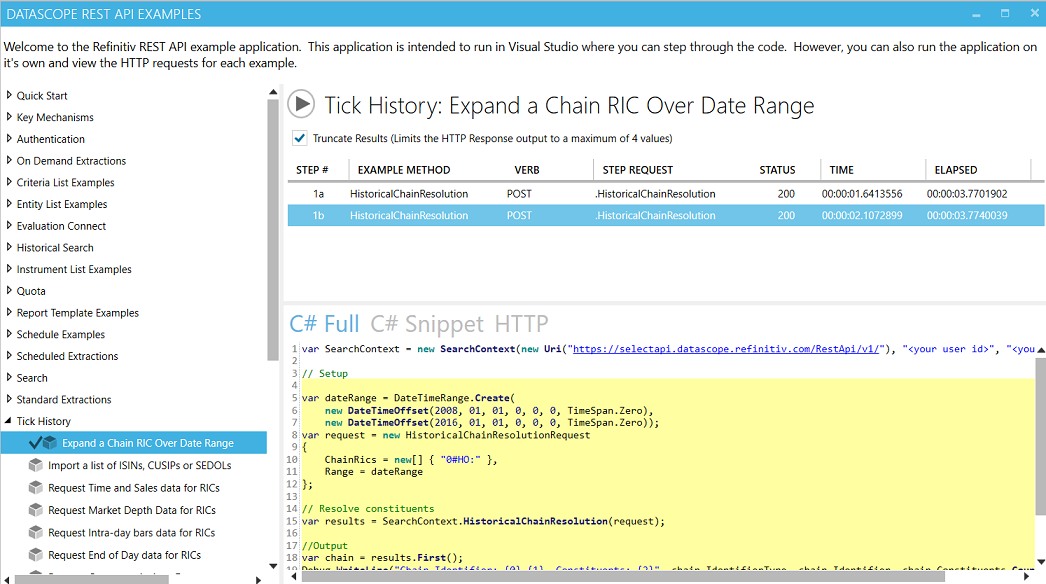
If there are several steps, the related code snippet is highlighted in the C# full tab, which contains the complete code.
Clicking on the C# Snippet tab limits the display to the code related to the selected step, extracted from the full code:
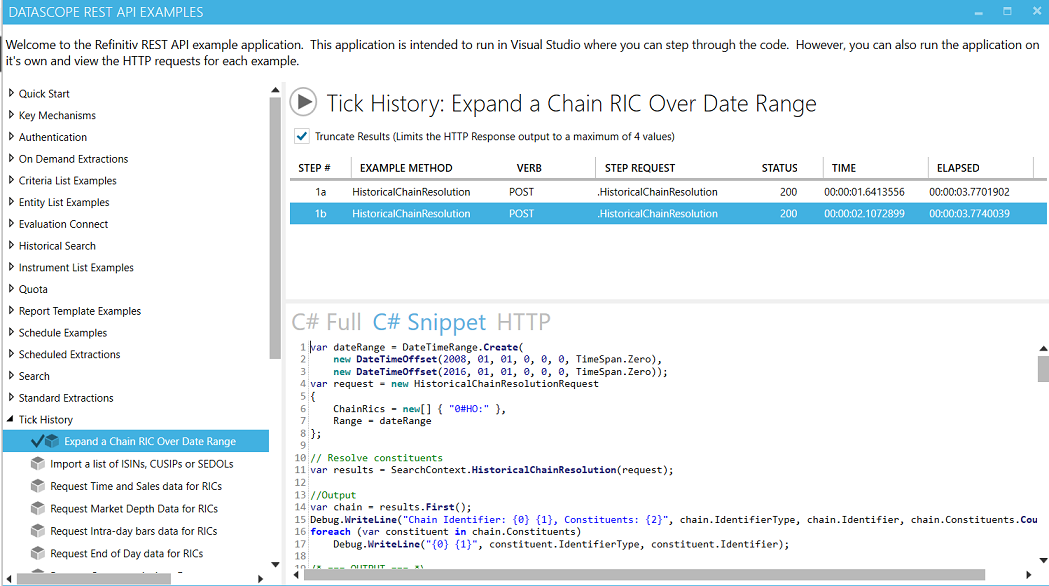
Clicking on the HTTP tab displays the underlying REST request and response:
Scrolling down we can see more of the HTTP Response:
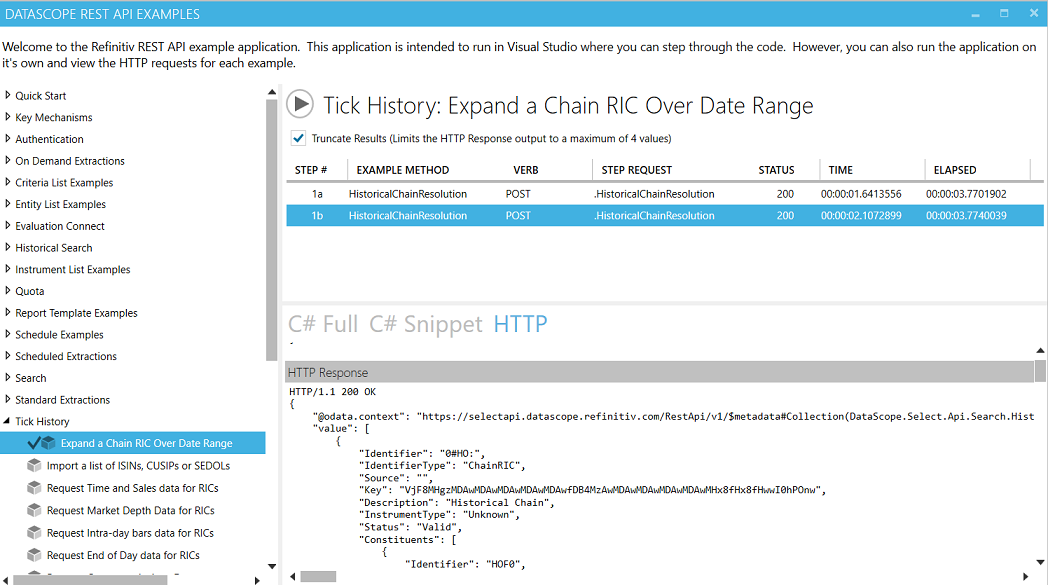
Note that by default the results set is truncated to 4 items, but that can be disabled by un-checking that option beneath the run button. Now try out other LSEG Tick History calls, and d proceed with other calls and the tutorials:
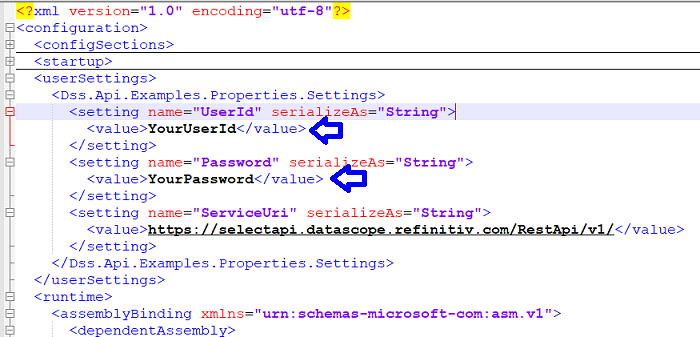
Storing your DSS credentials
If you run the example program often, you might want to store your DSS credentials to avoid entering them manually. This can be done in the configuration file. The example code is built to detect if the credentials were set in the configuration file and, if not set, to prompt for them at run time.
Note: the configuration file is not the same one if you are running from Microsoft Visual Studio or directly running the executable program.
If you have Microsoft Visual Studio
Edit file QuickStart\app.config:
If you don't have Microsoft Visual Studio
Edit file QuickStart\bin\Release\Dss.Api.Examples.exe.config:
Enter your DSS credentials in that file
Replace “YourUserId” and “YourPassword” with your DSS account user id and password, in the locations highlighted in the screenshot below:
To learn more
To gain further knowledge, follow the tutorials, which explain coding with the LSEG Tick History REST API in detail, and deliver further tips, tricks, and code snippets.
We also recommend you spend some time playing around with this example program.
It is a great tool to easily learn the LSEG Tick History REST API, and build your own applications by reusing code snippets. The knowledge of what results will be delivered, and their format, will help you further manipulate the data as required.