World-Check Customer Risk Screener
You will require:
- A World-Check One username and password for the person acting as the World-Check One administrator. This will be used to setup World Check settings.
- The World-Check One API Key and Secret. This is usually tied to the login of the World-Check One administrator but can be changed to a generic user upon request.
- The link to the World-Check Customer Risk Screener managed package to install in your sandbox / production environments.
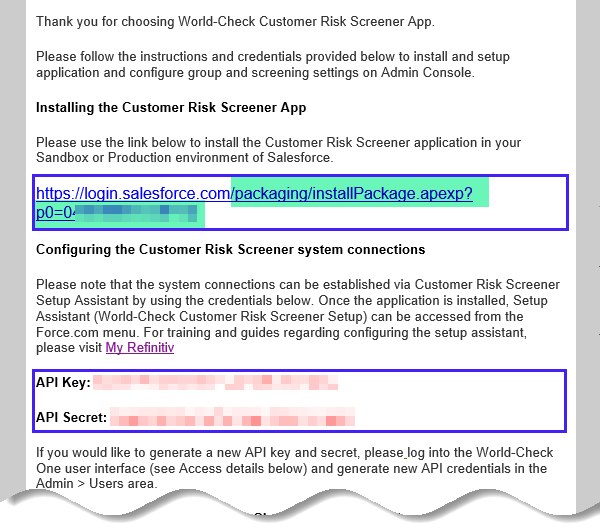
A welcome email is shared with the World-Check One administrator that contains the above information.
Org Strategy
New Customers will receive one production instance of World-Check One that they can connect to sandboxes and their production instance of Salesforce. We recommend deactivating the package in sandboxes once you go live into production and deleting any test data from sandboxes so that it doesn't count against your production limits.
Existing Customers of World-Check One Desktop can opt to receive a Pilot site instance of World-Check One which can be used to test connectivity and automations without risk of impacting their existing production data or limits. Please note the Pilot instance is limited to 500 Initial Screens and 500 Ongoing Screens.
World-Check One can support customers running multiple production Salesforces orgs. We recommend connecting all Production Salesforce Orgs to the same World-Check One instance as data can be segmented and access controlled within World-Check One using Groups and/or User IDs.
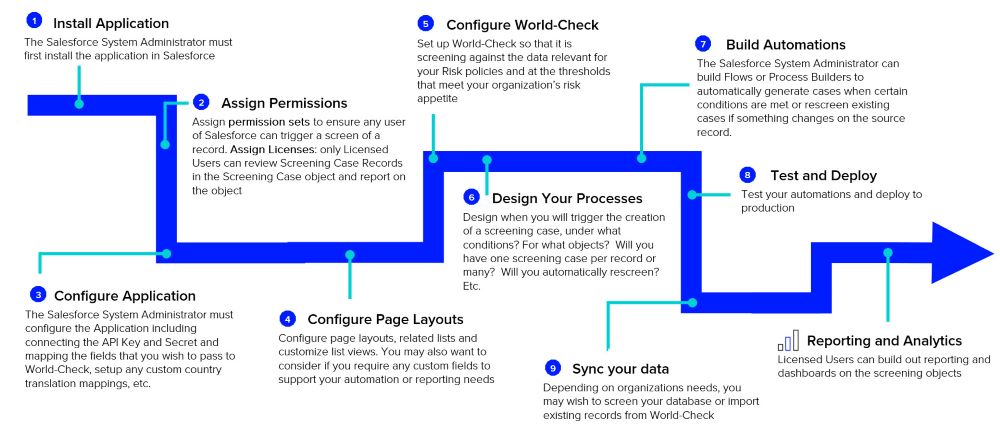
Process summary
- This quick start covers installing the application and testing basic connectivity
- The second quick start covers configuring World-Check One settings
- The third quick start is a quick reference card on how, and what can be automated from within Salesforce
- To get detailed examples of how to design and build automations please refer to the documentation and tutorials sections
Install the application
You will require:
- The link to the World-Check Customer Risk Screener managed package to install in your sandbox / production environments.
- The World-Check One API Key and Secret. This is usually tied to the login of the World-Check One administrator but can be changed to a generic user upon request.
A welcome email is shared with the World-Check One administrator that contains the above information.
To install in sandbox:
- Login into the sandbox you want to install World-Check Customer Risk Screener in
- Copy the second part of the package URL received in the welcome email (in highlighted above in green) and paste it into your Salesforce URL after force.com/
- Select Install for Admins Only and click Install
- Check Yes to approve third-party access and click Continue
- When the installation is complete, click Done. You will receive an automatic email confirming that the package was successfully installed
To install in production:
- Click on the full package URL contained in the welcome email
- when prompted login to your production org
- Select Install for Admins Only and click Install
- Check Yes to approve third-party access and click Continue
- When the installation is complete, click Done. You will receive an automatic email confirming that the package was successfully installed
Configure application
Establish a connection to World-Check One
The purpose of this section is to establish the connection between Salesforce and World-Check One and to specify the field mapping for screening for the standard objects of Contact, Lead and Account. Note custom mappings for standard object and custom objects are covered in a later part of this guide.
- Navigate to the app menu and select World-Check Customer Risk Screener Setup
- Click the Setup Assistant tab
- Click Get Started
- Input the API Key and Secret Key in System Connections and click Save & Continue
- Click Finish
Specify Field Mapping
Once a connection has been established to World-Check One you will be able to specify the appropriate World-Check One group, entity type and field mapping for each object. If you do not wish to screen a particular object then you can leave the mapping for that field blank. Click continue to step through the wizard and Finish to exit and save. Once you have completed setup the screen "You've completed Automation setup!" will display
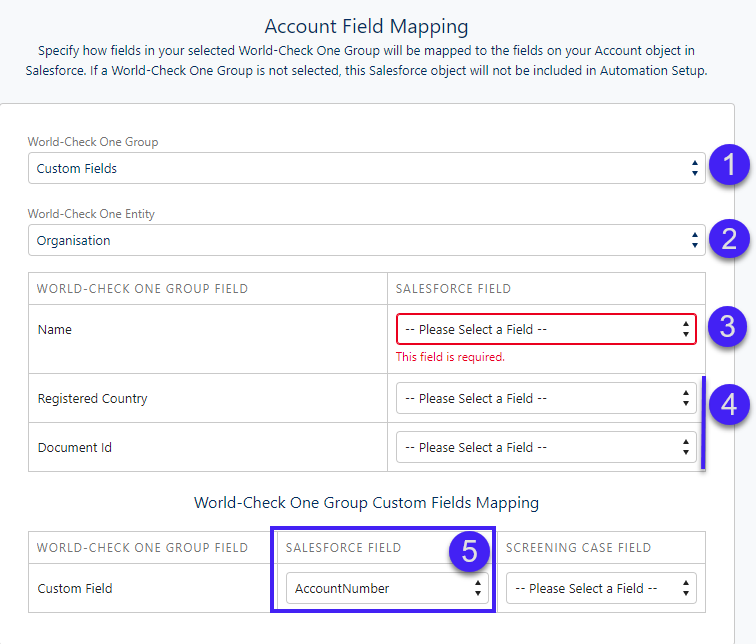
1. Select the Group you wish to send cases to for screening
2. Specify the universe of Entity Types you wish to screen the object against e.g. Organisations, Individuals, Vessels or if not known Unspecified
3. Name is mandatory for screening and must be mapped if an object is to be screened successfully
4. Secondary Identifiers are optional for screening but when mapped can help reduce the number of false positive matches returned. Secondary Identifiers displayed are specific to the entity type selected
| Entity Type: | Individual | Organisation | Vessel | Unspecified |
| Screened Name: | Name | Name | Name | Name |
| Secondary Identifiers | Gender Date of Birth Country Location Place of Birth Nationality Document ID |
Registered Country Document ID |
IMO Number | Document ID |
5. Custom Fields can be configured for each group within World-Check One desktop, it allows you to pass additional information from Salesforce to World-Check e.g. the ID of the record or business unit etc. Click here for more information on configuring custom fields.
Assign Permissions
Licenses
Access to World-Check data held in the custom objects included in the package is controlled by licenses. A license should be assigned to any user who is required to work within the application (including Salesforce System Administrators during the setup process). Note licensing is not typically enabled for sandboxes but can be on request. Licensing will be automatically applied to your production environment.
To assign licenses to the users in Salesforce:
- Go to Setup / Installed Packages:
- Click on ‘Manage Licenses’
- Click on ‘Add Users’
- Select appropriate users and click on ‘Add’

Permission Sets
Two permission sets are available within the CRS App:
| Permission Set | Description |
| World-Check User | Grants the ability to generate a screening case either manually or via Flows. It should be assigned to:
We recommend that you review your new user onboarding processes to include adding this permission set |
| World-Check Setup User | Provides access to the Setup Assistant which configures the connection between Salesforce (CRS App) and World-Check system. This should only be granted to users if the setup is going to be configured or reviewed by non-System Admins. |
Configure page layouts
The following components are available to add to your page layouts to aid navigation between Screening Cases and the record of source e.g. Account record. We recommend adding these to the Account, Contact and Lead page layouts associated to the relevant profiles in your Salesforce.
Type |
Component Name |
Function/Comments |
Button |
New Screening |
Allows Licensed users to manually create a Screening Case directly from the Account, Contact or Lead record in Classic View |
Lightning Action |
New Screening |
Allows Licensed users to manually create a Screening Case directly from the Account, Contact or Lead record in Lightning View |
Related List |
Screening Cases |
Lists Screening Cases associated to the record* |
Related List |
Screening Case Audit Events |
Lists Screening Case Audit Events associated to the record* |
Related List |
Automated Screening Errors |
Logs errors where a Screening Case has failed to generate. Common reasons for errors is where data has been passed to World-Check in an unexpected format e.g. Date of Birth is in the future* |
Button |
Get Group Info |
Where an organisation has multiple active Groups in World Check this button allows System Administrators to retrieve the World-Check IDs of the Groups which can then be used in Flows for routing records to specific Groups for screening. This button should not be promoted to production and should be removed from the layout once the Group IDs have been sourced. For more information about the function of Groups see World-Check One: Client and Group Administrator Quick Start Guide |
*Configuring Related Lists
When adding the Related Lists, it is important to remove the Salesforce defaulted “New” button as this will not work. To do this:
- Click the tool icon to edit the Related List Properties
- The Related Lists Properties page is displayed
- If needed, add additional fields you want to have displayed on the related list
- Choose a selected field to Sort By or keep as Default
- Expand the Buttons section
- Uncheck New and Click OK
- Click Save to exit the related list properties
- Save the page layout
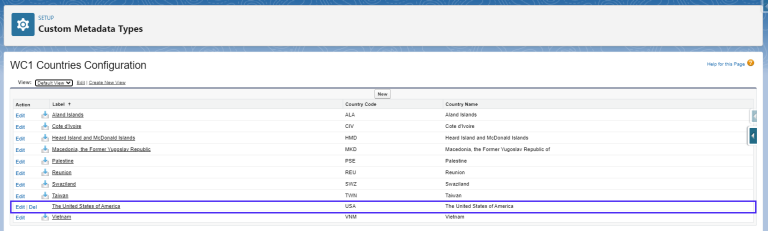
Configure Country Exceptions
World-Check Customer Risk Screener supports standard ISO 3166-1 Names, Alpha-3 codes and Alpha-2 Codes for countries. To be able to use country as a secondary identifier for screening, country data needs to be passed in ISO standard or a translation for mismatches needs to be applied in the Custom Medatdata Type "WC1 Countries Configuration".
This is an important step and is the most common reason for failures between Salesforce and World-check
Customers on version 6.0 and above can configure this:
- Compare your country data to the list in the file Country Names and ISO Codes and identify any differences
- Navigate to Salesforce Setup > Custom Code > Custom Metadata Types > “WC1 Countries Configuration” > select “Manage Records” > select “New”
- For each excpetion enter:
- Label
- Country Name: this will be the name of the country per your Salesforce instance
- Country Code: In ISO3 format.
- Save the record
Note CRS versions 6.2 and above automatically include the common exceptions for customers using the standard out of the box Salesforce native Country/Territory picklists. We recommend customers on earlier versions of Customer Risk Screener 5.0 and below upgrade to take advantage of this along with other features.
Perform a manual screen
You have completed basic setup! Perform a manual screen to check a screening case is created and results returned. To do this:
- Navigate to record where you have 1) enabled mapping 2) pulled the button or lightning quick action "New Screening" on to the page layout e.g. an Account record.
- Click the button "New Screening"
- A splash page appears where you can verify the field mapping you have specified and enter any additional secondary identifiers
- Click Continue.
- A record detail page will display
You do not have to leave the button or quick action on the page layout if this will not form part of your process.