
Last Updated: 21 Oct 2021
What is Tick History?
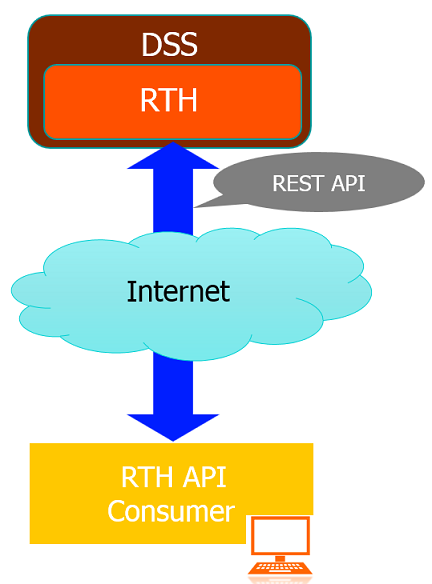
LSEG Tick History is an Internet-hosted product on DataScope Select platform or DSS. LSEG Tick History is a historical market data service, offering global data dating back to January 1996, for example, intraday summaries, end of days prices, time and sales, market depth and raw data. LSEG Tick History provides REST API to access all data. In this article, I will demonstrate how to retrieve intraday summaries using an on demand request.
Prerequisites
- Python 3.6 or higher
- Jupyter Notebook
- DSS username and password which is permissioned for LSEG Tick History content. To obtain DSS account, please contact LSEG account team for process and details.
Implementation
The steps and Python source code to request LSEG Tick History content on demand are listed below:
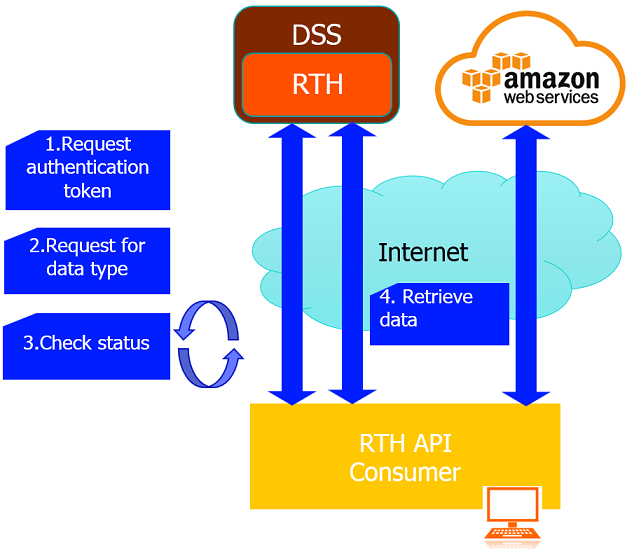
Step 1. Request authentication token with DSS username and password.
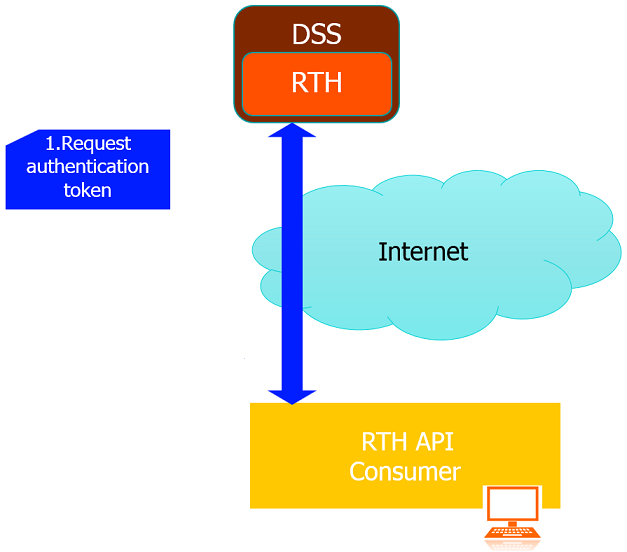
- Send HTTP post with DSS username and password
import getpass as gp
import requests
import json
username=input('Enter DSS username:')
password=gp.getpass('Enter DSS Password:')
requestUrl = "https://selectapi.datascope.refinitiv.com/RestApi/v1/Authentication/RequestToken"
requestHeaders={
"Prefer":"respond-async",
"Content-Type":"application/json"
}
requestBody={
"Credentials": {
"Username": username,
"Password": password
}
}
authenticationResp = requests.post(requestUrl, json=requestBody,headers=requestHeaders)
print("Received the response for authentication request")

- Check if the status code of the response is 200. If yes, the request has succeeded so the application extracts and prints the authentication token. Otherwise, it prints the error.
if authenticationResp.status_code == 200 :
print("Received status code 200, get the authentication token from the response")
jsonResponse = json.loads(authenticationResp.text.encode('ascii', 'ignore'))
token = jsonResponse["value"]
print ('Authentication token (valid 24 hours):')
print (token)
else:
print("Error with status code:",authenticationResp.status_code,"\n Text:",json.dumps(json.loads(authenticationResp.text),indent=4))

Step 2. Request for data type using the received authentication token
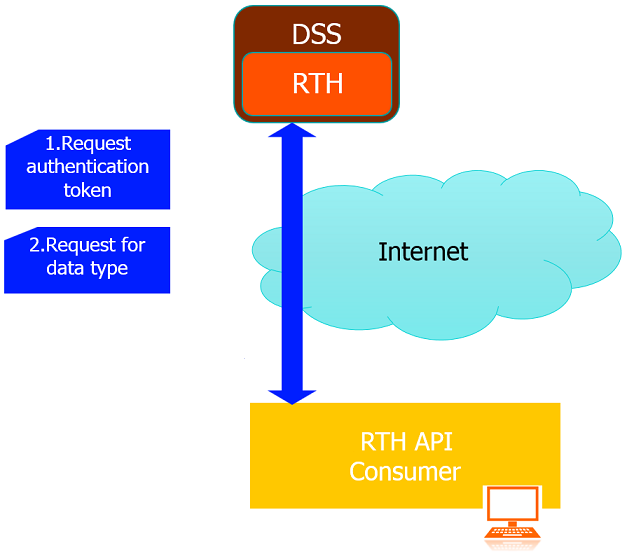
- Send HTTP post with on demand extraction request to request for data type.
The applications requests for intraday summaries. For more details of the others tick history data types (reports) and their fields, please see in Data Dictionary - Custom Reporting
You can see all parameters of each data type in REST API Reference Tree at https:/selectapi.datascope.refinitiv.com/RestApi.Help/Home/RestApiProgrammingSdk. You need to login with DSS username and password to access this page.
requestUrl='https://selectapi.datascope.refinitiv.com/RestApi/v1/Extractions/ExtractRaw'
requestHeaders={
"Prefer":"respond-async",
"Content-Type":"application/json",
"Authorization": "token " + token
}
requestBody={
"ExtractionRequest": {
"@odata.type": "#DataScope.Select.Api.Extractions.ExtractionRequests.TickHistoryIntradaySummariesExtractionRequest",
"ContentFieldNames": ["Open","High","Low","Last","Volume"],
"IdentifierList": {
"@odata.type": "#DataScope.Select.Api.Extractions.ExtractionRequests.InstrumentIdentifierList",
"InstrumentIdentifiers": [
{"Identifier": "ADVANC.BK", "IdentifierType": "Ric"},
{"Identifier": "PTT.BK", "IdentifierType": "Ric"}
],
"UseUserPreferencesForValidationOptions":"false"
},
"Condition": {
"MessageTimeStampIn": "GmtUtc",
"ReportDateRangeType": "Range",
"QueryStartDate": "2019-09-03T09:30:00.000Z",
"QueryEndDate": "2019-09-03T17:00:00.000Z",
"SummaryInterval": "FifteenMinutes",
"DisplaySourceRIC":"true"
}
}
}
extractionResp = requests.post(requestUrl, json=requestBody,headers=requestHeaders)
print("Received the response for on demand extraction request")

Step 3. Check the request status untill the request has been processed completely.
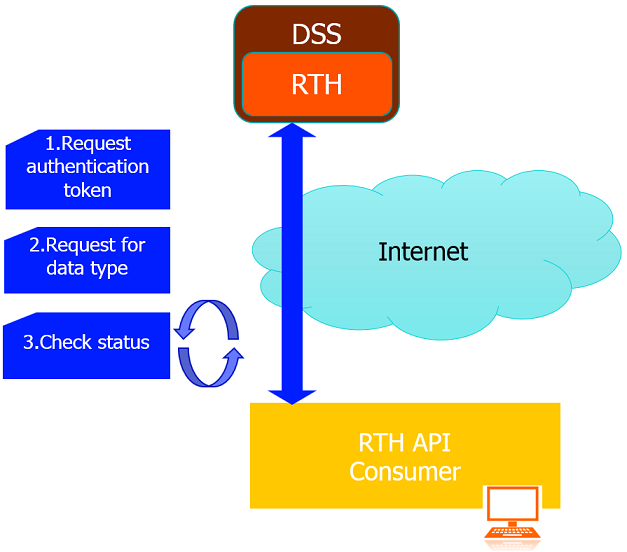
- If the HTTP status code of response is 202 this means the extraction request was accepted, but processing has not completed yet. Hence, the application gets the received location url from 202 response header received in the previous step.
requestStatus = extractionResp.status_code
print("Received status code " + str(requestStatus))
requestUrl=None
if requestStatus == 202 :
requestUrl = extractionResp.headers["location"]
print ('Extraction is not complete, poll the location URL:')
print (str(requestUrl))

- While the status of the extraction request is 202, poll the request status every 30 seconds using the location url got from the previous step.
import time
while (requestStatus == 202):
print ('Received status code 202, waits 30 seconds, then poll again until the status is not 202')
time.sleep(30)
extractionResp = requests.get(requestUrl,headers=requestHeaders)
requestStatus= extractionResp.status_code
print ('Received status code which is not 202')

- When the request is completed (The HTTP status code is not 202), check the status code. If it is 200 or OK, the application gets and prints the results which are jobId and the extraction notes. The jobId is used to retrieve the data while the extraction can be used to analyze data or troubleshooting problems. Apart from the HTTP status code 200, it is an error and the application prints it.
if requestStatus == 200 :
print("Received status code 200, get the JobId and Extraction notes")
extractionRespJson = json.loads(extractionResp.text.encode('ascii', 'ignore'))
jobId = extractionRespJson["JobId"]
print ('\njobId: ' + jobId + '\n')
notes = extractionRespJson["Notes"]
print ('Extraction notes:\n' + notes[0])
else:
print("Error with status code:",extractionResp.status_code,"\n Text:",json.dumps(json.loads(extractionResp.text),indent=4))

Step 4. Retrieve data from LSEG Tick History or AWS
- Send HTTP get with a JobID got from the 200 OK response to retrieve data from Tick History or AWS
LSEG Tick History provides downloading some extraction data directly from Amazon Web Services (AWS) where the data files are hosted. The tick history data types which are supported by this feature are:
- Time and Sales
- Market Depth
- Intraday Summaries
- Raw.
This sample requests for intraday summaries which supports AWS download. Therefore, I will download data from AWS which provides faster download speed than LSEG Tick History directly. The application must include the HTTP header field X-Direct-Download: true to specify for the download to occur through AWS. When the application sends the request with X-Direct-Download: true header, it will receive a response with HTTP status 302 or redirect. The response header contains a redirection URI in item Location. Fortunately, Python application automatically follows the redirection so the application has nothing to do. A call is made in the background to this URI and the data is retrieved.
DownloadFromAWS=True
requestUrl="https://selectapi.datascope.refinitiv.com/RestApi/v1/Extractions/RawExtractionResults" + "('" + jobId + "')" + "/$value"
requestHeaders={
"Prefer":"respond-async",
"Content-Type":"text/plain",
"Accept-Encoding":"gzip",
"Authorization": "token " + token
}
if DownloadFromAWS==True:
requestHeaders.update({"X-Direct-Download":"true"})
dataRetrieveResp=requests.get(requestUrl,headers=requestHeaders,stream=True)
print("Received the response for retreiving data using the jobId")

- If the status is 200 or OK that means the application can retrieve data from LSEG Tick History or AWS successfully. Otherwise, it prints the error and exits.
if dataRetrieveResp.status_code == 200 :
print("Received status code 200, retrieved data from the server successfully")
else:
print("Error with status code:",extractionResp.status_code,"\n Text:",json.dumps(json.loads(extractionResp.text),indent=4))
exit()

- You should save the downloaded data before decompressing it instead of decompressing it on the fly. This is to avoid data lost issues especially with large data sets.
In Python, you can ensure that the data is not automatically decompressed on the fly by setting requests.Response.raw.decode_content to be false.
import os
import shutil
dataRetrieveResp.raw.decode_content = False
fileName= os.getcwd() + "\compressData.csv.gz"
print ('Saving compressed data to file:' + fileName + ' ... please be patient')
chunk_size = 1024
rr = dataRetrieveResp.raw
with open(fileName, 'wb') as fd:
shutil.copyfileobj(rr, fd, chunk_size)
fd.close
print ('Finished saving compressed data to file:' + fileName + '\n')

- For the best practice, you should handle the data line by line instead of store all the data in one variable. This is to avoid issues with large data sets. Below is the code to read and decompress for each line (maximum 10 lines) from the data file that just created and display.
import gzip
maxLines = 10
print ('Reading data from file, and decompress at most ' + str(maxLines) + ' lines of it:')
count = 0
with gzip.open(fileName, 'rb') as fd:
for line in fd:
dataLine = line.decode("utf-8")
print (dataLine)
count += 1
if count > maxLines:
break
fd.close()

Summary
This article explains how to request tick history data on demand from LSEG Tick History via REST API on Jupyter Notebook step by step. It demonstrates how to retrieve data from LSEG Tick History and AWS which provides faster download speed than LSEG Tick History. It also mentions the ways to avoid data lost issues with Python sample source code. Therefore, you can use the techniques explained in this article with other programming languages to request for any tick history data types and handle data without losing data issues.