


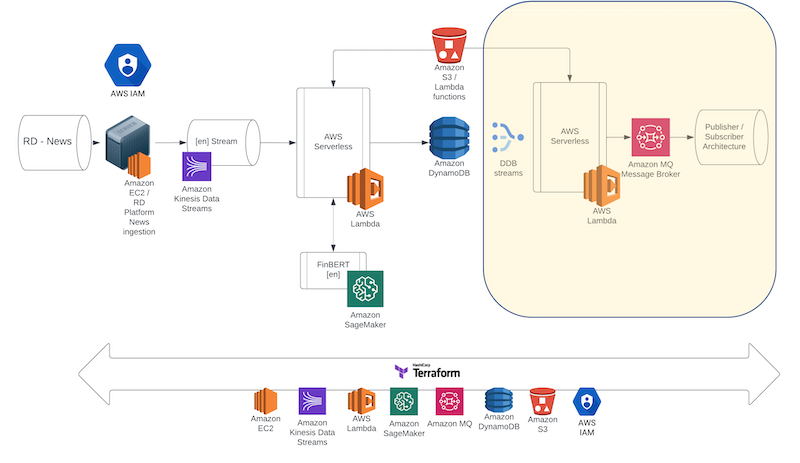
In this Blueprint we present Stage III, the final stage of this prototype consisting of a DynamoDB stream connected to a new Lambda layer that will receive any new data inserted and forward to an Amazon MQ server, hosting a RabbitMQ Broker service. We present the integration with the previous two stages as well as the implementation of a Consumer module that will allow us to test the complete lifecycle of the prototype.
Amazon DynamoDB Streams
We start this Blueprint by implementing the DynamoDB stream. This is a functionality that allows DynamoDB to capture any change, create, update, or delete, that is happening in an item in a table. The stream not only captures the changes but also preserves their sequence allowing for the implementation of very interesting software architectures. Moreover, we can parameterize the stream so that it provides keys only, new only, old only and both new and old data item versions. In this prototype we are capturing the insert event in the NoSQL table, unwrapping the data item in the stream, and forwarding it to a RabbitMQ Broker. Enabling streams in DynamoDB is just a matter of a few clicks from the table dashboards, but continuing our fully automated pipeline, we will be enabling it through our Terraform scripts:
resource "aws_dynamodb_table" "nlp_news_headlines_table" {
name = "nlp_news_headlines_table"
billing_mode = "PROVISIONED"
read_capacity = 20
write_capacity = 20
hash_key = "id"
stream_enabled = true
stream_view_type = "NEW_IMAGE"
attribute {
name = "id"
type = "S"
}
}
We can see that in the nlp_news_headline table we set stream_enabled to true and the stream_view_type to NEW_IMAGE so that the stream does not have to store older version of the data just the one resulting from the change. When the Terraform script executes we have the table ready in place to receive data as well as the stream online triggering events on any activity in the table.
AWS Lambda layers
Now that the DynamoDB stream is in place we need to connect to it to the next layer of the architecture - a new Lambda layer - that will receive and unpack the newly inserted data item in DynamoDB and forward it to Amazon MQ. This new Lambda function, written in Python, will implement a Producer functionality. To accomplish this, we will need to introduce a new functionality of AWS Lambda - the Lambda layer. To implement our producer, we are using the 'Pika' Python library that can integrate with a RabbitMQ Broker. This means that we need to make the library available on AWS Lambda to be used when the function executes. AWS Lambda allows us to do that using Lambda layers, prepackaged layers with all the appropriate modules needed for a Lambda function to execute. To create the Lambda layer, using command line, we need to switch to a directory and pip install pika specifically into that directory: The appropriate command looks like:
pip install pika -t /path
This will install the pika module in the directory and once that is done, we can zip the directory and move the zip to the appropriate directory Terraform will look in to push the layer on to AWS Lambda. We can now create a Terraform resource that describes the appropriate layer as:
resource "aws_lambda_layer_version" "rabbitmq_layer" {
filename = " " # provide path to the local directory where the zipped layer is stored
layer_name = "rabitmq_layer"
description = "Python layer for RabbitMQ."
compatible_architectures = ["x86_64"]
compatible_runtimes = ["python3.7"]
}
This resource can now be used during the implementation of the Terraform script that describes the Lambda resource that we would like to initialise on AWS. We can see in the following script that there is a bit more going on compared to the previous Lambda function configuration. Again, we define the appropriate bucket where the Lambda function is stored on S3 for it to be loaded into our serverless structure. In addition to that, we can see the layers collection that defines the appropriate resource to be used for the Pika layer. Finally, another new item in the list is the environment variable. Those variables are used during instantiation to store the appropriate Amazon Rabbit MQ credentials that the Lambda will need to connect and push the data items into the Amazon MQ Broker.
resource "aws_lambda_function" "my_rabitmq_lambda_function" {
function_name = "RabitMQLambda"
s3_bucket = aws_s3_bucket.my_nlp_bucket.bucket
s3_key = aws_s3_object.lambda_to_rabitmq.key
runtime = "python3.7"
handler = "lambda.lambda_handler"
source_code_hash = data.archive_file.lambda_triggering_sagemaker.output_base64sha256
layers = [
resource.aws_lambda_layer_version.rabbitmq_layer.arn
]
role = aws_iam_role.nlp_application_role.arn
environment {
variables = {
RABBITMQ_USERNAME = var.rabbitmq_user
RABBITMQ_PASSWORD = var.rabbitmq_password
RABBITMQ_ARN = aws_mq_broker.rabbitMQ.arn
}
}
}
Let’s now turn to the Lambda function that we need in order to capture the DynamoDB streams event, unpack it and then send it to the RabbitMQ Broker message queue:
def lambda_handler(event, context):
if event['Records'][0]['eventName'] == "INSERT":
image = {}
image['id'] = event['Records'][0]['dynamodb']['Keys']['id']['S']
image['score'] = event['Records'][0]['dynamodb']['NewImage']['score']['S']
image['label'] = event['Records'][0]['dynamodb']['NewImage']['label']['S']
image['headline'] = event['Records'][0]['dynamodb']['NewImage']['headline']['S']
body = json.dumps(image)
print(
f"Sent message. Exchange: {exchange}, Routing Key: {routing_key}, Body: {body}")
channel.close()
connection.close()
Once the structure is in place and live - then any new item inserted in DynamoDB will cause an event to trigger receiving the following data:

We should now write the Lambda that will unpack this event and bundle a new item to send to Amazon MQ. The Lambda function starts by importing several built-in python packages including the external 'Pika' one which it will find installed in the lambda layer.
import json
import ssl
import pika
import os
import re
The handler starts by checking if the event is an INSERT trigger and then unpacks the event and accesses the appropriate data items from the event item received. We then create a new JSON object using the image we just constructed:
def lambda_handler(event, context):
if event['Records'][0]['eventName'] == "INSERT":
image = {}
image['id'] = event['Records'][0]['dynamodb']['Keys']['id']['S']
image['score'] = event['Records'][0]['dynamodb']['NewImage']['score']['S']
image['label'] = event['Records'][0]['dynamodb']['NewImage']['label']['S']
image['headline'] = event['Records'][0]['dynamodb']['NewImage']['headline']['S']
body = json.dumps(image)
Once that is done, we need to instantiate a connection with the Amazon Rabbit MQ Broker. We start by loading the environment variables for the user_name, the password and the newly created ARN for Amazon Rabbit MQ broker. We than open an SSL communication channel to the appropriate url and setup the connection to the appropriate channel and queue. Once done, we are ready to publish the new item in the queue and we do so by using the basic_publish function.
rabbitmq_user = os.environ['RABBITMQ_USERNAME']
rabbitmq_password = os.environ['RABBITMQ_PASSWORD']
rabbitmq_broker_arn = os.environ['RABBITMQ_ARN']
rabbitmq_broker_id = re.search(
r'(?<=myService:).*', rabbitmq_broker_arn).group(0)
region = 'eu-central-1'
url = ''
queue_name = 'Headline Sentiment'
routing_key = queue_name
exchange = ''
ssl_context = ssl.SSLContext(ssl.PROTOCOL_TLSv1_2)
ssl_context.set_ciphers('ECDHE+AESGCM:!ECDSA')
url = f"amqps://{rabbitmq_user}:{rabbitmq_password}@{rabbitmq_broker_id}.mq.{region}.amazonaws.com:5671"
parameters = pika.URLParameters(url)
parameters.ssl_options = pika.SSLOptions(context=ssl_context)
connection = pika.BlockingConnection(parameters)
channel = connection.channel()
channel.queue_declare(queue=queue_name)
channel.basic_publish(exchange=exchange,
routing_key=routing_key,
body=body)
Amazon MQ – Rabbit MQ
Amazon MQ is a managed Broker service that allows us to implement a production ready message broker using either ActiveMQ or RabbitMQ. In this final stage of the prototype, we will use RabbitMQ as the service Broker and we provide the following Terraform configuration script to spin up the MQ instance. It is worth noting that this is the lengthiest of the processes in the Terraform IaC process taking the longest time in the automation.
resource "aws_mq_broker" "rabbitMQ" {
broker_name = "myService"
publicly_accessible = true
engine_type = "RabbitMQ"
engine_version = "3.9.16"
host_instance_type = "mq.t3.micro"
user {
username = var.rabbitmq_user
password = var.rabbitmq_password
}
}
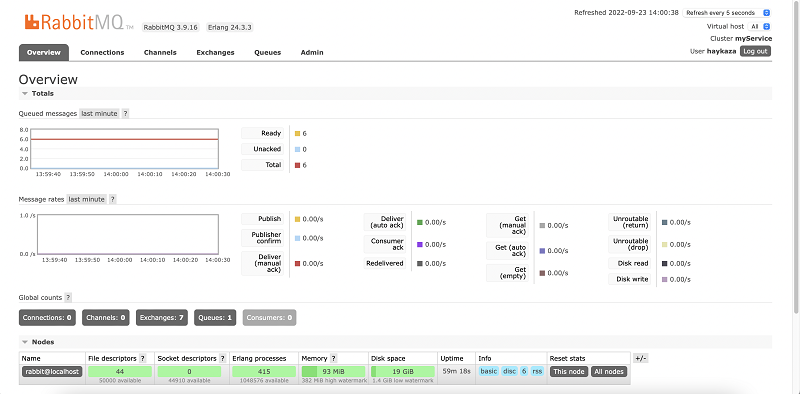
In the script we are instantiating a micro instance mainly for demo purposes, however this would not be a configuration that can support production purposes. Once the instance is online, we can access its UI through our AWS Dashboard, and this is the final component of our AWS infrastructure that we need to complete the Cloud side of the prototype.
Writing the Consumer Application
The final part of our prototype is the implementation of the consumer or subscriber service using pika. The consumer connects to the RabbitMQ message queue and consumes in real-time any messages waiting inline. After the messages are consumed, the new AI enhanced headline stream is available to be further utilised on a use-case basis. The Python script starts by importing 'ssl' and 'Pika' and then continues with the implementation of the RMQClient object. The object is responsible for the connection with the Broker via a persistent channel.
import ssl
import pika
class RMQClient:
def __init__(self, usr, pwd, broker):
ssl_context = ssl.SSLContext(ssl.PROTOCOL_TLSv1_2)
ssl_context.set_ciphers('ECDHE+AESGCM:!ECDSA')
url = f"amqps://{usr}:{pwd}@{broker}"
parameters = pika.URLParameters(url)
parameters.ssl_options = pika.SSLOptions(context=ssl_context)
self.connection = pika.BlockingConnection(parameters)
self.channel = self.connection.channel()
The second object of the Python script is the RMQSubscriber. This is the object that is responsible for consuming any messages from the existing connected channel. The code needs to run in a continuous loop basis and the necessary stopping conditions should be in place. For the purposes of our demo test, the EC2 instance will push 10 messages in the infrastructure and our subscriber will terminate after receiving those. However for consistency purposes, we also provide the appropriate destructor that can act as a template and will allow for a graceful termination when in looping conditions.
class RMQSubscriber(RMQClient):
def get_message(self, queue):
method_frame, header_frame, body = self.channel.basic_get(queue)
if method_frame:
print(method_frame, header_frame, body)
self.channel.basic_ack(method_frame.delivery_tag)
return method_frame, header_frame, body
else:
print("No message.")
def consume_messages(self, queue):
def _callback(ch, method, properties, body):
print(f"> Received : {body} ")
self.channel.basic_consume(
queue=queue, on_message_callback=_callback, auto_ack=True)
self.channel.start_consuming()
def close(self):
self.channel.close()
self.connection.close()
def __del__(self):
self.channel.close()
self.connection.close()
Testing the full end-to-end lifecycle
We now have the entire infrastructure implemented and all code and configuration scripts are in place to allow real-time serverless AI news sentiment analysis using AWS. If you have tried the previous Blueprints, please remember to execute the command terraform destroy in your working folder to delete the entire infrastructure on AWS and start fresh. Let’s apply the Terraform configurations, launch the all the instances and resources and observe the results. Once again, to do so, we need to have all the .tf and .py scripts in a single folder, following the structure of the repository, open the terminal or console, navigate to that folder, and run the terraform init command which will re-initialize our working directory. After successful initialization we run the terraform apply command which will create the entire structure on AWS and transfer all the necessary the files.
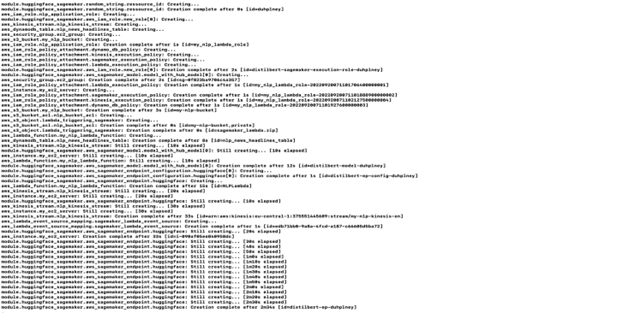
Once the IaC scripts are done we have the entire infrsatructure in place and we can run our final test. To test everything, we again connect to the EC2 instance, navigate to our ec2_main_stream.py file and run the scripts:
cd ../home/ubuntu
python3.8 ec2_main_stream.py
As an interim stage, as in Blueprint II of this series, we can again check the DynamoDB table we have created by navigating to the DynamoDB service in our AWS Management console where we will be able to see the AI enhanced data. However now we can take a step further and check our Amazon MQ Broker, connect to the RabbitMQ console using our username and password that was provided through initialisation. The RabbitMQ dashboard provides a lot of information about our Broker the queue its health and much more.
We can also see the messages waiting in the queue to get consumed:

As a quick test we can use the get_messages functionality provided from the dashboard, and we will see the main payload of the messages consisting of our AI enhanced headline:
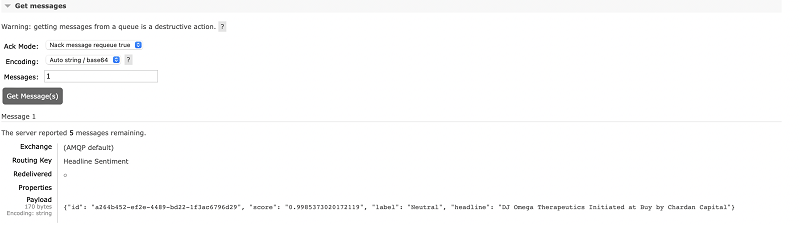
Finally, we can use the subscriber script locally and ingest the queued messages and inspect them. Please note that if you have executed the get_messages step on the dashboard - the queue has been configured to not hold the messages and therefore will be emptied. You can re-execute the EC2 instance scripts to repopulate the queue with new messages and then run the subscriber to get the following results on screen:

Alternative AWS architectures
Amazon Web Services is a rich, continuously updated ecosystem of services. It is therefore natural that the same system can be implemented in a few different ways using different services in place. Every architecture may have its own benefits and can be a better candidate depending on the use-case. For example, in the proposed architecture, if we assume that news headline sequence of events is not that critical for the application, the Kinesis stream can be swapped with an Amazon SQS stream. The SQS stream would then trigger the initial Lambda layer and the rest of the prototype architecture could remain the same. This would make the implementation much more cost efficient, however, delivery of the messages is not guaranteed to be in order. Similarly, Amazon SQS can be used in place of Amazon MQ with the same implications. In another architectural design, a team might decide to use SageMaker Async potentially increasing the system response performance in exchange for a more complicated event processing layer. These design choices are really made depending on the application use-case, after careful consideration of the benefits and drawbacks they introduce to both the management, technical, and the implementation layer of the system.
Conclusions
In this final part of a three series Blueprints, we presented the three remaining elements of an AWS architecture that allows ingestion of our news headline feeds, using RD libraries, and enhances them using AI inference in real-time. The architecture then re-serves the enhanced stream through a Broker service allowing for the ingestion of the AI enhanced stream. We’ve also presented a full implementation of an Infrastructure-as-Code layer using Terrafom, that automates the configuration and setup of the entire system to a production-ready state. The architecture presented can also be used in similar real-time use cases is modular enough to be easily tweaked to manage more complex scenarios.
For more information and resources on this prototype you can also visit the AWS Machine Learning Blog:
Enriching real-time news streams with the Refinitiv Data Library, AWS services, and Amazon SageMaker.