


Overview
The first building block of the AWS architecture is the creation of an Amazon Elastic Compute Cloud (Amazon EC2) instance through a ‘Refinitiv Data library’-ready AMI. In this blueprint we first present the AMI set-up and creation process, then we discuss the real time news ingestion process from the Amazon EC2 instance. This is depicted as the highlighted section in the diagram below:
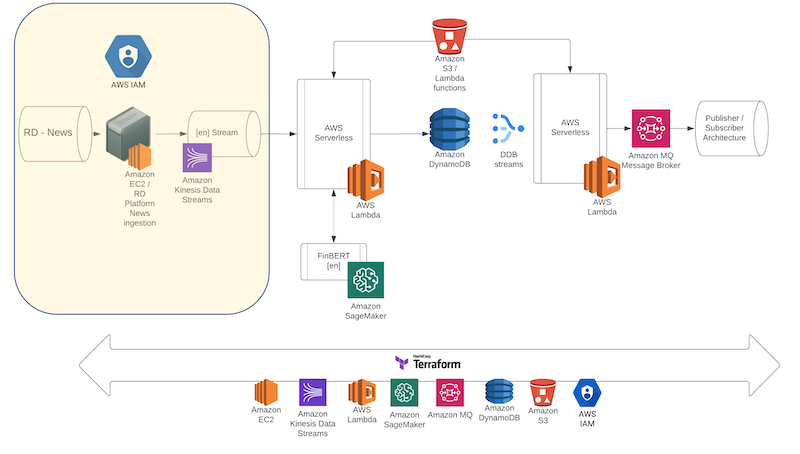
Finally, we will show how the instance will be connected to Kinesis which will also trigger the next steps of the AWS architecture.
Importantly, we will document how to create both the Amazon EC2 instance, along with the underlying security groups and the file SCP transfers, and the Kinesis Stream automatically through Terraform (infrastructure-as-code or IaC) scripts.
Preparing your instance for RD News ingestion
As described in the Enhancing real-time news streams using AWS Serverless AI. An automated MLOps architecture using Terraform blueprint the business incentive of the AWS architecture is the consumption of enhanced news feed using serverless AI. We will ingest the news feed from the Refinitiv Data Libraries (RD) API; thus, we will need to set-up an Amazon EC2 instance in a way that it enables the connection to the API and the real-time stream. This is the first step of the AWS pipeline and to ensure the reusability and the scalability of the instance, we will save the image of the created Amazon EC2. Further, will launch the new Amazon EC2 instances from the saved AMI automatically using Terraform.
First let’s create the Amazon EC2 instance then. There are multiple ways of launching a new instance which are very well described in the AWS official documentation on launching an EC2. In the scope of the current architecture, we launched our instance through the new launch instance wizard following the AWS guideline. Particularly, we have selected Ubuntu Server 22.04 LTS (HVM) with a 64-bit architecture and 8GiB storage as our Amazon Machine Image (AMI). Instance type was chosen t2.micro which is free-tier eligible instance satisfying the needs of our use case. After creating and saving a new Key pair we have created a new security group with default parameters. Without changing any of the Advanced parameters we simply launched the instance.
Less than a minute later we had our instance up and running after which, we connect to it using the Amazon EC2 Instance connect console. After hitting the Connect button we will be redirected to the following ubuntu console:
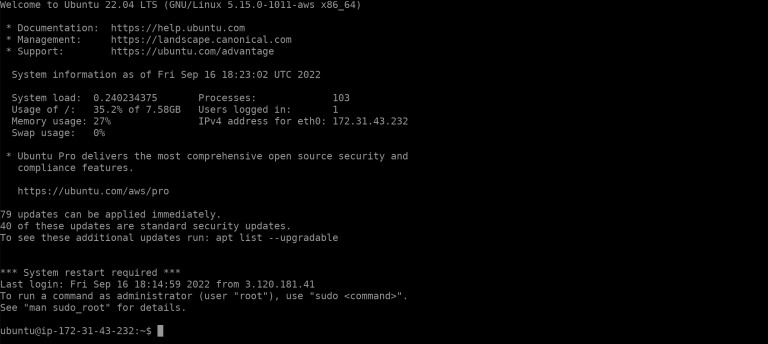
If you see this console after launching, it means you are successfully connected to the instance and that is ready for the set-up. We will consume the news feed using Python which is already pre-installed in the Amazon EC2 base-instance. Further, there are a range of libraries which are also pre-installed with the Amazon EC2 base-instance. However, we still need to install a couple of libraries to include Refinitiv Data Libraries (RD) for the real-time news ingestion and boto3 - a Python API for AWS infrastructure services - which will be used for creating a Kinesis client. Before going ahead and installing these packages we would need to update outdated packages on the system and install pip (Package Installer for Python) using the following commands:
sudo apt update
sudo apt install python3-pip
Finally, we can install RD Libraries and boto3 using the following commands:
pip install refinitiv-data
pip install boto3
In the scope of this article, we have installed RD Libraries version 1.0.0
Now our instance is ready for real-time news ingestion and streaming using RD libraries. To ensure the reusability of our instance we created an image and saved the AMI according to this guide. We can see our AMI in the following image:

Real-time news ingestion from Amazon EC2
After we have an ‘RD Library’-ready AMI, we will need to prepare our ec2_main_stream.py file with the scripts required for the Real-time news streaming. In addition to that, we will need to configure refinitiv-data.config.json file by providing our Machine ID and the APP KEY credentials required to connect to the RD Libraries API through a platform session. More on the configuration of RD libraries can be found here.
To start with, we just import the necessary packages as those were already installed in our Amazon EC2 image. The code is built using Python 3.10. Other prerequisite packages are imported below.
import asyncio
import boto3
import refinitiv.data as rd
from refinitiv.data.content import pricing
To ingest news headlines through a real-time streaming, we have built a class with a set of functions allowing us to ingest, validate and stream news headlines. It is worth mentioning that we used Python asyncio to handle asynchronous requests/responses. The NewsStream class comprises of the following functions:
- __init__ – constructor function which initializes the input arguments, including the counter limit which allows us to stop the streaming when a specified number of news streams are received. We are using 10 as a default value for the purpose of the current demo.
- display_updated_fields_async – this is the main asynchronous function which prints the news headline after checking if a news stream item contains a headline and validating if the headline language is in English. This is done by calling the respective functions:
- get_headline – this function returns the HEADLINE value from the news stream Object.
- is_headline – this function returns true if the HEADLINE value from the news stream object is not None.
- Is_headline_eng - this function returns true if the HEAD_LANG value from the news stream Object is English.
After printing a valid headline, the function updates the COUNTER variable which ensures we output only a limited amount (smaller than the counter_limit variable) of news headlines. After we achieve the requested amount of streamed news headlines, we close the stream and the asyncio loop.
- display_updated_fields – this function calls asyncio.run_coroutine_threadsafe which submits a coroutine (our main async function) to the given event loop by allowing regular blocking code to make use of asyncio.
- __del__ - this is the destructor function which will be called when references to the object are destroyed. This will close the stream if it is Open and stop the loop if it is still running.
Below is presented the code snippet which includes the described NewsStream object:
class NewsStream:
COUNTER = 0
def __init__(self, counter_limit=10):
self.counter_limit = counter_limit
async def display_updated_fields_async(self, pricing_stream, instrument_name, fields):
if self.is_headline_eng(fields) and self.is_headline(fields):
print(self.get_headline(fields))
self.COUNTER += 1
if self.COUNTER > self.counter_limit:
stream.close()
loop.stop()
def get_headline(self, fields):
return list(fields.values())[0]['HEADLINE1']
def is_headline(self, fields):
return list(fields.values())[0]['HEADLINE1'] != None
def is_headline_eng(self, fields):
return list(fields.values())[0]['HEAD_LANG'] == 'en'
def display_updated_fields(self, pricing_stream, instrument_name, fields):
asyncio.run_coroutine_threadsafe(self.display_updated_fields_async(
pricing_stream, instrument_name, fields), loop)
def __del__(self):
if stream.open_state.value == 'Opened':
stream.close()
if loop.is_running():
loop.stop()
print('Destructor called, Stream closed.')
To run the abovementioned object and get the news headlines stream, first, we need to connect to RD Libraries via the platform session.
rd.open_session("platform.rdp")
Next, we define the loop.
loop = asyncio.new_event_loop()
asyncio.set_event_loop(loop)
To open the stream, first, we initiate the NewsStream Object and define our stream using content.pricing.Definition function from RD Libraries.
my_news_stream = NewsStream()
stream = rd.content.pricing.Definition(
universe=['NFCP_UBMS'], service="ERT_FD3_LF1").get_stream()
In the stream we have asked for the NFCP_UBMS universe - a streaming news headline RIC which returns the news headline and a wide range of metadata, including the language of the headline. In addition, we have connected to ERT_FD3_LF1 service to which my Machine ID was entitled to access. If we miss the service parameter, our request would have been directed to the default service which is ELECTRON_DD for this type of a request.
Finally, we use on_update callback on our stream and open it along with the loop.
stream.on_update(my_news_stream.display_updated_fields)
stream.open()
loop.run_forever()
After a reference to the object are destroyed, e.g., file is closed, the destructor function will close the stream and stop the loop.
Creating and launching Amazon EC2 from the AMI
As we already have a news stream ready AMI, streaming, and the RD config files, it is time to launch a new instance by simultaneously transferring those files to the newly created instance, all automatically using Terraform.
The first step is to define aws_instance resource using Terraform below:
resource "aws_instance" "my_ec2_server" {
ami = " " #provide the ID of the AMI
instance_type = "t2.micro"
security_groups = [aws_security_group.ec2_group.name]
key_name = " " #provide the name of the key
user_data = local.ec2_platform_config
tags = {
Name = var.instance_name
}
}
Here we specify the ID of the AMI we want the Amazon EC2 instance be launched from and the instance_type which is a free-tier t2.micro instance. Additionally, we create a custom security group and refer to it in this Terraform resource. Finally, we provide the user_data, the name of the key pair and the tags.
Below is the Terraform script for the custom security group we have created to be attached to the Amazon EC2 instance.
resource "aws_security_group" "ec2_group" {
name = "ec2_group"
ingress {
from_port = 22
to_port = 22
protocol = "tcp"
cidr_blocks = ["0.0.0.0/0"]
}
egress {
from_port = 0
to_port = 0
protocol = "-1"
cidr_blocks = ["0.0.0.0/0"]
}
}
In this terraform resource we have provided configuration blocks for inbound (ingress) and outbound (egress) rules to control incoming traffic and outgoing traffic from our instance. Particularly, in inbounding rules we allow incoming SSH access from all IPv4 addresses in the network. In outbound rules, we allow all traffic to all type of protocols and port ranges. This relaxed network security access control configuration serves well for the demo prototype purposes. However,for production use cases it is advised that these configurations are made granular enough to allow only necessary access to ports and protocols.
At the final step of the Amazon EC2 launch through Terraform, we provide a script for the SCP file transfer from our local machine to the newly created Amazon EC2 instance. Below is a code snipped allowing to transfer ec2_main_stream.py and refinitiv-data.config.json files described above.
locals {
ec2_platform_config = <<-END
#cloud-config
${jsonencode({
write_files = [
{
path = "./home/ubuntu/ec2_main_stream.py"
permissions = "0644"
owner = "root:root"
encoding = "b64"
content = filebase64("/…/ec2_main_stream.py") # file path in local machine
},
{
path = "./home/ubuntu/refinitiv-data.config.json"
permissions = "0644"
owner = "root:root"
encoding = "b64"
content = filebase64("/…/refinitiv-data.config.json")
},
]
})}
END
}
In the locals provided above, we specify source (content) and destination (path) file paths along with the permissions, encoding and the owner username. This ensures the secure file transfer from our local machine to the Amazon EC2 during the process of infrastructure launch.
Creating a Kinesis data stream
A similar process to launching the Amazon EC2 instance is used to create the kinesis stream using Terraform. For that we simply need to define aws_kinesis_stream resource and provide several arguments, such as the name, shard_count, retention_period, shard_level_metrics and the tags.
resource "aws_kinesis_stream" "nlp_kinesis_stream" {
name = "my-nlp-kinesis-en"
shard_count = 1
retention_period = 24
shard_level_metrics = ["IncomingBytes", "OutgoingBytes"]
tags = { Environment = "UAT" }
}
According to the AWS documentation a shard is a uniquely identified sequence of data records in a stream. A stream is comprised of one or more shards, each of which provides a fixed unit of capacity. More about the maximum capacity of read/write transaction on each shard can be found in the above referred documentation. Here in our example, we specify shard count equal to 1 as our application must process all messages in order.
The retention period which is the length of time that data records are accessible after they are added to the stream is set to default value of 24 hours. In shard level metrics we set IncomingBytes and OutgoingBytes to monitor kinesis metrics which are provided in Amazon CloudWatch due to the integration between the latter and the kinesis. Finally in the Environment variable within the tags, we specify User Acceptance testing (UAT) environment.
Connecting and pushing data to Kinesis
The last step of streaming news headlines using Amazon EC2 and Kinesis is to set up a connection between the two and push the headlines through. This will also trigger the next steps of our AWS pipeline. To do this we introduce two additional functions to be added in the NewsStream Object. The first function is to create a Kinesis client - for which we use boto3. The code snippet below creates the Kinesis client.
def create_client(self, service, region):
return boto3.client(service, region_name=region,aws_access_key_id=" ",
aws_secret_access_key=" ")
To create the Kinesis client, we call boto3.client function by providing the kinesis service(‘kinesis’), the AWS region and the access and secret keys. Additionally, we also define a function named push_to_kinesis which pushes the news headlines into the Kinesis stream by taking the headline, kinesis client, stream name and shard count as an input. The function is introduced in the code snipped below:
def push_to_kinesis(self, kinesis_client, kinesis_stream_name,kinesis_shard_count, data, send_to_kinesis=True):
encoded_data = bytes(data, 'utf-8')
if send_to_kinesis:
response = kinesis_client.put_record(Data=encoded_data, StreamName=kinesis_stream_name,PartitionKey=str(kinesis_shard_count))
print(response)
It should be noted that before putting the headlines to the stream we encode the input data using ‘utf-8’.
Finally, we change display_updated_fields_async from the NewsStream object into validate_headlines_and_push_to_kinesis_async which instead of printing the validated headlines is pushing those to the kinesis stream by calling push_to_kinesis function introduced.
async def validate_headlines_and_push_to_kinesis_async(self, pricing_stream, instrument_name, fields):
if self.is_headline_eng(fields) and self.is_headline(fields):
self.push_to_kinesis(self.my_kinesis, "my-nlp-kinesis-en",
1, self.get_headline(fields))
self.COUNTER += 1
if self.COUNTER > self.counter_limit:
stream.close()
loop.stop()
The final version of the ec2_main_stream.py file containing the NewsStream object can be found in the respective GitHub repo. The GitHub repo contains also an ec2_main_batch.py file which describes news ingestion in batch followed by putting the batch items into a kinesis stream.
Testing the prototype so far
Now, as we have all Terraform and Python scripts ready for the AWS infrastructure launch, let’s proceed with it. To launch the instances introduced so far and transfer the files from local machine to the Amazon EC2 instance, we locate all the scripts in a single folder, open it in terminal/console and run terraform init command which will initialize a working directory containing Terraform configuration files.
terraform init
After successful initialization we run terraform apply command which will create the instances and transfer the files.
terraform apply

To test if everything we have created is working, we connect to the Amazon EC2 instance, navigate to our ec2_main_stream.py file and run the following scripts:
cd ../home/ubuntu
python3.8 ec2_main_stream.py
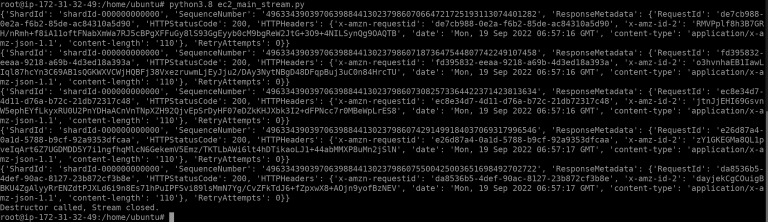
The 200 HTTPStatusCode from the abovementioned ubuntu terminal output is indicating that the records are successfully put into the Kinesis stream that we have created. This will trigger the next ‘news sentiment analysis’ stage of the pipeline which is discussed in the blueprint Real-time Serverless AI news sentiment analysis using Kinesis Data Streams, Lambda and SageMaker.
Conclusion
This blueprint presented a workflow for creating a Real-time Serverless news stream using Amazon EC2 and a Kinesis stream. We started by presenting the AMI set-up and creation process, then showcased how it can be reused when launching new Amazon EC2 instances programmatically using Terraform (infrastructure-as-code or IaC). We have also described the news streaming process using Refinitiv Data Libraries and shown how the streamed headlines can be pushed into the Kinesis which will trigger the next steps of the architecture presented in Enhancing real-time news streams using AWS Serverless AI. An automated MLOps architecture using Terraform. using Terraform blueprint. Furthermore, we presented Terraform scripts for launching the entire architecture programmatically.
For more information and resources on this prototype you can also visit the AWS Machine Learning Blog:
Enriching real-time news streams with the Refinitiv Data Library, AWS services, and Amazon SageMaker.