
How to use AutoRest with RDP
RDP Overview
Refinitiv Data Platform (RDP) is our cloud-enabled, open platform, that brings together content, analytics and proprietary, customer and third-party data distribution and management technology. It provides simple web-based API access to a broad range of content. Therefore, any programming languages which support web-based API can connect and consume data from RDP.
RDP provides online documents that list all available APIs and demonstrates how to use those APIs. Moreover, developers can also download a swagger file for each API. With this file, we can use tools such as AutoRest, or NSwagStudio to generate client libraries for accessing RESTful web services.
This article demonstrates how to use AutoRest to generate client libraries for RDP services.
AutoRest Overview
AutoRest is an OpenAPI (Swagger) specification code generator. It is an open-source tool generating client libraries for accessing RESTful web services. It can generate libraries for many programming languages including CSharp, Node.js, Python, Java, Ruby, Go, PHP, and TypeScript.
AutoRest is a Node.js console application. To install AutoRest, please refer to the AutoRest website.
OperationId
AutoRest supports both swagger JSON and YAML files and the RDP website can provide swagger files in JSON format. However, if you use these JSON files with AutoRest, it may show the following errors.
FATAL: OperationId is required for all operations. Please add it for 'get' operation of '/authorize' path.
FATAL: AutoRest.Core.Logging.CodeGenerationException: OperationId is required for all operations. Please add it for 'get' operation of '/authorize' path.
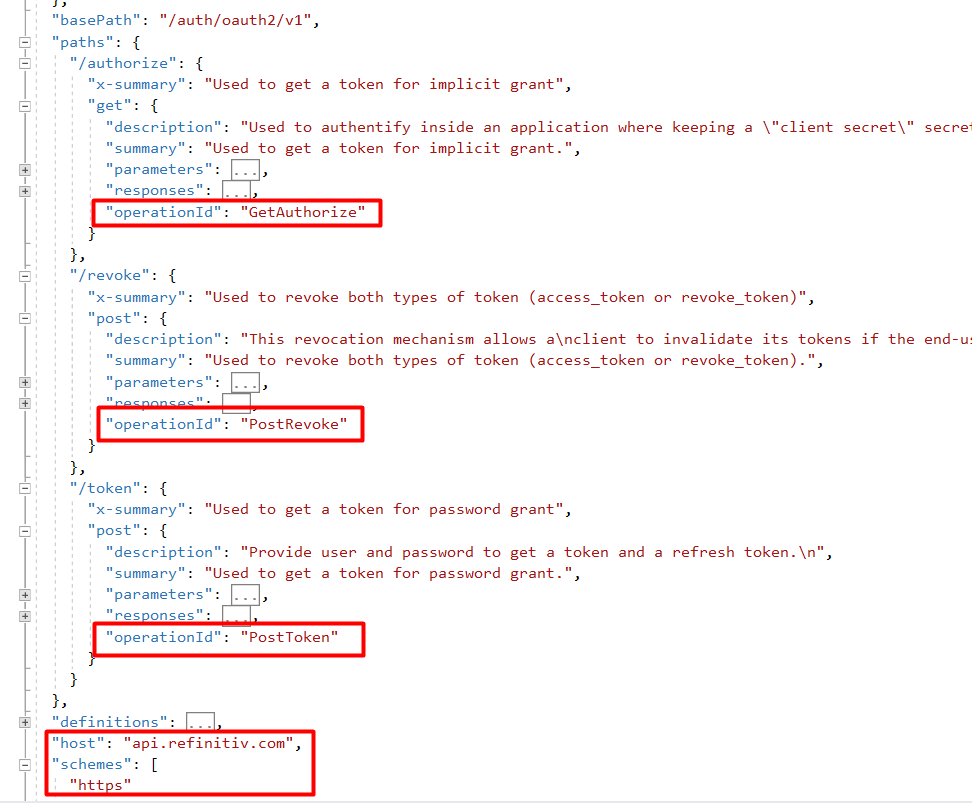
AutoRest uses operationId to determine the method name for a given API but the swagger files from RDP may not have this field. Refer to the OpenAPI Specification, the operationId is a field under an operation object. It is a unique string used to identify the operation. The id MUST be unique among all operations described in the API. The operationId can be manually added to the swagger JSON file under the operation object, as shown below.
"paths": {
"/authorize": {
"get": {
"operationId": "GetAuthorize",
"description": "Used to authentify inside an application where keeping a \"client secret\" secret is not possible (a web app, for an example). Shove a IPDP cookie in your headers for now.",
"summary": "Used to get a token for implicit grant.",
...
In the above text, the operationId of the get operation of the /authorize path is GetAuthorize. Instead of manually adding the operationId field, we have implemented a simple Node.js script to add the operationId field to the RDP swagger JSON file. To install and use the script, please follow these steps.
1) Clone the project from GitHub
The following Git command clones the project repository into a new directory. The Git command can be downloaded from the Git download website.
git clone https://github.com/Refinitiv-API-Samples/Article.RDP.REST.AutoRest
Then, change the directory to Article.RDP.REST.AutoRest
2) Build the project
Node.js is required when building the project. It can be downloaded from the Node.js website
After installing Node.js, run the following command to download the script's dependencies which are command-line-args and command-line-usage libraries.
npm install
3) Run the script
The script accepts the following two parameters.
| Parameter Name | Type | Description |
| --input | String | The input JSON file downloaded from the RDP website |
| --output | String | The output JSON file after adding the operationId field |
Moreover, the script also adds the host and schemes fields.
node app.js --input auth_oauth2_v1.json --output auth_oauth2_mod.json
The script will create a modified JSON file. It contains the added operationId, host, and schemes fields. The operationId will be generated from the operation and path field, such as GetAuthorize, PostRevoke, and PostToken.
AutoRest Usage
This section explains how to use the modified JSON file from the previous step with AutoRest to generate client libraries for C#, Java, and Python. It also shows how to use the generated C#, Java, and Python classes to get an access token for password grant.
The examples use the swagger /auth/oauth2/v1 JSON file downloaded from the Refinitiv Data Platform's website. You can use the newer version of /auth/oauth2/.
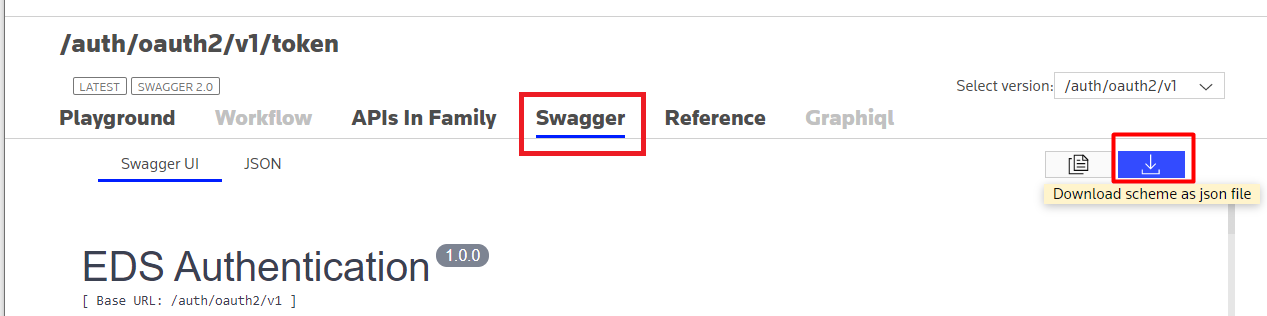
1) Go to https://api.refinitiv.com/ and find the /auth/oauth2/v1 service. Then, select the token path
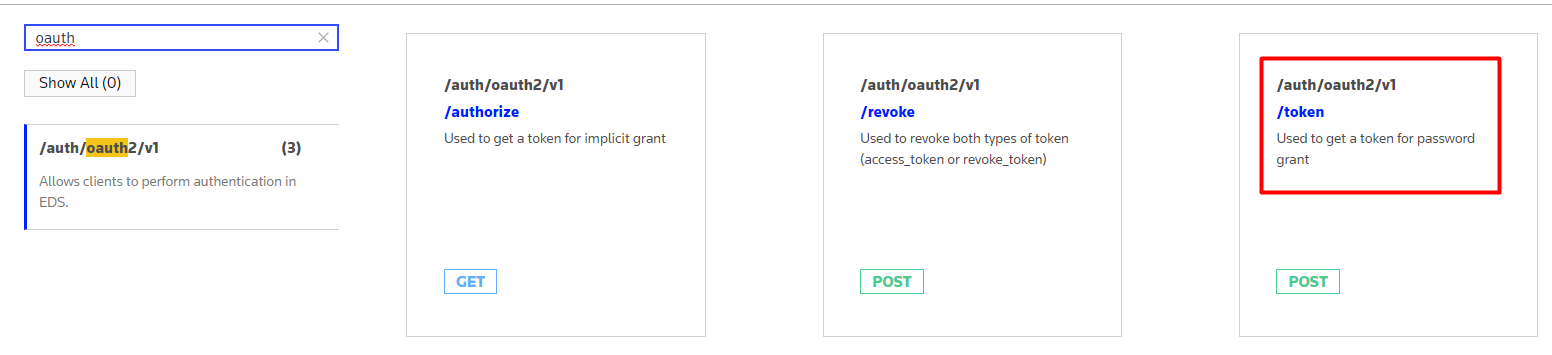
2) Select the Swagger menu to download the swagger JSON file
Then, use the node application in the previous step to add the operationId to the file.
node app.js --input auth_oauth2_v1.json --output auth_oauth2_mod.json
The AutoRest's options used in this section are:
| Option | Description |
| --input-file=FILENAME | Adds the given file to the list of input files for generating process |
| --output-folder=DIRECTORY | The location for generated files. If not specified, uses ./Generated as the default |
| --namespace=NAMESPACE | sets the namespace to use for the generated code |
| --package-name=PACKAGENAME | Name of the package (Ruby, Python) |
| --csharp | Runs the C# code generator |
| --java | Runs the Java code generator |
| --python | Runs the python code generator |
To install AutoRest, please refer to the AutoRest website.
C#
Run the following command with the modified JSON file to generate a C# client library.
autorest --input-file=auth_oauth2_mod.json --csharp --output-folder=CSharp --namespace=rdp.auth
The above command uses the auth_oauth2_mod.json file to generate the C# class library in the CSharp folder. The namespace of the classes is rdp.auth.
The class diagram for the generated classes is shown below.
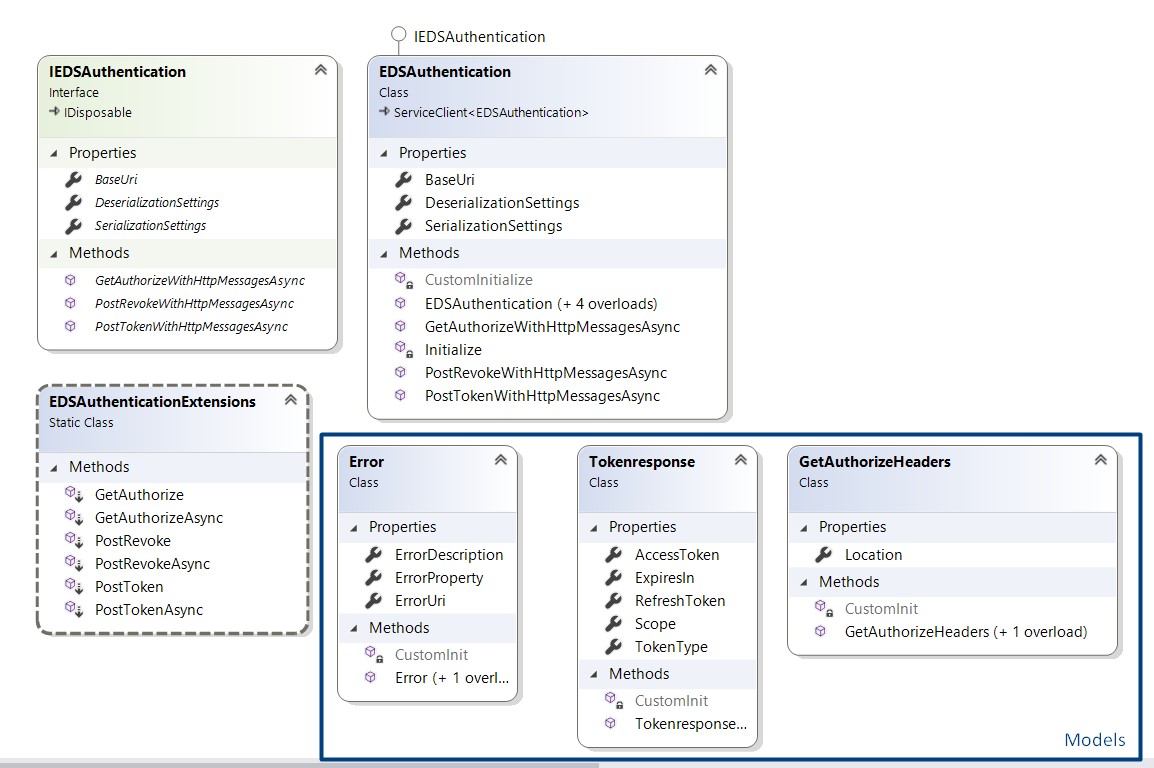
The main class is EDSAuthentication which provides several methods to access RDP services. Developers can call methods with the WithHttpMessagesAsync suffix to get the low-level HttpOperationResponse object containing the HTTP response body and response headers. Otherwise, the extension methods, such as GetAuthorize, PostRevoke, and PostToken, can be used to get the object level response. The model classes are also generated for the response (Tokenresponse) and error (Error).
The generated C# classes depend on Microsoft.Rest.ClientRuntime and Newtonsoft.Json so those libraries must be installed in the project.
The following code shows how to use EDSAuthentication to perform RDP authentication.
using rdp.auth;
using rdp.auth.Models;
static void Main(string[] args){
EDSAuthentication eds = new EDSAuthentication();
try{
var response = eds.PostToken("password"
, "<username>"
, "<password>"
, null
, "trapi"
, null
, "<clientid>"
, "true");
if (response is Tokenresponse){
Tokenresponse tokenResp = (Tokenresponse)response;
Console.WriteLine(tokenResp.AccessToken);
}else if(response is rdp.auth.Models.Error){
rdp.auth.Models.Error tokenError = (rdp.auth.Models.Error)response;
Console.WriteLine(tokenError.ErrorProperty+":"+ tokenError.ErrorDescription);
}
}catch (HttpOperationException ex){
Console.WriteLine("Exception:"+ex.Response.ToString());
}
}
The above code calls the extension method (PostToken) with a username and password to get a token. Then, the returned object will be cast to the Tokenresponse or Error object according to its type.
Java
Run the following command with the modified JSON file to generate a Java client library.
autorest --input-file=auth_oauth2_mod.json --java --output-folder=Java --namespace=rdp.auth
The above command uses the auth_oauth2_mod.json file to generate the Java class library in the Java folder. The namespace of the classes is rdp.auth.
The class diagram for the generated classes is shown below.
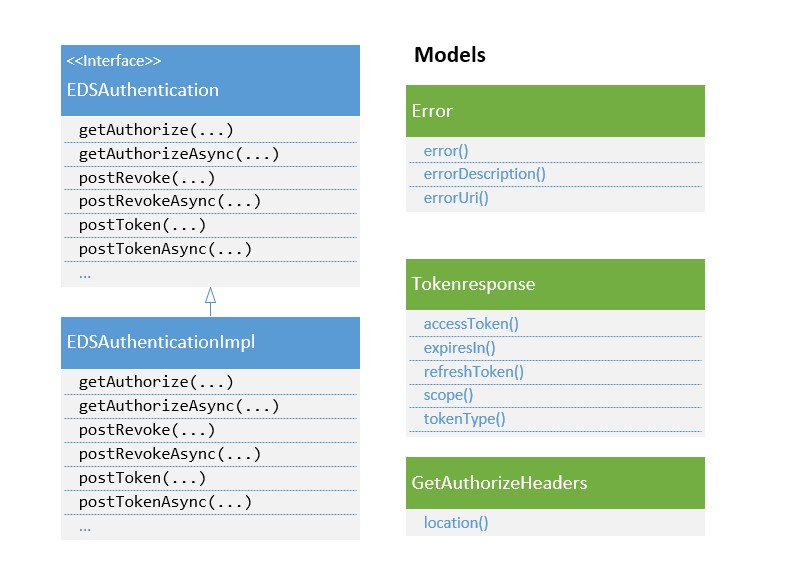
The interface, implementation, and model classes are generated. The main class is EDSAuthenticationImpl which provides several synchronous and asynchronous methods to access the service. The model classes are also generated for the response (Tokenresponse) and error (Error).
The client library depends on the com.microsoft.rest.client-runtime library. Developers need to install this library and its dependencies.
<dependency>
<groupId>com.microsoft.rest</groupId>
<artifactId>client-runtime</artifactId>
<version>1.6.5</version>
</dependency>
However, there is a problem in the generated classes. The "consumes" field in the auth_oauth2_v1.json file is "application/x-www-form-urlencoded". Refer to the OpenAPI Specification, the consumes field is a list of MIME types the APIs can consume.
{
"consumes": [
"application/x-www-form-urlencoded"
],
"produces": [
"application/json"
],
"swagger": "2.0",
"info": {
"description": "Allows clients to perform authentication in EDS.",
"title": "EDS Authentication",
"version": "1.0.0"
},
When a value of the "consumes" field in the swagger file is "application/x-www-form-urlencoded", the content type of the request message must be application/x-www-form-urlencoded. However, the generated Java class sets the content type of the request message to multipart/form-data instead. This causes a bad request with the following error returned to the application.
{
"error":{
"id":"786a57ea-c5a6-4177-a7f8-af8c9cbc710f",
"code":"400",
"message":"Validation error",
"status":"Bad Request",
"errors":[
{
"key":"grant_type",
"reason":"Invalid Content-Type 'multipart/form-data', allowed: [application/x-www-form-urlencoded]"
}
]
}
To solve this issue, the generated EDSAuthenticationImpl.java must be modified by changing Java annotations of the postRevoke and postToken methods from @Multipart and @Part to @FormUrlEncoded and @Field respectively, as shown below.
...
import retrofit2.http.FormUrlEncoded;
...
interface EDSAuthenticationService {
...
@FormUrlEncoded
@POST("revoke")
Observable<Response<ResponseBody>> postRevoke(@Field("token") String token, @Field("token_type_hint") String tokenTypeHint, @Field("client_id") String clientId);
@FormUrlEncoded
@POST("token")
Observable<Response<ResponseBody>> postToken(@Field("grant_type") String grantType, @Field("username") String username, @Field("password") String password, @Field("deviceId") String deviceId, @Field("scope") String scope, @Field("refresh_token") String refreshToken, @Field("client_id") String clientId, @Field("takeExclusiveSignOnControl") String takeExclusiveSignOnControl, @Field("multiFactorAuthenticationCode") String multiFactorAuthenticationCode, @Field("newPassword") String newPassword);
}
After modifying the code, we can use the EDSAuthenticationImpl class to perform RDP authentication, as shown below.
public static void main( String[] args )
{
EDSAuthentication auth = new EDSAuthenticationImpl();
Object resp = auth.postToken( "password"
, "<username>"
, "<password>"
, null
, "trapi"
, null
, "<clientid>"
, "false"
, null
, null);
if(resp instanceof Tokenresponse) {
System.out.println("Access Token: "+((Tokenresponse) resp).accessToken());
}else if(resp instanceof Error) {
System.out.println("Error: "+((Error)resp).errorDescription());
}
}
The above code calls the postToken method with a username and password to get a token. Then, the returned object is casted to the Tokenresponse or Error object according to its type.
Python
Run the following command with the modified JSON file to generate a Python client library.
autorest --input-file=auth_oauth2_mod.json --python --output-folder=Python --namespace=rdp.auth --package-name=rdp.auth
The above command uses the auth_oauth2_mod.json file to generate the Python class library in the Python folder. The namespace and package name of the classes are rdp.auth.
The class diagram for the generated classes is shown below.
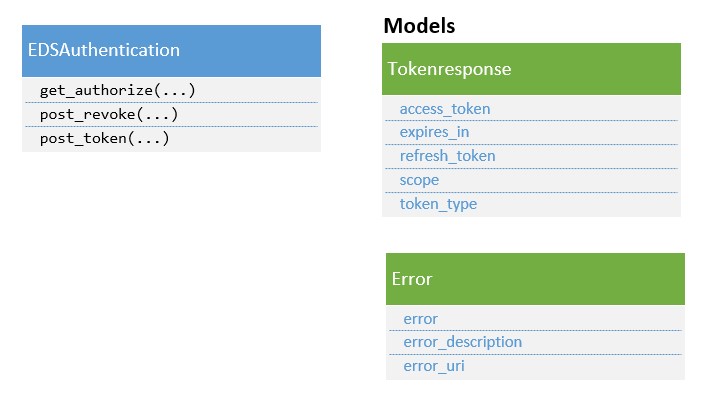
The main class is EDSAuthentication which provides several methods to access RDP services. The model classes are also generated for the response (Tokenresponse) and error (Error).
The client library depends on the AutoRest Python Client Runtime. Developers can use the following command to install this library.
pip install msrest
The following code shows how to use EDSAuthentication with Python to perform RDP authentication.
import rdp.auth as auth
rdpAuth = auth.EDSAuthentication()
resp = rdpAuth.post_token("password"
, "<usrname>"
, "<password?"
, scope="trapi"
,client_id="<clientid>"
,take_exclusive_sign_on_control="true")
if hasattr(resp, 'access_token'):
print(resp.access_token)
elif hasattr(resp, 'error_description'):
print(resp.error_description)
The above code calls the post_token method with a username and password to get a token. Then, it uses the hasattr() method to verify the presence of the access_token or error_description of the returned object.
Troubleshooting
1) Get this error "AutoRest.Core.Logging.CodeGenerationException: OperationId is required for all operations." when running AutoRest
AutoRest uses the operationId fields as method names for the generated class. Please make sure that the operationId field is under the operation field. Otherwise, the node.js script mentioned in the OperationId section can be used to add the operationId field to the swagger JSON file.
2) Get this error "Invalid URI: The format of the URI could not be determined." or "The method or operation is not implemented." when running the application
The swagger file may not have host or schemes field. AutoRest uses the values in these fields to connect to the server. Please make sure that the host is set to api.refinitiv.com and the schemes is https.
"host": "api.refinitiv.com",
"schemes": [
"https"
]
Otherwise, the node.js script mentioned in the OperationId section can be used to add these fields to the swagger JSON file.
3) Get this error "Invalid Content-Type 'multipart/form-data', allowed: [application/x-www-form-urlencoded]" when running Java code
The generated Java code doesn't support the request message with the 'application/x-www-form-urlencoded' content type. The generated code must be modified to support this content type. For more information, please refer the AutoRest Usage/Java section.
Summary
This article introduces how to use AutoRest to generate client libraries for Refinitiv Data Platform services. Using AutoRest can save developers time; Developers don't need to implement its own classes to consume REST services from Refinitiv Data Platform.
The steps are summarized here. First, download the swagger JSON file from the Refinitiv Data Platform's website. Then, run the node.js script with the downloaded file to create a new JSON file with the operationId fields. AutoRest uses the operationId fields as method names for generated classes. After that, run the AutoRest command with the modified JSON file to generate the client library. Next, install dependencies for the client library. Then, construct a class, and call an appropriate method. Finally, a returned object may need to be cast according to its type.
References
- AutoRest
- AutoRest for C# Client
- AutoRest for Java Client
- AutoRest for Python Client
- OpenAPI Specification
- NSwagStudio