

Have you ever had to implement a request for an API call in any programming language? If so and in case you haven’t heard about this, the Postman application can convert an API request into a code snippet in a programming language in just a few clicks.
This article demonstrates how to generate Python code from the Postman collection provided in the download pages of RDP API and DSS API, including an API request generated from RKD API's Support Portal
What's the problem?
Let's say I have the postman collection with the API request that's working properly and I want my application to call it, hence, I need to convert this API call into a code for an application, what do I need to do?
The answer is I need to Find the proper library for calling a REST API in the programming language that I'm using, then learn how to use it and try implementing, testing, and fixing issues in the code if there are any.
What if there's an easier way to do so?
I bet you already knew the tool named Postman, which is an API platform for building and using APIs. Postman simplifies each step of the API lifecycle and streamlines collaboration so you can create better APIs — faster. Plus, Postman can convert an API request into a code snippet in the programming language or framework of your choosing. You can use this generated code snippet in your front-end applications.
This can be done in a few clicks as steps below
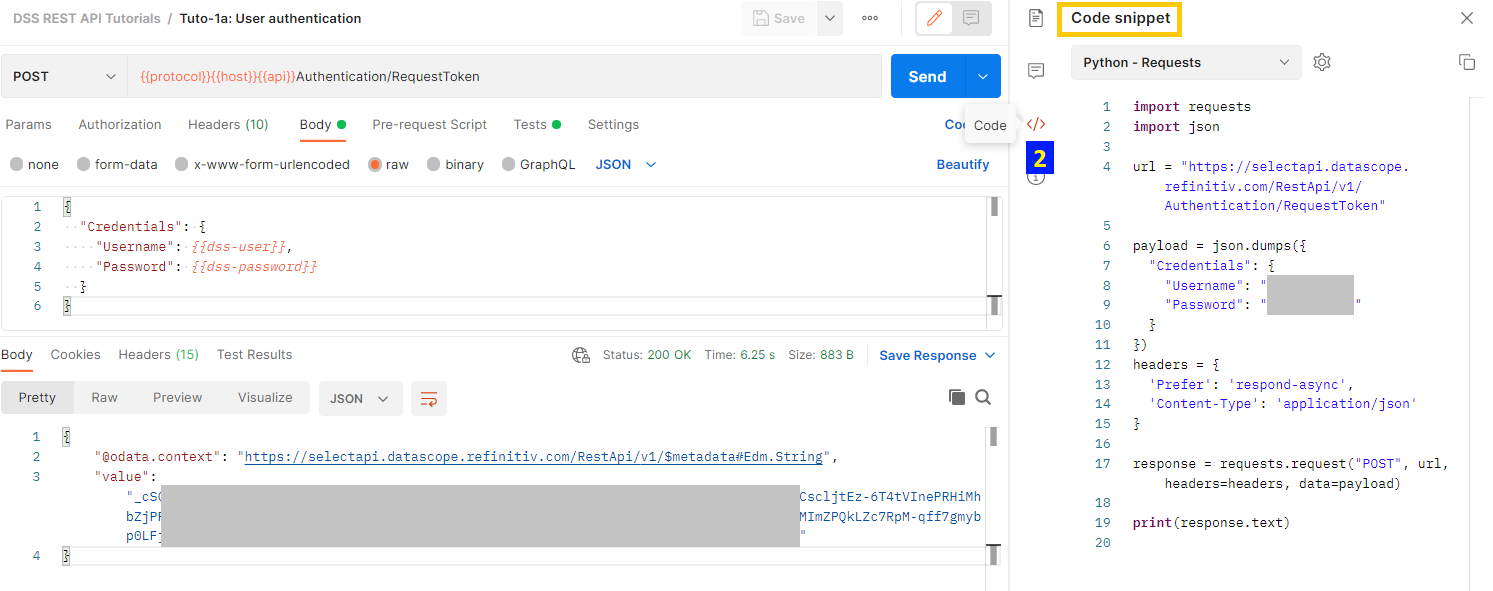
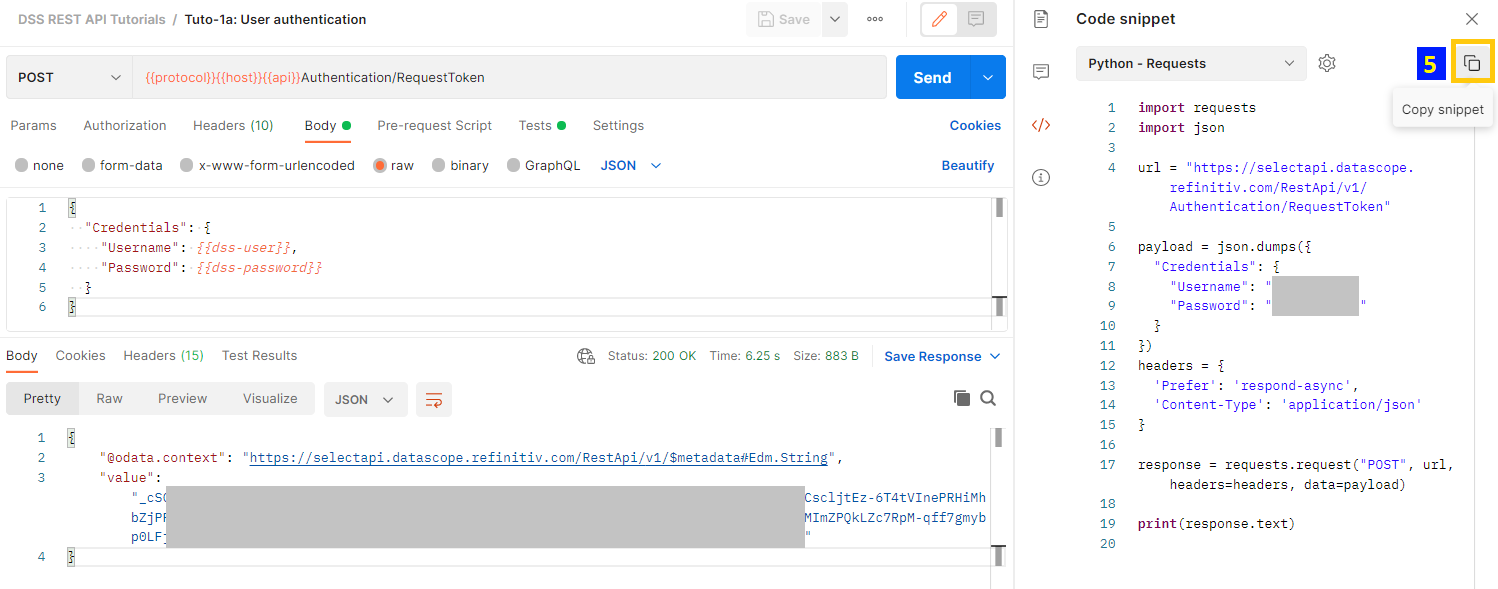
1. In the Postman app of the request, click on the Code button on the toolbar at the right of the screen

2. The 'Code snippet' tab will be shown
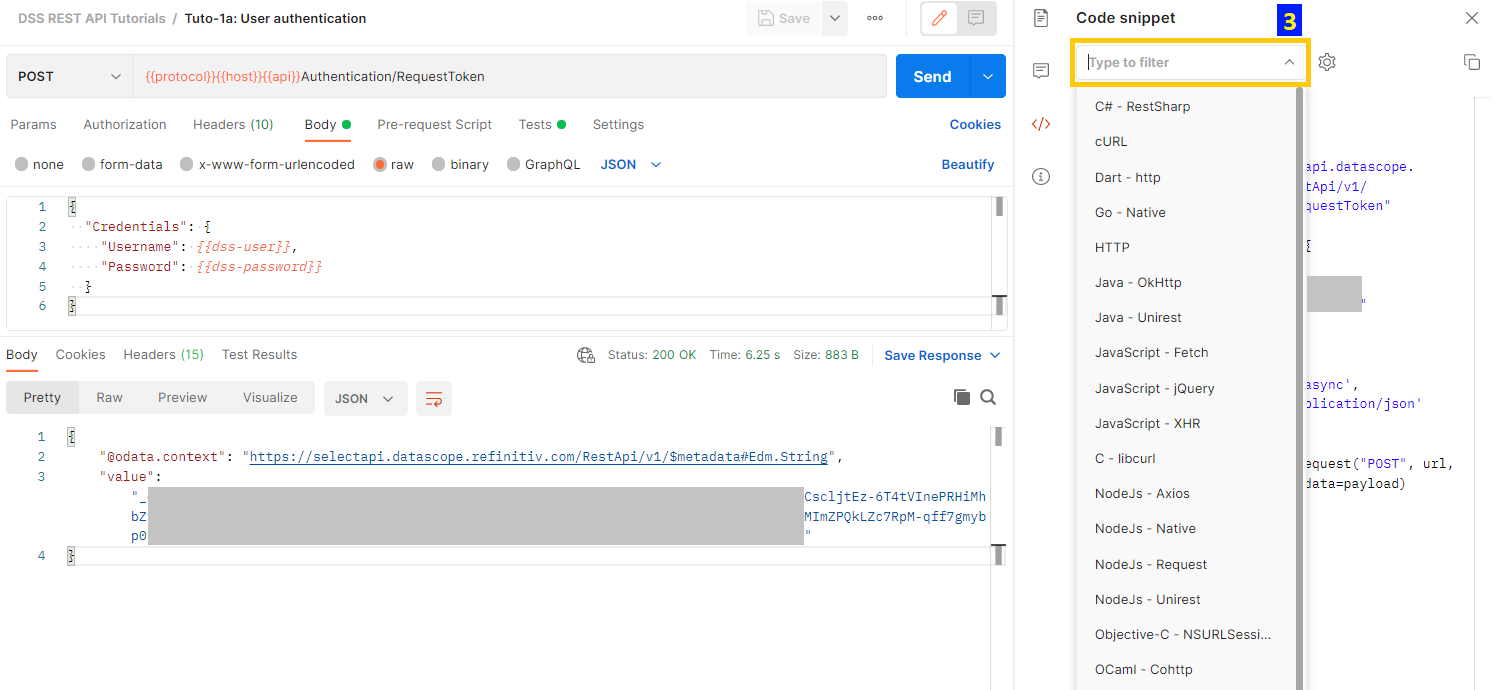
3. Click on the dropdown to select the programming language you prefer
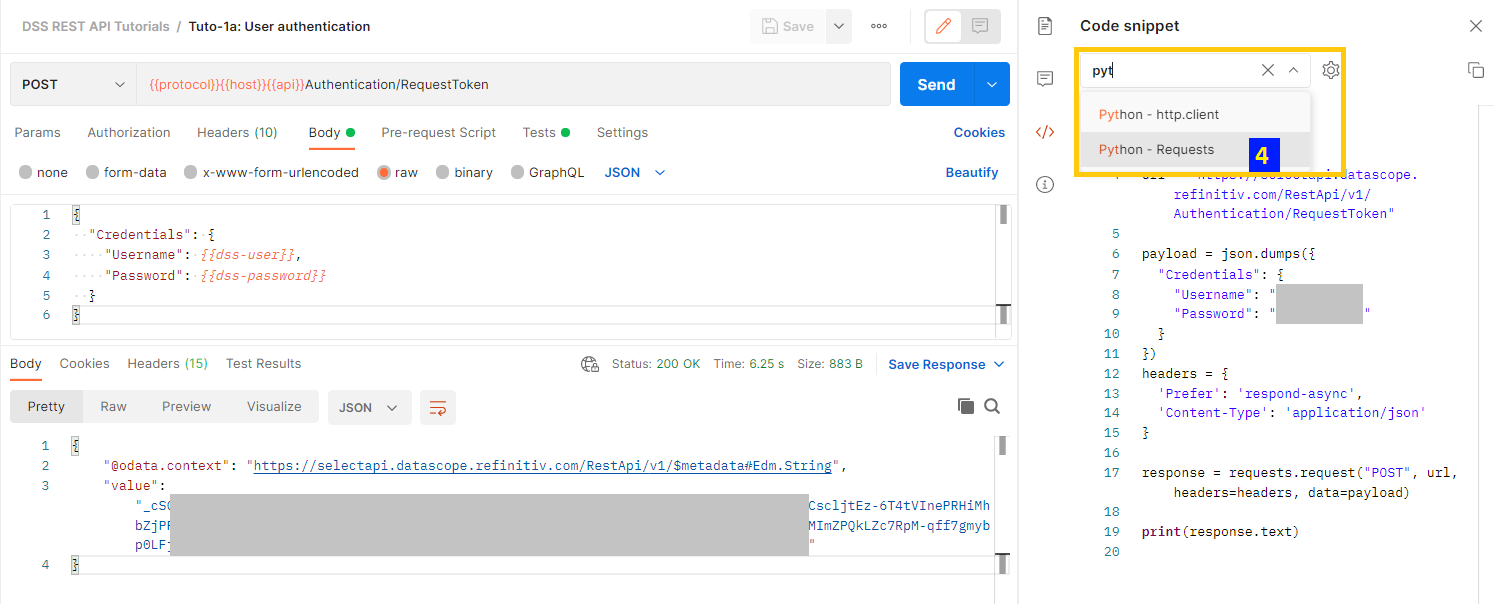
4. Type to search for the language, here we're using Python with Requests Library
5. Now the Python code for this API call is generated, click the 'Copy snippet' button to copy the code into the clipboard
Please note that your credentials such as username, password, and app key will be automatically available with the generated code. Hence, please be careful when sharing or using the code. Do not share your credentials with others.
The code generated is the below (real credentials are replaced with DSS_USERNAME and DSS_PASSWORD)
import requests
import json
url = "https://selectapi.datascope.refinitiv.com/RestApi/v1/Authentication/RequestToken"
payload = json.dumps({
"Credentials": {
"Username": "DSS_USERNAME",
"Password": "DSS_PASSWORD"
}
})
headers = {
'Prefer': 'respond-async',
'Content-Type': 'application/json'
}
response = requests.request("POST", url, headers=headers, data=payload)
print(response.text)
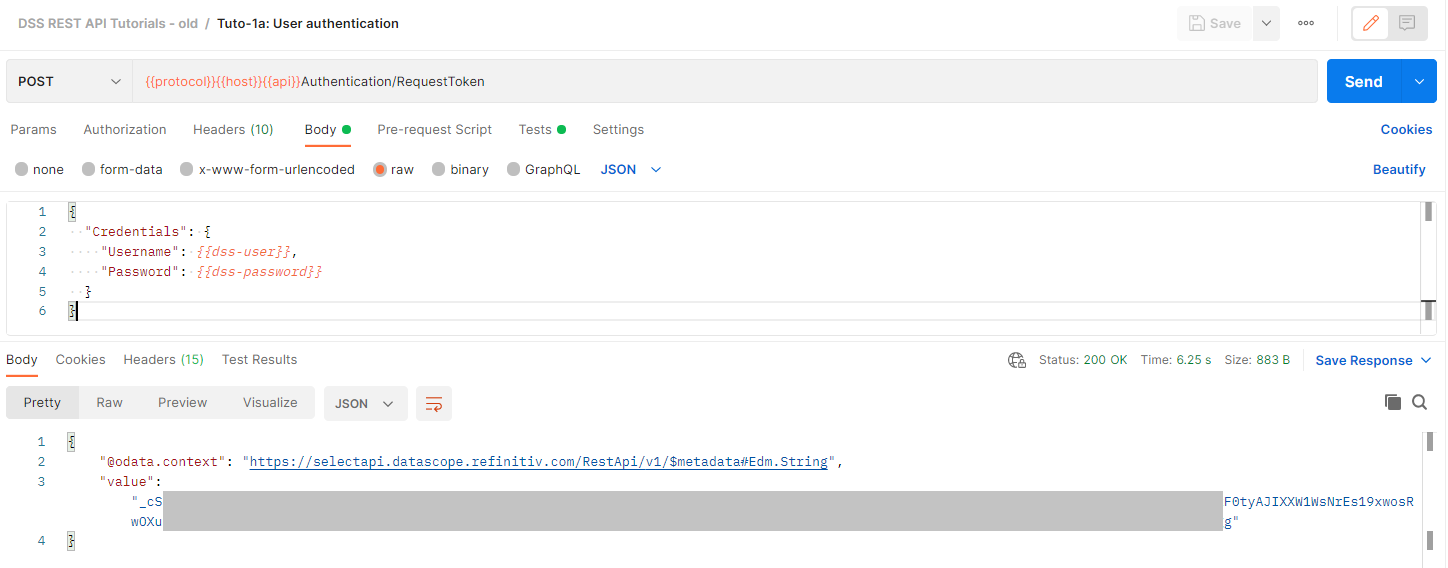
Here's the output of the code (the real token was replaced with TOKEN)
{"@odata.context":"https://selectapi.datascope.refinitiv.com/RestApi/v1/$metadata#Edm.String","value":"_TOKEN"}
Real-world example
Now, let’s use this functionality of postman to generate client code for Refinitiv APIs, which are
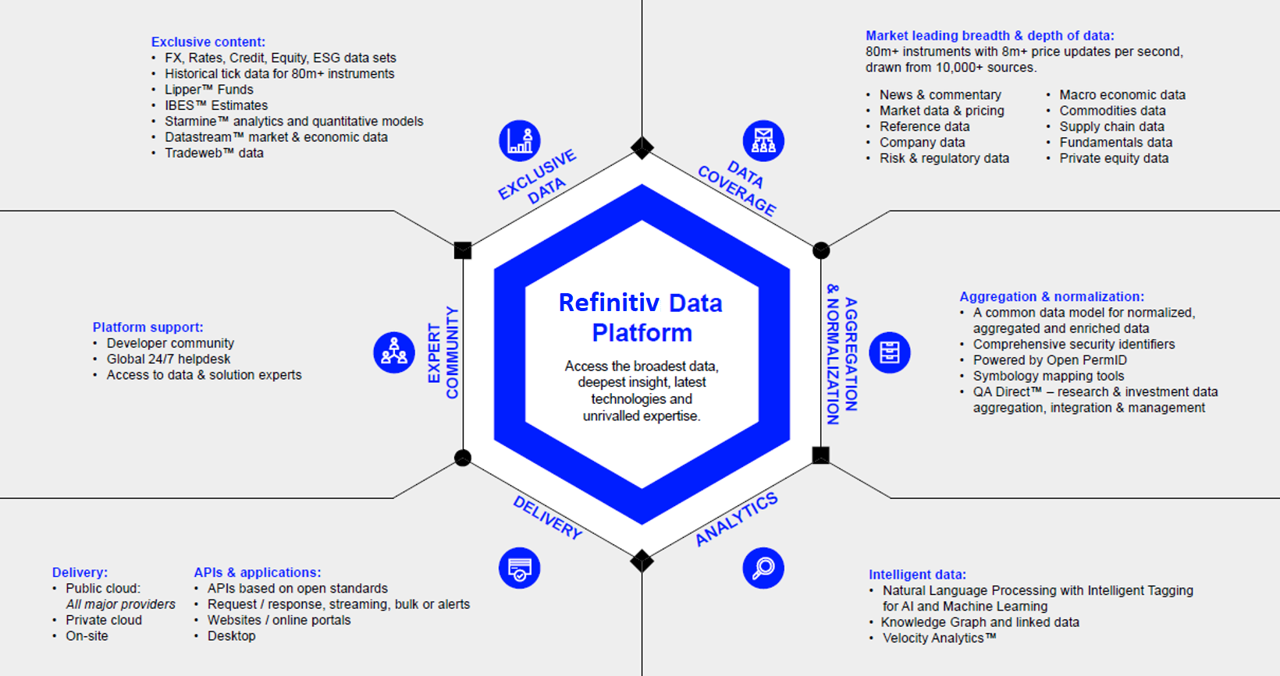
- Refinitiv Data Platform APIs (RDP APIs)
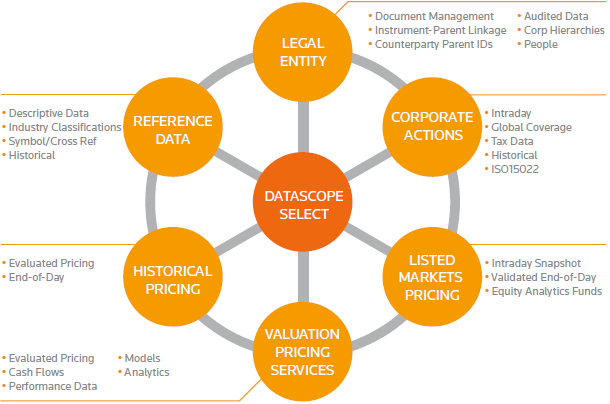
- Refinitiv DataScope Select - REST API (DSS API)
- Refinitiv Knowledge Direct API (RKD API)
1. Refinitiv Data Platform APIs (RDP APIs)
The token is required In each of the RDP API calls. Hence, to call any endpoint, we must generate the token to be used.
That's why we're going to generate Python code for the endpoints below
- Get Access Token: Provide user and password to get a token and a refresh token
- Symbology: From Identifier to Identifier
To get started exploring RDP API requests from Postman, you will need to setup clientID, following the Quickstart guide for Refinitiv Data Platform will take you through obtaining it.
Next, you could:
1. Download RDP Postman Starter Collection and Tutorial Samples starter collection:
2. Import the collection and the starter environment supplied with it into your Postman
3. Enrich the starter environment, with your valid User, Password, and Client ID
4. Run Authentication -> Get Token
5. Next you can run any RDP API request that your RDP user-supplied is permission for.
If you are new to Postman, it may be beneficial to review some of the RDP Postman Tutorials starting with Authorization.
Follow the step mentioned at the beginning of this article to generate Python code from the RDP API Postman Collection, The Jupyter notebook of these codes can be found on this Github Repository
1.1) Get Access Token: Provide user and password to get a token and a refresh token.
The screenshot of generating Python code from the Postman app
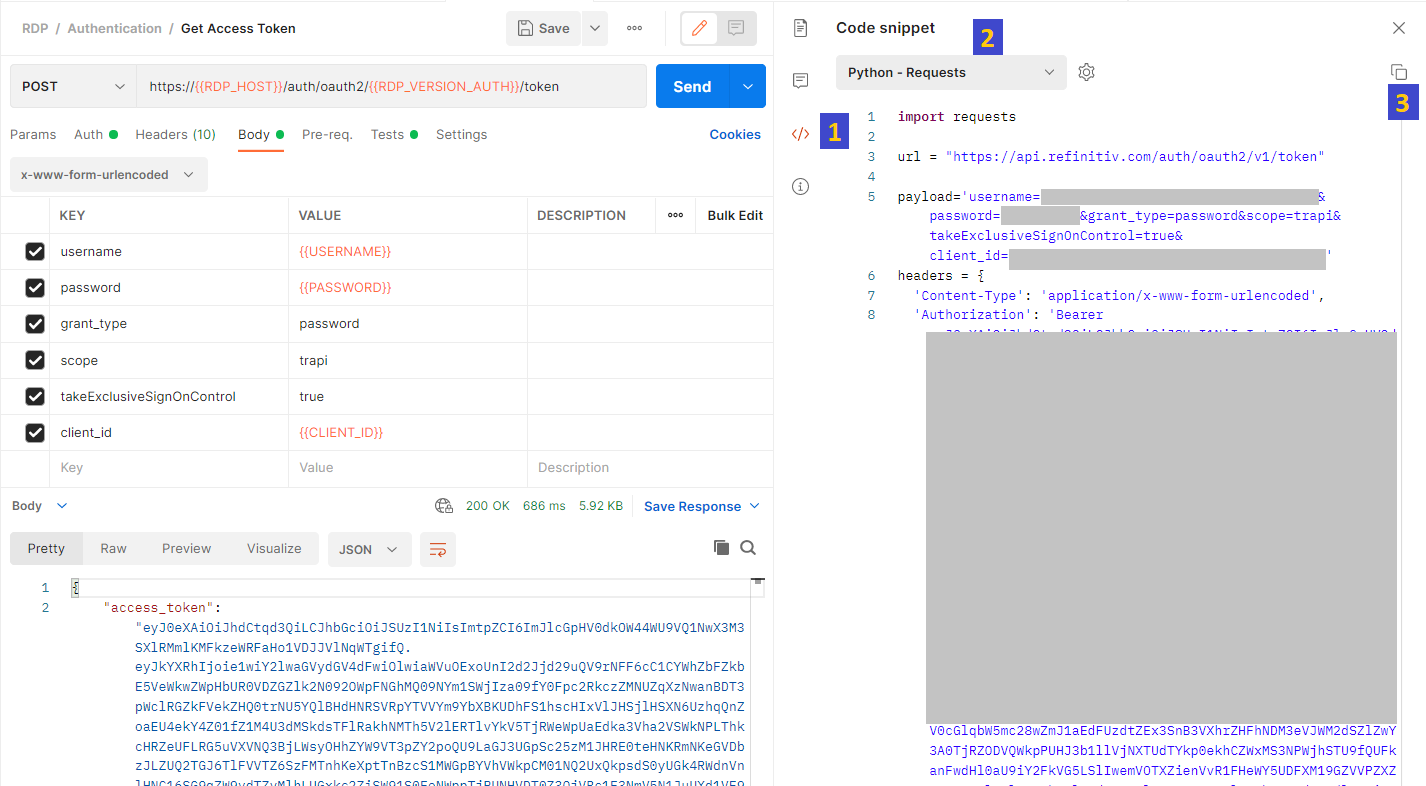
Generated code: Replace the below
- [RDP_USERNAME] and [RDP_PASSWORD] with your credentials
- [APP_KEY] with the Application ID
- [TOKEN] with Token (this parameter for this endpoint is not necessary and can be removed but this Postman collection generates this for us automatically)
import requests
rdp_token_url = "https://api.refinitiv.com/auth/oauth2/v1/token"
rdp_token_payload='username=[RDP_USERNAME]&password=[RDP_PASSWORD]&grant_type=password&scope=trapi&takeExclusiveSignOnControl=true&client_id=[APP_KEY]'
rdp_token_headers = {
'Content-Type': 'application/x-www-form-urlencoded'
}
rdp_token_response = requests.request("POST", rdp_token_url, headers=rdp_token_headers, data=rdp_token_payload)
print(rdp_token_response.text)
1.2) Symbology: From Identifier to Identifier
The screenshot of generating Python code from the Postman app
Generated code: Replace [TOKEN] with the Token from the previous step
import requests
import json
rdp_sym_url = "https://api.refinitiv.com/discovery/symbology/v1/lookup"
rdp_sym_payload = json.dumps({
"from": [
{
"identifierTypes": [
"Isin"
],
"values": [
"US01F0313464"
]
}
],
"to": [
{
"identifierTypes": [
"PermId"
]
}
],
"type": "strict"
})
rdp_sym_headers = {
'Content-Type': 'application/json',
'Accept': 'application/json',
'Authorization': 'Bearer [TOKEN]'
}
rdp_sym_response = requests.request("POST", rdp_sym_url, headers=rdp_sym_headers, data=rdp_sym_payload)
print(rdp_sym_response.text)
2. Refinitiv DataScope Select - REST API (DSS API)
The token is required In each of the DSS API calls. Hence, to call any endpoint, we must generate the token to be used.
That's why we're going to generate Python code for calling both endpoints User authentication and Request EoD data
To get started exploring DSS API requests from Postman,I'd recommend you to go through the Quickstart guide for DSS API and DSS API Documentation
Then, you could:
1. Download DSS REST Tutorials Postman collection:
2. Import the collection and the starter environment supplied with it into your Postman
3. Enrich the starter environment, with your valid Username and Password
4. Run User authentication -> Get Token
5. Next you can run any DSS API request that your DSS user-supplied is permission for.
Follow the step mentioned at the beginning of this article to generate Python code from the DSS API Postman Collection. The Jupyter notebook of these codes can be found on this Github Repository
2.1) User authentication
The screenshot of generating Python code from the Postman app

Generated code: Replace [DSS_USERNAME] and [DSS_PASSWORD] with your credentials
import requests
import json
dss_token_url = "https://selectapi.datascope.refinitiv.com/RestApi/v1/Authentication/RequestToken"
dss_token_payload = json.dumps({
"Credentials": {
"Username": "[DSS_USERNAME]",
"Password": "[DSS_PASSWORD]"
}
})
dss_token_headers = {
'Prefer': 'respond-async',
'Content-Type': 'application/json'
}
dss_token_response = requests.request("POST", dss_token_url, headers=dss_token_headers, data=dss_token_payload)
print(dss_token_response.text)
2.2) Request EoD data
The screenshot of generating Python code from the Postman app
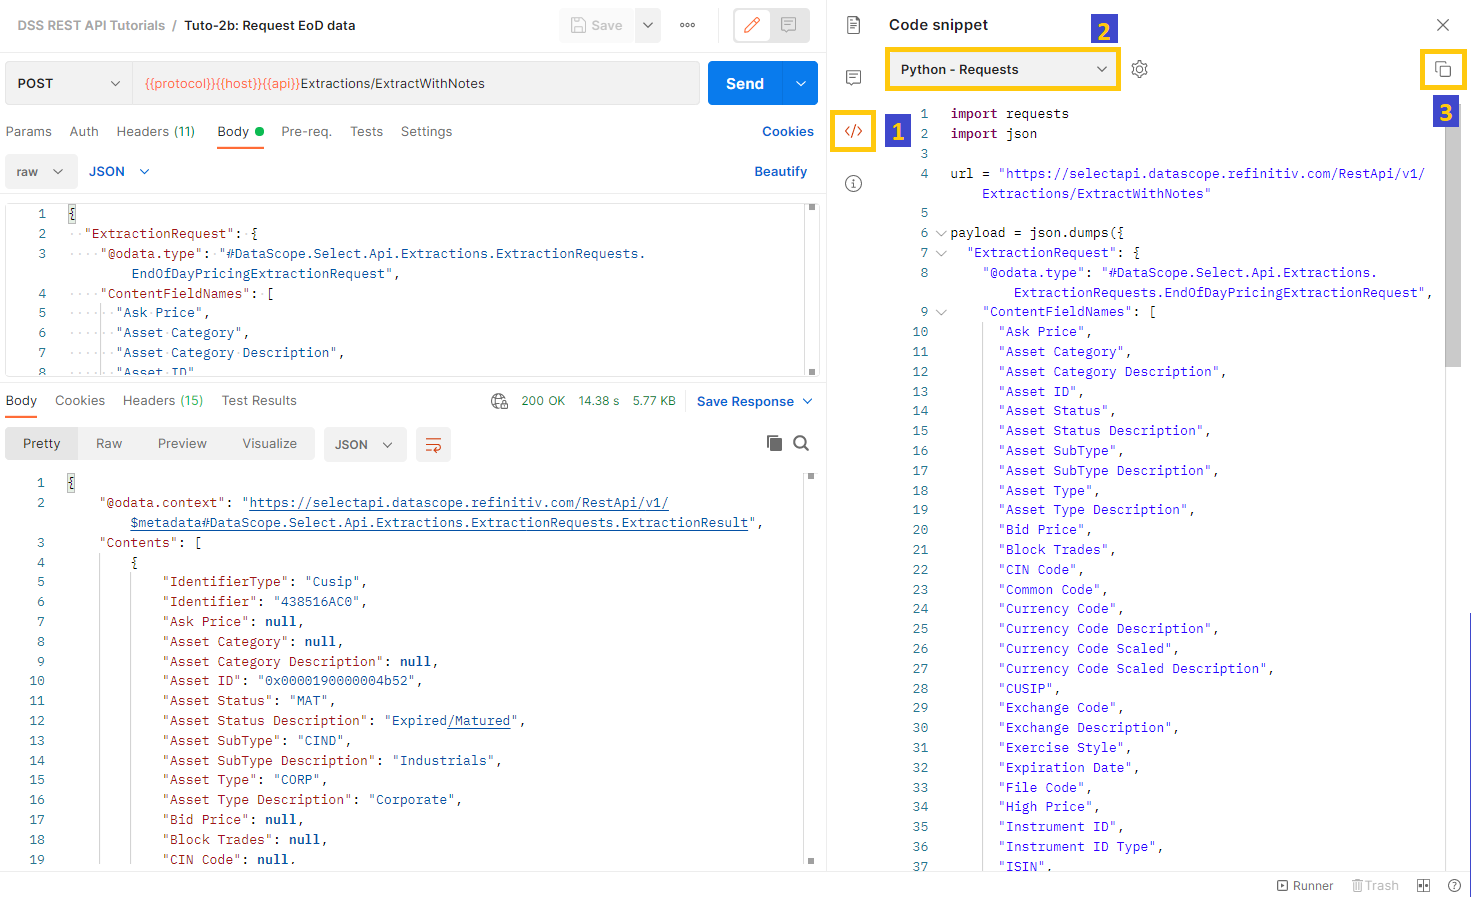
Generated code: Replace [TOKEN] with Token from the previous step
import requests
import json
dss_eod_url = "https://selectapi.datascope.refinitiv.com/RestApi/v1/Extractions/ExtractWithNotes"
dss_eod_payload = json.dumps({
"ExtractionRequest": {
"@odata.type": "#DataScope.Select.Api.Extractions.ExtractionRequests.EndOfDayPricingExtractionRequest",
"ContentFieldNames": [
"Ask Price",
"Asset Category",
"Asset Category Description",
"Asset ID",
"Asset Status",
"Asset Status Description",
"Asset SubType",
"Asset SubType Description",
"Asset Type",
"Asset Type Description",
"Bid Price",
"Block Trades",
"CIN Code",
"Common Code",
"Currency Code",
"Currency Code Description",
"Currency Code Scaled",
"Currency Code Scaled Description",
"CUSIP",
"Exchange Code",
"Exchange Description",
"Exercise Style",
"Expiration Date",
"File Code",
"High Price",
"Instrument ID",
"Instrument ID Type",
"ISIN",
"Issuer OrgID",
"Lot Size",
"Low Price",
"Market MIC",
"MIC",
"Mid Price",
"Net Asset Value",
"Number of Price Moves",
"Offer Price",
"Official Close Price",
"Open Price",
"Previous Close Price",
"Put Call Indicator",
"Quote ID",
"RCP ID",
"RIC",
"Security Description",
"SEDOL",
"Settlement Date",
"Settlement Price",
"SICC",
"Sicovam",
"Strike Price",
"Ticker",
"Trade Date",
"Trading Status",
"Trading Symbol",
"Turnover",
"Underlying RIC",
"Universal Ask Price",
"Universal Bid Ask Date",
"Universal Bid Price",
"Universal Close Price",
"Usage Instrument SubType",
"Usage Instrument Type",
"Valoren",
"Volume",
"VWAP Price",
"Wertpapier"
],
"IdentifierList": {
"@odata.type": "#DataScope.Select.Api.Extractions.ExtractionRequests.InstrumentIdentifierList",
"InstrumentIdentifiers": [
{
"Identifier": "438516AC0",
"IdentifierType": "Cusip"
},
{
"Identifier": "IBM.N",
"IdentifierType": "Ric"
}
]
},
"Condition": None
}
})
dss_eod_headers = {
'Prefer': 'respond-async',
'Content-Type': 'application/json',
'Authorization': 'Token [TOKEN]'
}
dss_eod_response = requests.request("POST", dss_eod_url, headers=dss_eod_headers, data=dss_eod_payload)
print(dss_eod_response.text)
3. Refinitiv Knowledge Direct API (RKD API)
Check the article Get the RKD API request of your choice with its Support Portal, which mentions what RKD API is and how to generate an RKD API requests using RKD API's Support Portal
The token is required In each of the RKD API calls. Hence, to call any endpoint, we must generate the token to be used.
That's why we're going to generate Python code for the endpoints below
3.1) Token Management: An application that uses a single credential for all its users can use this method to create a token. The tokens have expiry timestamps associated with them and they must be renewed before they expire. Note that you must use HTTPS when invoking this method.
3.2) Quote Service: Gets a quote value. The method lets you choose exactly which fields you retrieve when you request a quote for a specific instrument. Full details of RICs, and the fields that accompany them, are provided in the Refinitiv Knowledge Direct API Data Guide.
Follow the step mentioned at the beginning of this article to generate Python code from the RKD API request in Postman. The Jupyter notebook of these codes can be found on this Github Repository
3.1) Token Management
The screenshot of generating Python code from the Postman app
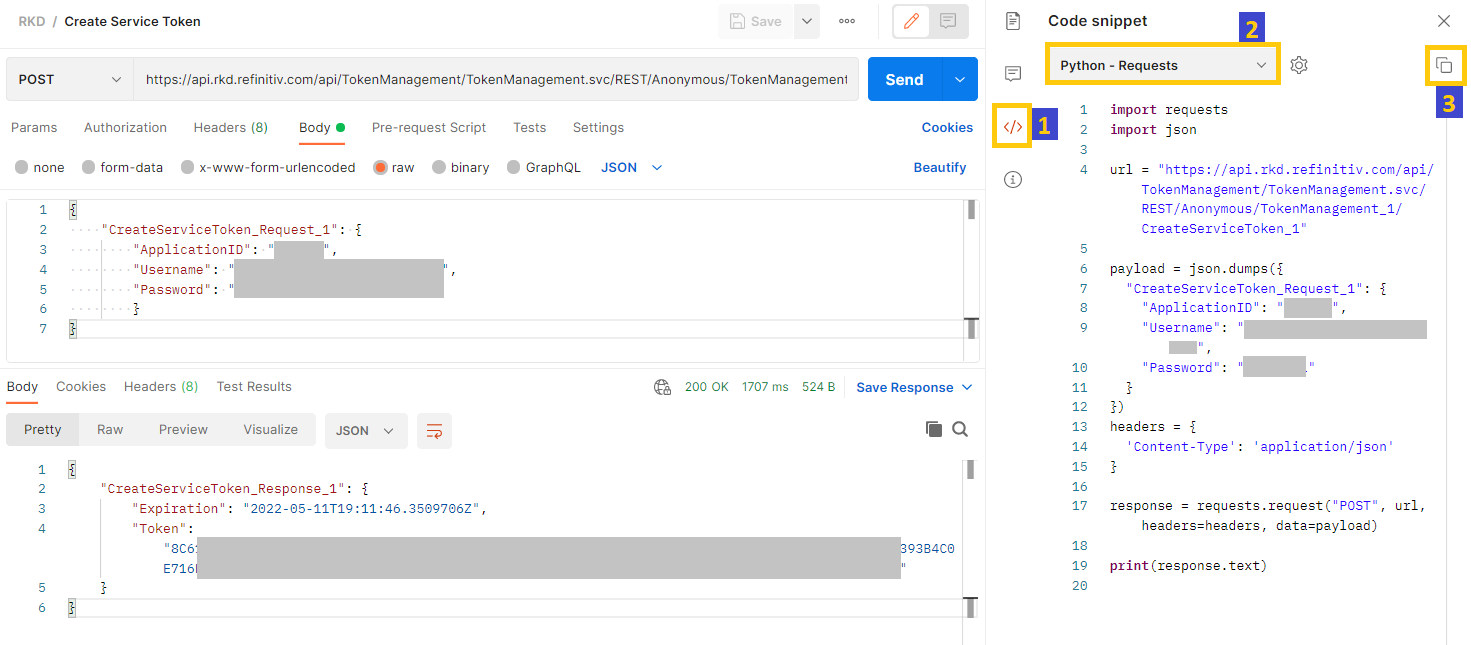
Generated code: Replace the below
- [RKD_API_APPLICATION_ID] with the Application ID
- [RKD_USERNAME] with the RKD API Username
- [RKD_PASSWORD] with the RKD API Password
import requests
import json
rkd_token_url = "https://api.rkd.refinitiv.com/api/TokenManagement/TokenManagement.svc/REST/Anonymous/TokenManagement_1/CreateServiceToken_1"
rkd_token_payload = json.dumps({
"CreateServiceToken_Request_1": {
"ApplicationID": "[RKD_API_APPLICATION_ID]",
"Username": "[RKD_USERNAME]",
"Password": "[RKD_PASSWORD]"
}
})
rkd_token_headers = {
'Content-Type': 'application/json'
}
rkd_token_response = requests.request("POST", rkd_token_url, headers=rkd_token_headers, data=rkd_token_payload)
print(rkd_token_response.text)
3.2) Quote Service
The screenshot of generating Python code from the Postman app

Generated code: Replace the below
- [RKD_API_TOKEN] with the RKD API Token retrieved from previous step
- [RKD_API_APPLICATION_ID] with the Application ID
import requests
import json
rdp_sym_url = "https://api.refinitiv.com/discovery/symbology/v1/lookup"
rdp_sym_payload = json.dumps({
"from": [
{
"identifierTypes": [
"Isin"
],
"values": [
"US01F0313464"
]
}
],
"to": [
{
"identifierTypes": [
"PermId"
]
}
],
"type": "strict"
})
rdp_sym_headers = {
'Content-Type': 'application/json',
'Accept': 'application/json',
'Authorization': 'Bearer [TOKEN]'
}
rdp_sym_response = requests.request("POST", rdp_sym_url, headers=rdp_sym_headers, data=rdp_sym_payload)
print(rdp_sym_response.text)
Conclusion
To implement a request for an API call as a code, other than the developer needs to write the code and test each change in the payload, the Postman application can be used to test an API call and generate the code for the call in any programming language you’d like with just a few clicks.
Do you think this is convenient and a very useful function? Feel free to leave a comment for any discussion regarding this article or any Refinitiv API usage in the Developer Community (Q&A Forum). I’d be more than happy to discuss it with you.
Reference
- Register or Log in to applaud this article
- Let the author know how much this article helped you