Refinitiv Contributions Channel (RCC) is the next generation of Real-Time contributions service. RCC allows users to publish market prices to the Refinitiv Real-Time platform which is the industry’s most robust global data distribution service.
Once data of the instrument or RIC is contributed to the Refinitiv Real-Time platform through RCC, the data is available to the clients using Refinitiv products, such as Refinitiv Eikon, Refinitiv Workspace, and Refinitiv Real-Time SDKs. Currently, there are three methods to contribute data to the RCC.

- Use Refinitiv Real-Time SDKs to directly connect to RCC to contribute data. To use this method, please refer to the following tutorials:
- Use Refinitiv Real-Time SDKs or WebSocket API for contributing data to RCC via Refinitiv Real-Time Distribution System. To use this method, please refer to the following articles:
- Use Web Socket API to directly connect to RCC to contribute data
This tutorial focuses on the third method which shows how to use WebSocket API to directly connect and contribute data to the Refinitiv Contributions Channel (RCC). The Python programming language is used for demonstration, but the implementation can be applied to any programming languages which support WebSocket connection.
Prerequisites
To follow the steps mentioned in this tutorial, you need to have:
Python version 3.7.x or above
Credentials (machine ID and password) to connect to the Refinitiv Data Platform for authentication. The machine ID must be set up for contributions.
RIC to which that the user has permission to contribute data
The Python example (Refinitiv Contributions Channel WebSocket Examples) is available in the Downloads tab.
Developing a Python Application to Connect and Contribute data to RCC
To contribute data over the WebSocket connection to the Refinitiv Contributions Channel, there are two different servers the application connects to. The first server is the RDP Auth Gateway for Authentication purposes. The application will connect to this server to retrieve tokens used to connect to the Refinitiv Contributions Channel. The second server is the Refinitiv Contributions Channel. The application will create a WebSocket connection to the Refinitiv Contributions Channel, log in with the token, and then contribute data.
The high-level sequence of interactions for contributing data is illustrated in the diagram below.
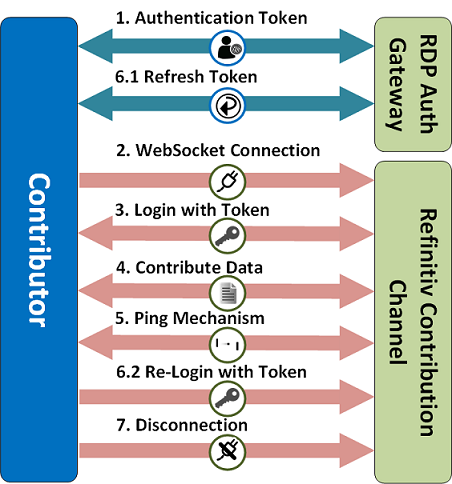
1. Authentication Token
Refinitiv Data Platform (RDP) entitlement checking is based on the OAuth 2.0 specification. This requires the use of two types of tokens.
- a short-lived Access token which is used as part of the Login to Refinitiv Contributions Channel
- a Refresh token which is used to get a new Access token and a new Refresh token when the previous ones expire
Detailed exploration of the tokens and how to request them is outside the scope of this high-level overview. You can read more about these token types and their usage in Authorization –All about tokens along with the Authorization in Python tutorial. In addition to these, you will also find RDP Gateway Authentication examples in Java, C#, and Python in the RDP subfolder of the Sample Applications available on the Downloads page.
Note that developers should be coding against the Pre-Production Environment while developing applications, as shown below.
| RDP Auth Gateway URL | |
|---|---|
| Pre-Production Environment | https://api.ppe.refinitiv.com/auth/oauth2/v1/token |
| Production Environment | https://api.refinitiv.com:443/auth/oauth2/v1/token |
To get tokens, the application needs to send an HTTP POST request with the machine ID or user name and password to the RDP Auth Gateway. The content type of the POST message is application/x-www-form-urlencoded. The body of the POST message contains the following key and value pairs.
| KEY | VALUE |
|---|---|
| username | <machine_ID> |
| password | <password> |
| grant_type | Password |
| client_id | <machine_ID> |
| takeExclusiveSignOnControl | true |
The machine ID can be used as the value of the client_id.
The HTTP POST message looks like this.
POST http://api.refinitiv.com/auth/oauth2/...
Host: api.refinitiv.com
User-Agent: python-requests/2.12.4
Accept-Encoding: gzip, deflate
Accept: application/json
Connection: keep-alive
Content-Length: 112
Content-Type: application/x-www-form-urlencoded
Authorization: Basic RDZENz*************DNkNEREQ3NDo=
username=****&password=****&grant_type=password&client_id=****&takeExclusiveSignOnControl=true
The client ID can be the machine ID and is sent in the HTTP header as Basic Authentication: Authorization: Basic <BASE64 encoding of the client ID>.
If the credential is valid, the status of the HTTP response message will be 200 OK and the body of the response message will contain the tokens.
200 OK 2.1k
Date: Fri, 05 Feb 2021 06:42:30 GMT
Content-Type: application/json
Transfer-Encoding: chunked
Connection: keep-alive
Content-Encoding: gzip
X-Amzn-Trace-Id: Root=1-601ce8d6-58df7be032ced39c40c124dc
X-Served-By: region=ap-southeast-1; cid=7a72cda58f2a4e4a96bf7eb04fd9dc53
X-Tr-Requestid: ca60d000-ed35-49d1-87e2-612de922512f
{
"access_token": "****",
"expires_in": "600",
"refresh_token": "****",
"scope": "",
"token_type": "Bearer"
}
The get_sts_token method in the Python example code is used to retrieve tokens.
...
user = '<machine ID>'
password = '<password>'
clientid = '<machine ID>'
client_secret = ''
if __name__ == "__main__":
…
sts_token, refresh_token, expire_time = get_sts_token(None)
...
def get_sts_token(current_refresh_token, url=None):
…
if url is None:
url = auth_url
…
…
data = f'grant_type=password&username={user}&password={password}&client_id={clientid}&takeExclusiveSignOnControl=true'
…
…
r = requests.post(url,
headers={'Accept': 'application/json','content-type': 'application/x-www-form-urlencoded'},
data=data,
auth=(clientid, client_secret),
verify=True,
allow_redirects=False)
…
…
if r.status_code == 200:
auth_json = r.json()
print("RDP-API Gateway Authentication succeeded. RECEIVED:")
print(json.dumps(auth_json, sort_keys=True, indent=2, separators=(',', ':')))
return auth_json['access_token'], auth_json['refresh_token'], time.time() + int(auth_json['expires_in'])
…
The get_sts_token method constructs the post message and then sends it to the RDP Auth Gateway. If the status code in the response is 200, the method will return the access token, refresh token, and expiration to the caller. The values of the access_token, and refresh_token are stored in the variables: sts_token, and refresh_token respectively, and the expires_in (second) is used to calculate the expiration timestamp and stored in the variable expire_time to be used in the subsequent steps.
2. WebSocket Connection
After getting the access token, the application establishes a ‘long-lived’ type WebSocket connection to the Refinitiv Contributions Channel.
The code required to do this will depend on the language and the specific WebSocket library being used. For this tutorial, we will use the Python ‘websocket-client’ module that provides an ‘event-driven’ interface.
...
port = '443'
scheme = 'wss'
ws_address = f"{scheme}://{hostname}:{port}/WebSocket"
…
def connect_websocket():
""" Connecting to WebSocket """
…
# Start WebSocket handshake
print("Connecting to WebSocket " + ws_address +
" ... - Attempt: " + str(retry_count + 1))
web_socket_app = websocket.WebSocketApp(ws_address, on_message=on_message,
on_error=on_error,
on_close=on_close,
subprotocols=['tr_json2'])
web_socket_app.on_open = on_open
wst = threading.Thread(target=web_socket_app.run_forever)
wst.start()
…
if __name__ == "__main__":
…
connect_websocket()
When creating the WebSocket we need to provide the callback methods that the WebSocketApp will call for the following events:
on_open: Once the WebSocket is open
on_close: When the WebSocket is closed
on_error: If an error occurs
on_message: When it receives a message from the Refinitiv Contributions Channel
Note also that we set the ‘subprotocols’ as ‘tr_json2’ to ensure that the ‘Sec-WebSocket-Protocol 'header value of the WebSocket connection is ‘tr_json2’.
Then, it creates a new thread to dispatch messages retrieved via the WebSocket connection to the callback methods. The above code can vary depending on the WebSocket library you decide to use.
The raw request and response for establishing a WebSocket connection look like:
GET https://contrib-....refinitiv.com/WebSocket
Upgrade: websocket
Host: contrib-....refinitiv.com
Origin: http://contrib-....refinitiv.com
Sec-WebSocket-Key: LMKIj3hSmrIJchSsEGtYQQ==
Sec-WebSocket-Version: 13
Connection: upgrade
Sec-WebSocket-Protocol: tr_json2
<< 101 Switching Protocols 0b
Upgrade: websocket
Connection: Upgrade
Sec-WebSocket-Protocol: tr_json2
Sec-WebSocket-Accept: BA//eSPWsEf0HZYrXoa9QuybY9s=
Note that developers should be coding against the UAT Environment while developing applications.
These servers are for WebSocket connections and must not be used with the Refinitiv Real-Time SDK RCC Contribution examples.
Note: These are Internet endpoints but we also provide private Delivery Direct network access endpoints.
3. Login with Token
Once the connection to the server has been established and the WebSocket connection is open, the ‘on_open’ callback method is called. In this method, the application attempts to log in to the Refinitiv Contributions Channel which is done by sending a login request message to the server. You can find more detail regarding the WebSocket API's JSON message format in the WebSocket API Try it Now! Documentation.
def on_open(_):
""" Called when handshake is complete and websocket is open, send login """
print("WebSocket successfully connected!")
global web_socket_open
web_socket_open = True
send_login_request(sts_token, False)
The on_open callback method calls the send_login_requests method with the access token.
def send_login_request(auth_token, is_refresh_token):
"""
Send login request with authentication token.
Used both for the initial login and subsequent reissues to update the
authentication token
"""
login_json = {
'ID': 1,
'Domain': 'Login',
'Key': {
'NameType': 'AuthnToken',
'Elements': {
'ApplicationId': '',
'Position': '',
'AuthenticationToken': '',
}
}
}
login_json['Key']['Elements']['ApplicationId'] = app_id
login_json['Key']['Elements']['Position'] = position
login_json['Key']['Elements']['AuthenticationToken'] = auth_token
if is_refresh_token:
login_json['Refresh'] = False
web_socket_app.send(json.dumps(login_json))
print("SENT:")
print(json.dumps(login_json, sort_keys=True, indent=2, separators=(',', ':')))
The send_login_requests method constructs a JSON login request message containing the following information.
ApplicationID – unique ID (optionally) allocated to your application by your organization, otherwise use the default value of 256
Position – the local IP address/hostname of the machine that your application is running on
ID – unique identifier for each event stream between your application and server, use the value of 1 for the Login request
AuthenticationToken - the Access Token obtained previously from the RDP Auth Gateway
This method supports both the first login attempt and a re-login with the new access token (step 6.2). For the first login attempt, specifying False in the second parameter when calling the send_login_requests method. With this setting, the application will use the default value of the ‘Refresh’ flag which is True in the login request message. This ‘Refresh’ flag indicates if the application requires a refresh response for this request. For the first login attempt, the application requires a refresh response from the server so it uses the default value of the ‘Refresh’ flag which is True in the login request message.
Finally, we send the JSON message over the WebSocket to the Refinitiv Contributions Channel.
The login request message looks like this.
{
"ID":1,
"Domain":"Login",
"Key":{
"NameType":"AuthnToken",
"Elements":{
"ApplicationId":"256",
"Position":"192.168.0.184/WIN-2NOVD7CLMV1",
"AuthenticationToken":"******"
}
}
}
Once the Login request has been sent, we expect a login refresh response from the server in the form of a JSON message over the WebSocket. Earlier on, we specified an on_message callback when creating our WebSocket so this method should be invoked when the response message arrives from the server.
def on_message(_, message):
""" Called when message received, parse message into JSON for processing """
print("RECEIVED: ")
message_json = json.loads(message)
print(json.dumps(message_json, sort_keys=True, indent=2, separators=(',', ':')))
for singleMsg in message_json:
process_message(singleMsg)
The retrieved response could contain an array of JSON messages so the on_message method iterates all JSON messages in the response. Then, the process_message method is called for each JSON message. The process_message handles each message according to its message type and message domain.
def process_message(message_json):
"""Parse at high level and output JSON of message."""
message_type = message_json['Type']
if message_type in ["Refresh", "Status"]:
if 'Domain' in message_json:
message_domain = message_json['Domain']
if message_domain == "Login":
process_login_response(message_json)
…
The significance of receiving a Login ‘Refresh’ is that the server has accepted our Login request – otherwise we would receive a Login ‘Status’ message with details on why the Login was rejected e.g. unknown user, expired token, etc.
- A successful Login should elicit a response similar to the one below:
{
"ClearCache":false,
"DoNotCache":true,
"Domain":"Login",
"ID":1,
"Key":{
"Elements":{
"TRCE:MaxMessagesPerSecond":1000
},
"Name":"*****"
},
"Private":true,
"Solicited":false,
"State":{
"Data":"Ok",
"Stream":"Open",
"Text":"Login accepted by host 4245b0fa1b69 via ip-10-158-203-19"
},
"Type":"Refresh"
}
Note that if element TRCE:MaxMessagesPerSecond is present in the login response message, it indicates the maximum message posting rate allowed for this application, and should not be exceeded.
Note also, the ID of 1 – which is the ID of Login Stream.
- The application can get the login-stream-closed message with the "System busy" string in the status text as a response like the below text box.
Please be aware that this is not an error. it simply means that the server can't handle the request now. This is normal for a cloud application. In this case, the connection will be disconnected and we need to perform the retry WebSocket connection logic to recover the connection (the retry logic in this tutorial can be found in the main function and it will be performed when the connection is not closed by the user).
{
"Domain":"Login",
"ID":1,
"Private":true,
"State":{
"Code":"NoResources",
"Data":"Suspect",
"Stream":"Closed",
"Text":"System busy"
},
"Type":"Status"
}
4. Contribute Data
Once the server has accepted our Login request by sending the login refresh message, the application can start contributing data to the Refintiv Contributions Channel. In the example code, the send_market_price_post method is used to contribute data. It is called inside the process_login_response method.
def process_login_response(message_json):
…
send_market_price_post(ric)
The send_market_price_post method accepts a parameter which is a RIC. The example gets the RIC from the parameter passed when running the example. This method constructs a post message with the following attributes:
We are going to use the Login Stream to post the messages, hence the same stream ID (ID) 1 as the above Login. This technique is called off-stream posting. Please refer to the WebSocket API tutorials for an explanation of off-stream vs on-stream posting.
The Ack flag of the post message is True which indicates that it expects the server to send an acknowledgment message back to the application
The Key attribute contains the RIC and service name. The default service of the RCC is “DDS_TRCE”
The PostID attribute contains the Post ID used to identify the post message – we expect to receive this back in the Ack message corresponding to this Post.
The Message attribute contains the update message with the field list in its payload. The message must be the Update message type.
service = 'DDS_TRCE'
…
def send_market_price_post(ric_name):
""" Create and send simple Market Price post """
global PRIMACT
global SEC_ACT
global post_id
mp_post_json = {
"Ack":True,
"ID":1,
"Key":{
"Name": ric_name,
"Service": service
},
"Message":{
"Fields":{
"ASK":451.57,
"PRIMACT_1": PRIMACT,
"SEC_ACT_1": SEC_ACT,
"DSPLY_NAME": "Hello RCC",
"BID":451.55,
},
"ID":0,
"Type":"Update"
},
"PostID":post_id,
"Type":"Post"
}
PRIMACT = PRIMACT + 1
SEC_ACT = SEC_ACT + 1
post_id = post_id + 1
web_socket_app.send(json.dumps(mp_post_json))
print("SENT:")
print(json.dumps(mp_post_json, sort_keys=True, indent=2, separators=(',', ':')))
Next, it increases the values in the PRIMACT, SEC_ACT, and post_id by one so the values will be different in the subsequent contributions. Finally, the post message is sent over the WebSocket to the Refinitiv Contributions Channel.
The post message looks like the following.
{
"Ack":true,
"ID":1,
"Key":{
"Name":"TRCCTEST01",
"Service":"DDS_TRCE"
},
"Message":{
"Fields":{
"ASK":451.57,
"PRIMACT_1":100,
"SEC_ACT_1":20,
"DSPLY_NAME":"Hello RCC",
"BID":451.55
},
"ID":0,
"Type":"Update"
},
"PostID":1,
"Type":"Post"
}
Because the Ack flag is set to True, we expect the server sends the acknowledgment message back to the application. Therefore, in the process_message method, there is a code used to verify and handle the acknowledgment message.
def process_message(message_json):
…
if message_type == "Ack":
...
The acknowledgment message looks like the following.
{
"ID":1,
"Type":"Ack",
"AckID":1
}
The AckID in the acknowledgment message typically matches the post message’s PostID.
For the negative acknowledgment, the message will contain the NaKCode attribute that indicates the problem. The negative acknowledgment message looks like the following.
{
"AckID":1,
"ID":1,
"NakCode":"SymbolUnknown",
"Text":"Symbol unknown",
"Type":"Ack"
}
For all available NaKCodes, please refer to the WebSocket API Specifications and Developers Guide.
5. Ping Mechanism
The Refinitiv Contributions Channel uses the ping mechanism to determine the status of the connected application. It will regularly send a ping message every specific interval (20 seconds).
{"Type":"Ping"}
Therefore, the application must send a pong message back to the server when receiving the ping message.
The pong message looks like the following.
{"Type": "Pong"}
If the server does not receive any messages from the application for three consecutive ping messages, the server will cut the connection.
6. Refresh Token and Re-Login
The access token retrieved in the first step (Authentication Token) and used in the third step (Login with Token) will expire every 10 minutes (600 seconds). Therefore, we need to get a new access token from the RDP Auth Gateway and use it to re-login to the Refinitiv Contributions Channel before it expires.
6.1 Refresh Token
To get a new access token, the application needs to send an HTTP POST request to the RDP Auth Gateway. The content type of the POST message is application/x-www-form-urlencoded. The body of the POST message contains the following key and value pairs.
| KEY | VALUE |
|---|---|
| username | <machine_ID> |
| refresh_token | <current refresh token> |
| grant_type | refresh_token |
| client_id | <machine_ID> |
The machine ID can be used as the value of the client_id.
The grant_type is refresh_token and it contains the refresh_token key instead of password.
The HTTP POST message looks like this.
POST http://api.refinitiv.com/auth/oauth2/...
Host: api.refinitiv.com
User-Agent: python-requests/2.12.4
Accept-Encoding: gzip, deflate
Accept: application/json
Connection: keep-alive
Content-Length: 112
Content-Type: application/x-www-form-urlencoded
Authorization: Basic RDZENz*************DNkNEREQ3NDo=
username=****&refresh_token=****&grant_type=refresh_token&client_id=****
The client ID can be the machine ID and is sent in the HTTP header as Basic Authentication: Authorization: Basic <BASE64 encoding of the client ID>.
If the refresh token is valid, the status of the HTTP response message will be 200 OK and the body of the response message will contain the tokens.
200 OK 2.1k
Date: Tue, 09 Feb 2021 10:30:36 GMT
Content-Type: application/json
Transfer-Encoding: chunked
Connection: keep-alive
Content-Encoding: gzip
X-Amzn-Trace-Id: Root=1-6022618c-073dec015a2219b27f4b1839
X-Served-By: region=ap-southeast-1; cid=7a72cda58f2a4e4a96bf7eb04fd9dc53
X-Tr-Requestid: de4021f7-2e98-4f21-899e-a744c575882a
{
"access_token": "****",
"expires_in": "300",
"refresh_token": "****",
"scope": "",
"token_type": "Bearer"
}
The get_sts_token method in the Python example code is used to refresh tokens by setting the current refresh token in the first argument. This method is called by the main thread before the access token expires.
if __name__ == "__main__":
…
try:
while True:
if int(expire_time) > 30:
time.sleep(int(expire_time) - 30)
else:
sys.exit(1)
sts_token, refresh_token, expire_time = get_sts_token(refresh_token)
if not sts_token:
sys.exit(1)
…
…
def get_sts_token(current_refresh_token, url=None):
…
data = f'grant_type=refresh_token&username={user}&refresh_token={current_refresh_token}&client_id={clientid}'
…
pdata=(url,{'headers':{'Accept': 'application/json', 'content-type': 'application/x-www-form-urlencoded'}},
{'data':data},
{'auth':(clientid, client_secret)},
{'verify':True},
{'allow_redirects':False})
if debug_level > 0: pprint(pdata)
r = requests.post(url,
headers={'Accept': 'application/json','content-type': 'application/x-www-form-urlencoded'},
data=data,
auth=(clientid, client_secret),
verify=True,
allow_redirects=False)
…
if r.status_code == 200:
auth_json = r.json()
print("RDP-API Gateway Authentication succeeded. RECEIVED:")
print(json.dumps(auth_json, sort_keys=True, indent=2, separators=(',', ':')))
return auth_json['access_token'], auth_json['refresh_token'], time.time() + int(auth_json['expires_in'])
The get_sts_token method constructs the post message and then sends it to the RDP Auth Gateway. If the status code in the response is 200, the method will return the new access token, refresh token, and expiration to the caller. The caller updates the values in the sts_token, refresh_token, and expire_time variables.
6.2 Re-Login with Token
After getting the new access token, the application needs to send a login request with the new access token to the Refinitiv Contributions Channel. This can be done by calling the send_login_request method with the new access token as the first argument and True as the second argument.
if __name__ == "__main__":
…
try:
# If the connection is not disconnected by the user
while not disconnected_by_user:
# Generate token with refresh_token when the expire_time is less than next 60 sec
if expire_time - time.time() < 60:
print(
f"[GENERATE NEW TOKEN] Expire time is: {expire_time}, current time is: {time.time()}. {expire_time-time.time()} seconds left, generate a new token with refresh_token")
sts_token, refresh_token, expire_time = get_sts_token(
refresh_token)
# Update token in WebSocket
if logged_in:
send_login_request(sts_token, True)
…
time.sleep(1) # to not let it process all the time
…
The send_login_requests method constructs a JSON login request message and then sends it over the WebSocket connection to the Refinitiv Contribution. The login request message contains the new access token and the Refresh flag set to False. Therefore, it will not receive any response from the server for this login request.
The login request message looks like the following.
{
"ID":1,
"Domain":"Login",
"Key":{
"NameType":"AuthnToken",
"Elements":{
"ApplicationId":"256",
"Position":"192.168.0.184/WIN-2NOVD7CLMV1",
"AuthenticationToken":"*********"
}
},
"Refresh":false
}
After this, the application can continue contributing data to the Refinitiv Contributions Channel as and when required.
7. Disconnection
Once the application finishes contributing data to the Refinitiv Contributions Channel. The application needs to send the login close message to clean up the connection properly, and then close the WebSocket connection before exit.
LogOut_json = {
"ID": 1,
"Type": "Close",
"Domain": "Login"
}
...
def check_and_close_websocket():
""" Check if websocket is closed (on_close function is called) """
if not web_socket_closed:
web_socket_app.send(json.dumps(LogOut_json))
web_socket_app.close()
The login close message looks like the following.
{
"ID": 1,
"Type": "Close",
"Domain": "Login"
}
Running the example
The Python example (Refinitiv Contributions Channel WebSocket Examples) is available in the Downloads tab. To run the example, run the example the following parameters:
| Parameter | Description |
|---|---|
| --user | The machine ID |
| --password | The password of the machine ID |
| --clientid | The client ID |
| --ric | RIC to which that the user has permission to contribute data |
The output looks like the following.
C:\>python websocket_authentication_argp.py --user <machine ID> --password <password> --clientid <machine ID> --ric TRCCTEST01
Sending authentication request with password to https://api.refinitiv.com:443/auth/oauth2/...
RDP-API Gateway Authentication succeeded. RECEIVED:
{
"access_token":"*****",
"expires_in":"600",
"refresh_token":"*****",
"scope":"",
"token_type":"Bearer"
}
Connecting to WebSocket wss://contrib-....refinitiv.com:443/WebSocket ...
WebSocket successfully connected!
SENT:
{
"Domain":"Login",
"ID":1,
"Key":{
"Elements":{
"ApplicationId":"256",
"AuthenticationToken":"*****",
"Position":"192.168.0.184/WIN-2NOVD7CLMV1"
},
"NameType":"AuthnToken"
}
}
RECEIVED:
[
{
"ClearCache":false,
"DoNotCache":true,
"Domain":"Login",
"ID":1,
"Key":{
"Elements":{
"TRCE:MaxMessagesPerSecond":1000
},
"Name":"********"
},
"Private":true,
"Solicited":false,
"State":{
"Data":"Ok",
"Stream":"Open",
"Text":"Login accepted by host 01b6ef18b14d via ip-10-158-203-19"
},
"Type":"Refresh"
}
]
SENT:
{
"Ack":true,
"ID":1,
"Key":{
"Name":"TRCCTEST01",
"Service":"DDS_TRCE"
},
"Message":{
"Fields":{
"ASK":451.57,
"BID":451.55,
"DSPLY_NAME":"Hello RCC",
"PRIMACT_1":100,
"SEC_ACT_1":20
},
"ID":0,
"Type":"Update"
},
"PostID":1,
"Type":"Post"
}
RECEIVED:
[
{
"AckID":1,
"ID":1,
"Type":"Ack"
}
]
SENT:
{
"Ack":true,
"ID":1,
"Key":{
"Name":"TRCCTEST01",
"Service":"DDS_TRCE"
},
"Message":{
"Fields":{
"ASK":451.57,
"BID":451.55,
"DSPLY_NAME":"Hello RCC",
"PRIMACT_1":101,
"SEC_ACT_1":21
},
"ID":0,
"Type":"Update"
},
"PostID":2,
"Type":"Post"
}
RECEIVED:
[
{
"AckID":2,
"ID":1,
"Type":"Ack"
}
]
…
Press Ctrl+C to send the login close message, close the WebSocket connection, and exit. The flag disconnected_by_user will be set to true to indicate that the connection is closed by the user and the retry WebSocket connection logic is not needed to run (as we only apply the retry logic when the connection is not closed by the user, such as when the system is busy).
except KeyboardInterrupt:
# If user provide the keyboard interrupt, set a flag to indicate that the connection is disconnected by user
print("Getting keyboard interrupt. closing the websocket connection")
disconnected_by_user = True
check_and_close_websocket()