| Last update | Nov 2023 |
| Environment | Windows |
| Language | C# |
| Compilers | Microsoft Visual Studio 2019 |
| Prerequisites | DSS login, internet access, having done the previous tutorial |
| Source code | Download .Net SDK Tutorials Code |
Tutorial purpose
This is the second tutorial in a series of .Net SDK tutorials. It is assumed that the reader has acquired the knowledge delivered in the previous tutorial before following this one.
This tutorial is an introduction to the 3 basic core DSS operations. We shall take programmatic control of the DSS web GUI by creating:
- An instrument list: a list of financial instruments for which data is requested.
- A report template: defines the format and fields list of requested data: in this case 4 fields of EOD (end of day) data.
- A schedule: defines when the data will be retrieved: in this case it is an immediate extraction.
After that, to cleanup, we delete these 3 items.
Table of contents
Additional details on the prerequisites
An installed copy of Microsoft Visual Studio 2019 is required to experiment with the code.
A DSS user account (user name and password) is required, because this application uses it to authenticate to the DSS server.
An internet connection is required to download the software, and run it, as it connects to the DSS server.
If you have not yet gone through Tutorial 1, which includes the installation of the SDK and the code of all tutorials, do it now before proceeding further.
Getting ready
Opening the solution
The code installation was done in Tutorial 1.
Opening the solution is similar to what was done in Tutorial 1:
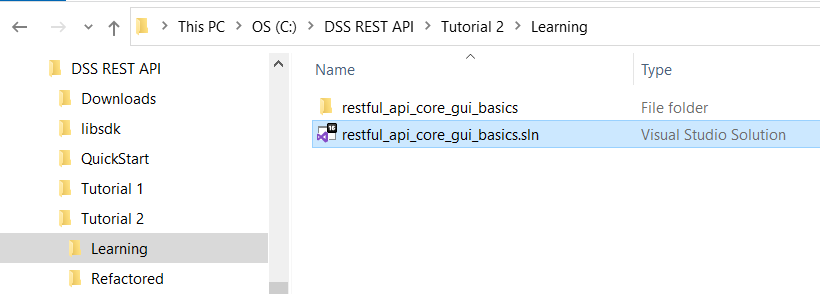
- Navigate to the \DSS REST API\Tutorial 2\Learning folder.
- Double click on the solution file restful_api_core_gui_basics.sln to open it in Microsoft Visual Studio:
Referencing the DSS SDK
Before anything else, you must reference the DSS REST API .Net SDK in the Microsoft Visual Studio project.
Important: this must be done for every single tutorial, for both the learning and refactored versions.
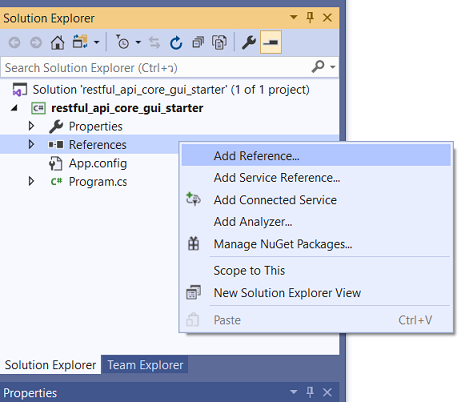
In Microsoft Visual Studio, in the Solution Explorer, right click on the References folder, select Add Reference...
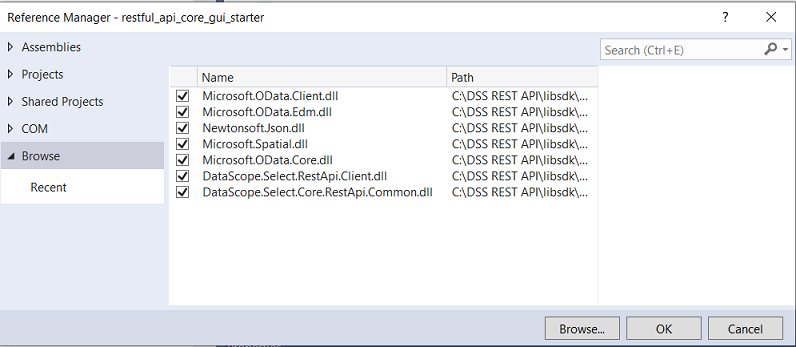
If you are running this tutorial just after the previous one, the reference manager will directly display the list of DLL files:
If that is the case, just select all 7 DSS SDK DLL files by clicking the selector box for each one, then click on OK:
If the 7 DSS SDK DLL files are not displayed, then reference the DSS SDK by following the instructions in Tutorial 1, under section: Referencing the DSS SDK.
Viewing the C# code
In Microsoft Visual Studio, in the Solution Explorer, double click on Program.cs and on DssClient.cs to display both file contents. Each file will be displayed in a separate tab:

Setting the user account
Before running the code, you must replace YourUserId with your DSS user name, and YourPassword with your DSS password, in these 2 lines of Program.cs:
private static string dssUserName = "YourUserId";
private static string dssUserPassword = "YourPassword";
Important reminder: this must be done for every single tutorial, for both the learning and refactored versions.
Failure to do so will result in an error at run time (see Tutorial 1 for more details).
Basic operations: explanations
Before explaining the code, let us briefly explain what we are trying to achieve.
To retrieve data from DSS, 3 basic elements are required:
- An instrument list
This is the list of financial instrument identifiers for which data will be requested.
Using the API, an instrument list can be created, and instruments added to it. - A report template
It defines the format of the requested data, and the list of fields.
Depending on the requested data (pricing data, reference data, news, estimates, corporate actions, etc.), different report options and data fields are available.
Using the API, a report template can be created, and its data fields selected. - An extraction schedule
It defines when the data will be retrieved, and triggers the actual data extraction.
Its frequency could be once-off or recurring.
Its timing could be immediate, at a fixed time, or triggered when data is available.
They are all stored on the DSS server, and you can have several of each.
They can be created, displayed, modified and deleted manually, using the DSS web GUI, and that might be the best solution if they are invariable in time and only need to be created once. But regular changes to some or all of these 3 elements might be required, and the purpose of the API is to give us the tools to automate that. The most frequent use case is the need to change the instrument list, which could be on a daily basis.
The purpose of this tutorial is to demonstrate how to do these things programmatically, using the DSS REST API.
If your use case only requires regular changes to an instrument list, you could decide to manually create an empty instrument list, a report template and an extraction schedule, and then create a program that automatically changes the contents of the instrument list. You could also do it all programmatically, which is easier.
Important note on DSS programming approaches
There are several ways you can proceed. In a nutshell, there are 2 approaches:
- Create (and modify when required) an instrument list, report template and extraction schedule, all stored on the DSS server, and retrieve your data once the extraction has completed. This mimics what you can do with the DSS web GUI. This approach is used in tutorials 2 to 4.
- Using On Demand advanced API calls, it is also possible to do on the fly data requests without storing an instrument list, report template and extraction schedule on the DSS server. It is a more direct and dynamic way of doing things. In this case the instrument list, report template and extraction schedule are ephemeral, and cannot be seen in the DSS web GUI. This approach is used in tutorials 5 and following.
The choice is yours, and will depend on your use case.
Understanding the code
We shall only describe what is new versus the previous tutorial.
DssClient.cs
This is nearly the same as the refactored version of Tutorial 1, except for the leading comment, and the fact that we must expose our extractions context to our main program:
//extractionsContext temporarily set to public, to expose it to our learning program.
public ExtractionsContext extractionsContext;
The reason for this lies in the way we coded our main program: as most DSS API calls were put in the learning version of the code (to make it easier to follow), the main program requires access to the extractions context.
No additional explanations are required as the rest of the code was described in Tutorial 1.
Program.cs
At the top of the code we see the using directives. As we are using a whole set of API calls, several using directives are required to give us access to the types of the DSS API namespace, so that we do not have to qualify the full namespace each time we use them. As in Tutorial 1, these are followed by a using directive referring to the namespace of our code:
using System;
using System.Collections.Generic;
using System.Linq;
using System.Text;
using System.Threading.Tasks;
using DataScope.Select.Api.Extractions;
using DataScope.Select.Api.Extractions.SubjectLists;
using DataScope.Select.Api.Content;
using DataScope.Select.Api.Extractions.ReportTemplates;
using DataScope.Select.Api.Extractions.Schedules;
using DataScope.Select.Api;
using DssRestfulApiTutorials;
In the main code block, after connecting to the server, we expose the extractions context from DssClient (to avoid having to use the dssClient. prefix before each use of extractionsContext):
ExtractionsContext extractionsContext = dssClient.extractionsContext;
After those preliminary steps, we proceed to implement the three basic operations.
Creating an instrument list
This is the first of our 3 basic operations. Programmatically, this is done in 3 steps:
- Create an array of instrument identifiers, in memory.
- Create an (empty) instrument list, on the DSS server.
- Append the instrument identifiers to our instrument list, on the DSS server.
Step 1: create an array of instrument identifiers, in memory:
IEnumerable<InstrumentIdentifier> instrumentIdentifiers = new[]
{
new InstrumentIdentifier
{
Identifier = "IBM.N",
IdentifierType = IdentifierType.Ric,
UserDefinedIdentifier = "EQUITYTEST"
},
new InstrumentIdentifier
{
Identifier = "438516AC0",
IdentifierType = IdentifierType.Cusip,
UserDefinedIdentifier = "BONDTEST"
}
};
A financial instrument identifier is created using at least 2 parameters (the third one here is optional):
- The identifier itself, a string containing the instrument code.
- Its type (Cusip, Isin, Ric, etc., more than 30 are available). In this example we define one instrument using a CUSIP code (Committee on Uniform Securities Identification Procedures, an identification system for north American and Canadian stocks) and another one using a RIC.
Note:
- All possible types can be displayed using the IntelliSense functions of Visual Studio, i.e. in this specific case right click on IdentifierType in the code, followed by F12 or Alt-F12.
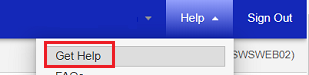
- More information on them can be found by browsing in the API Reference Tree or searching in the help in the DSS web GUI:
- An optional user defined identifier (string). This is just an additional tag that will be stored in the instrument list on the DSS server. It could contain a customer internal identifier, asset class, industry sector, country, currency, etc. Instrument identifiers can be filtered or sorted by this tag in the DSS web GUI.
Step 2: create an (empty) instrument list, on the DSS server; a list ID will be returned:
var instrumentList = new InstrumentList { Name = "myInstrumentListName" };
extractionsContext.InstrumentListOperations.Create(instrumentList);
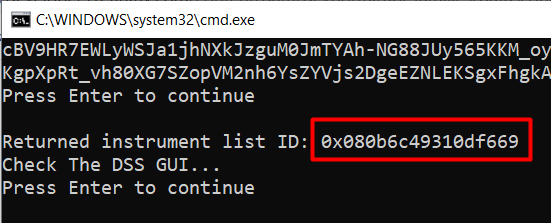
DebugPrintAndWaitForEnter("Returned instrument list ID: " +
instrumentList.ListId + "\nCheck The DSS GUI...");
Here is the returned instrument list ID:
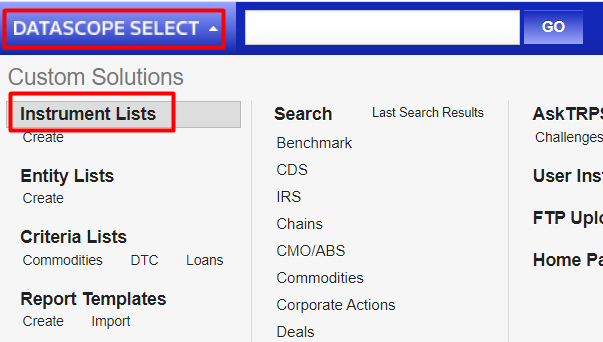
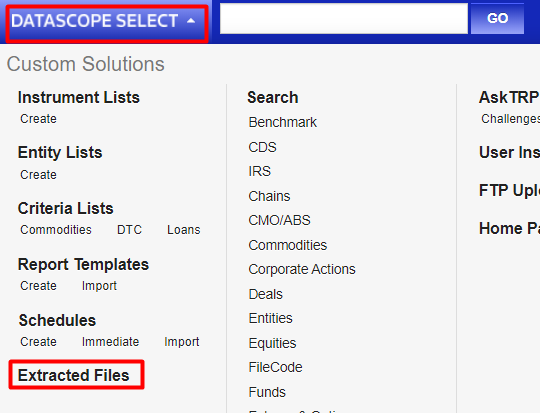
Let us display the result of this operation in the DSS web GUI: click on DATASCOPE SELECT top left, then on Instrument Lists:
At this stage, the instrument list is created, but when we click on it we see it is empty:
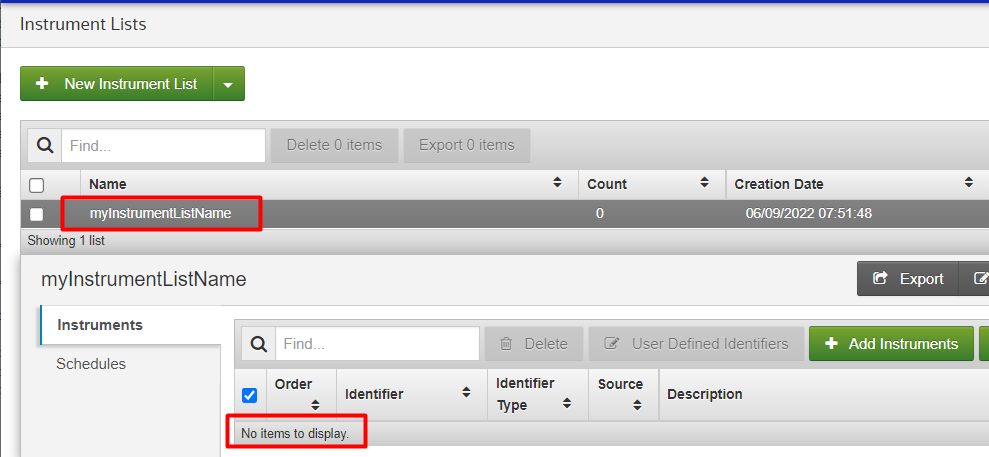
If there are many and you can’t find it, sort the entries by clicking on the Creation Date column header.
Step 3: append the instrument identifiers to our instrument list, on the DSS server:
extractionsContext.InstrumentListOperations.AppendIdentifiers(
instrumentList, instrumentIdentifiers, false);
The third parameter defines if duplicate instrument identifiers should be kept or not.
The result of this operation can be seen in the DSS web GUI. Now we find our instruments in the instrument list:
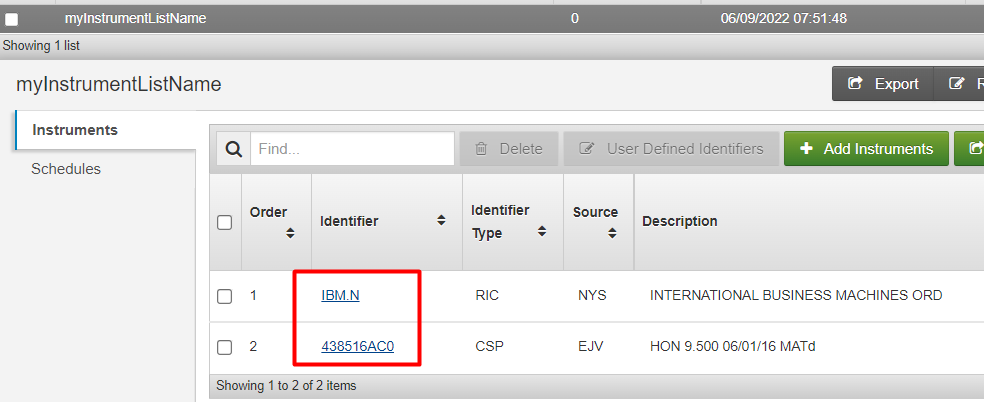
Note: a validation process is automatically applied to all instruments. Invalid instruments, inactive or historical ones might be filtered out, depending on your preference settings:
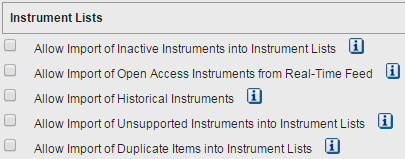
With the above preferences the matured bond was rejected. If the preferences had allowed import of Inactive and Historical instruments, then the matured bond would not have been rejected.
Creating a report template
This is the second of our 3 basic operations. Programmatically, this is done in 3 steps:
- Define a report template and set some of its properties, in memory.
- Add the field list to the report template definition, in memory.
- Create a report template, using the report template definition, on the DSS server.
Step 1: define a report template and set some of its properties, like its name and output format, in memory:
EndOfDayPricingReportTemplate eodReportTemplate = new EndOfDayPricingReportTemplate();
eodReportTemplate.Name = "myEodTemplateName";
eodReportTemplate.OutputFormat = ReportOutputFormat.CommaSeparatedValues;
Step 2: add the field list to the report template definition, in memory:
eodReportTemplate.ContentFields.AddRange("Instrument ID", "Security Description",
"Universal Close Price Date", "Universal Close Price");
Step 3: create the report template, using the report template definition, on the DSS server, a report template ID will be returned:
extractionsContext.ReportTemplateOperations.Create(eodReportTemplate);
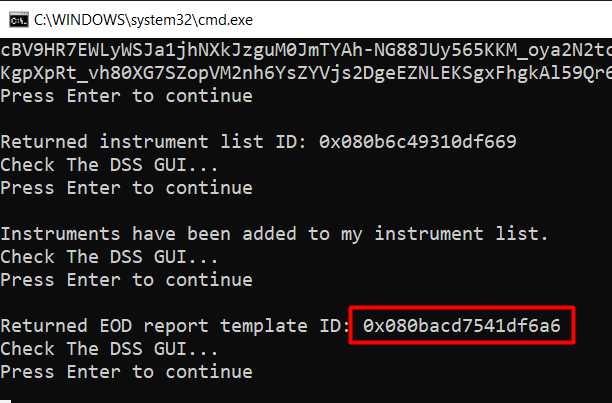
DebugPrintAndWaitForEnter("Returned EOD report template ID: " +
eodReportTemplate.ReportTemplateId + "\nCheck The DSS GUI...");
Here is the returned report template ID:
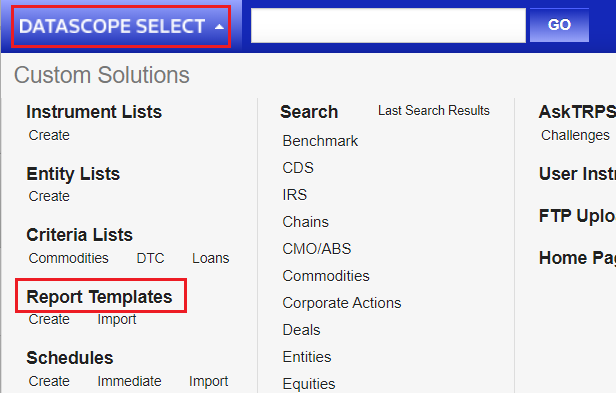
To display the results in the DSS web GUI, click on DATASCOPE SELECT top left, then on Report Templates:
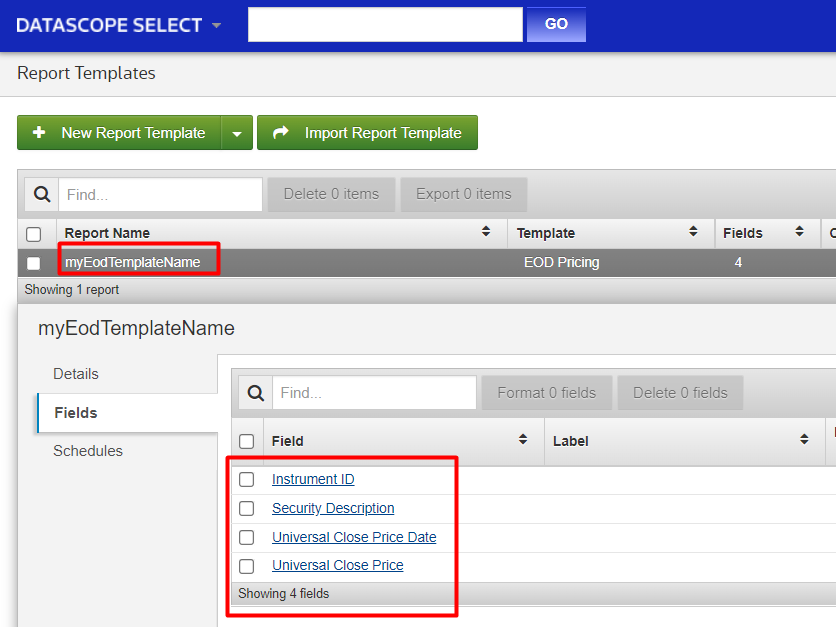
We find our report template with 4 fields:
If there are many and you can’t find it, sort the entries by clicking on the Creation Date column header.
How to choose a report template format, and find out what field names are available?
There are several report template formats, which depend on the data we want to retrieve, with different associated field lists. The easiest way to get familiar with these, and find the field names, is to look inside the DSS web GUI and manually start to create a report template for the desired data, by clicking on DATASCOPE SELECT top left, then on Create just beneath Report Templates:
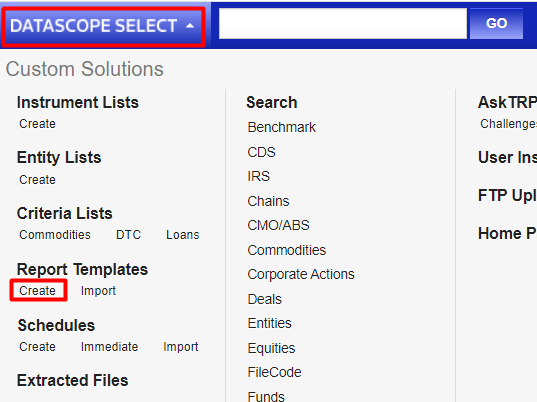
Even though we are starting to manually create a report template, we will not finish this creation. The idea here is not to do the work manually instead of with the API, but just to get familiar with what report template formats are available, and determine what data field names they contain, so that we can use these in our program.
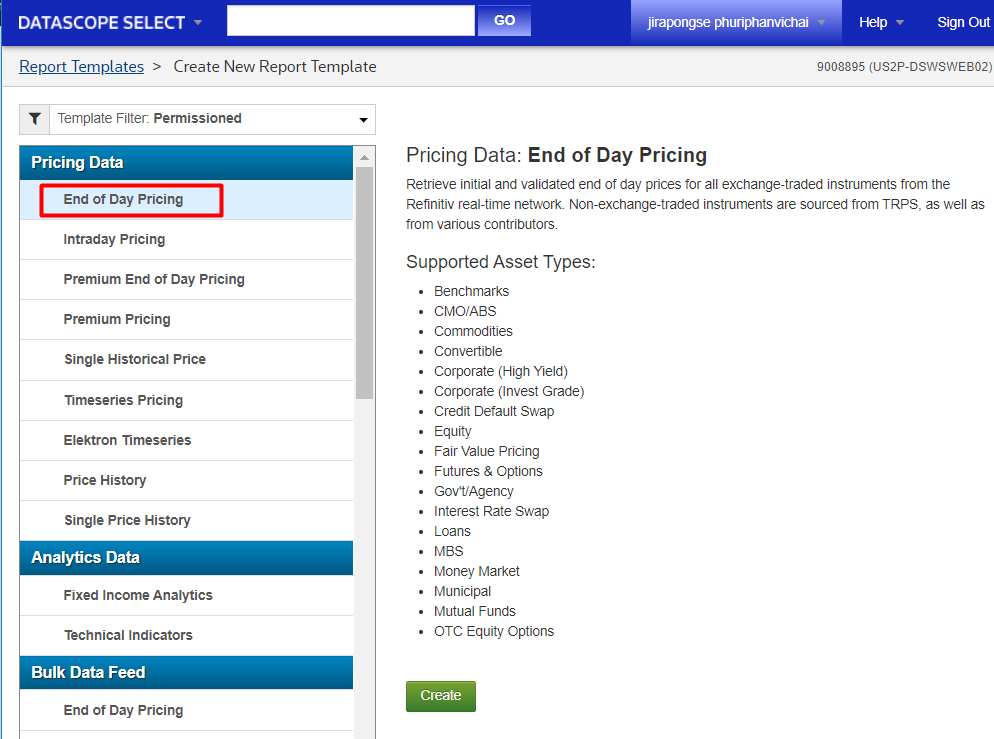
Here we select an End of Day (EOD) pricing report:
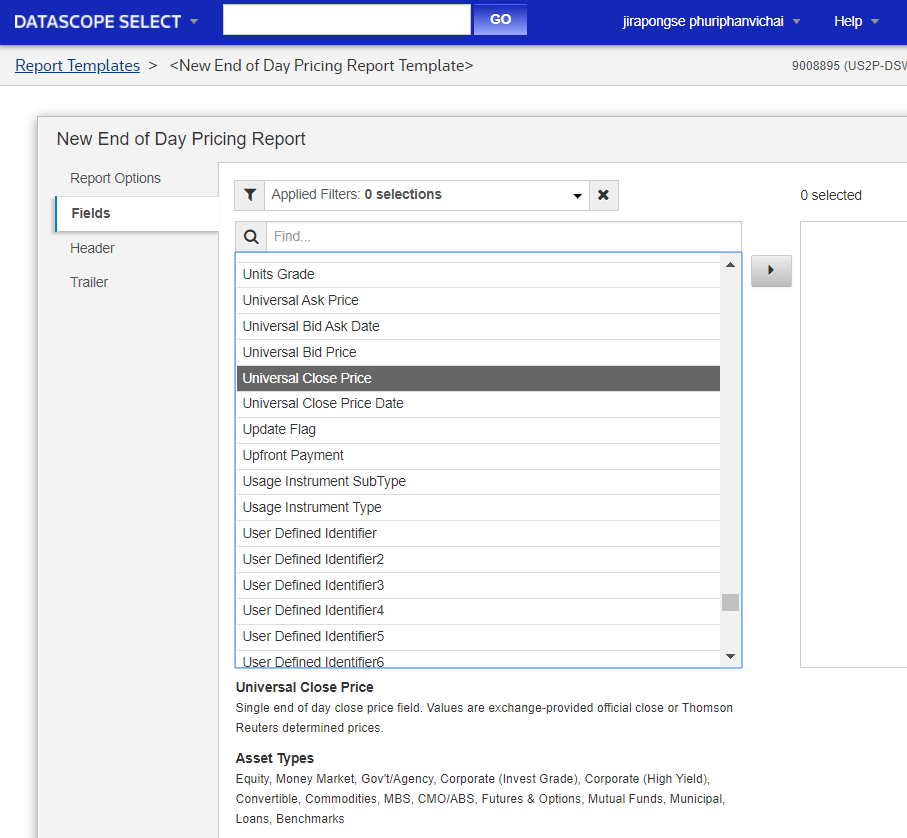
After clicking on the Create button we see the list of available fields for that type of report. For an EOD pricing report, hundreds are available ! Our sample will use, among others, the Universal Close Price field:
Scroll through the list to see what is available, and decide what you need. Once you have your list of fields, you can quit this creation process and get back to programming.
Creating extraction schedules
This is the third of our 3 basic operations.
An extraction schedule defines when the data will be retrieved, and triggers the actual extraction. It must refer to an instrument list (for which the extraction will be done), and a report template (defining what data needs to be extracted).
An extraction schedule can run once or recurring. Its timing can be immediate, at a fixed time, or triggered when data is available.
It is possible to define several schedules.
In this tutorial we define two extraction schedules for our previously created instrument list and report template:
- One for an extraction that will be run immediately, only once.
- One for a recurring extraction that will run every business day of the week, when data is available and corrected.
Programmatically, this is done in 2 steps:
- Define an extraction schedule and set some of its properties, in memory.
- Create the extraction schedule, using the extraction schedule definition, on the DSS server.
As a first example, let us first define a schedule for an immediate extraction. Recurrence is set to run only once and now, the trigger is immediate, we refer to our previously defined instrument list ID and report template ID, and we define the output file name. This will be created on the DSS server; we will look at it further in this tutorial, in the section called Extracted data.
Step 1: define an extraction schedule and set some of its properties, in memory:
Schedule immediateSchedule = new Schedule
{
Name = "myImmediateSchedule",
TimeZone = TimeZone.CurrentTimeZone.StandardName,
Recurrence = ScheduleRecurrence.CreateSingleRecurrence(DateTimeOffset.UtcNow, true),
Trigger = ScheduleTrigger.CreateImmediateTrigger(true),
ListId = instrumentList.ListId,
ReportTemplateId = eodReportTemplate.ReportTemplateId,
OutputFileName = "myImmediateExtractionOutput.out",
};
Step 2: create the extraction schedule, using the extraction schedule definition, on the DSS server; a schedule ID will be returned:
extractionsContext.ScheduleOperations.Create(immediateSchedule);
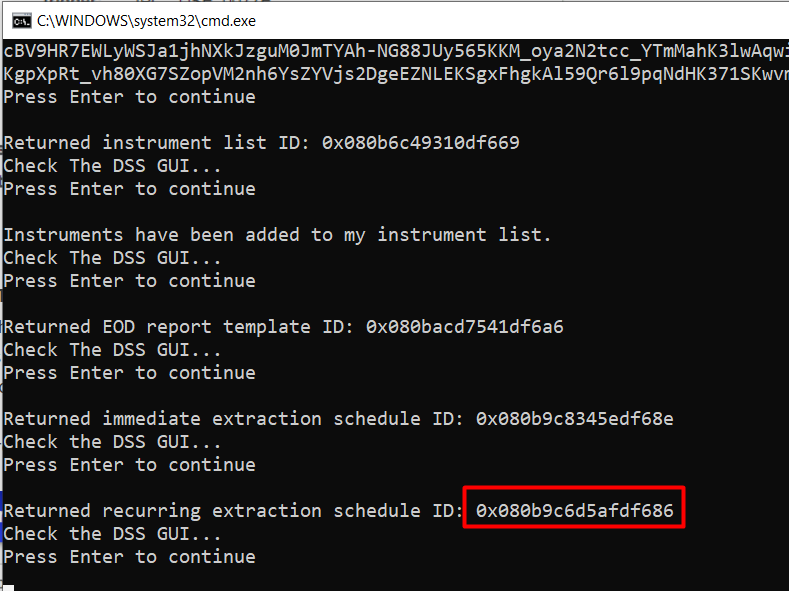
DebugPrintAndWaitForEnter("Returned immediate extraction schedule ID: " +
immediateSchedule.ScheduleId + "\nCheck the DSS GUI...");
Here is the returned schedule ID:

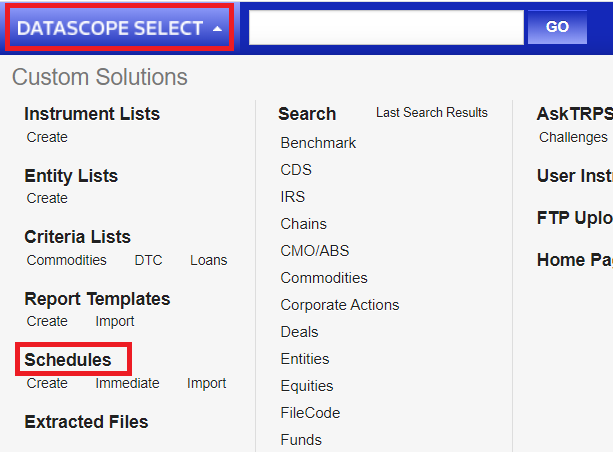
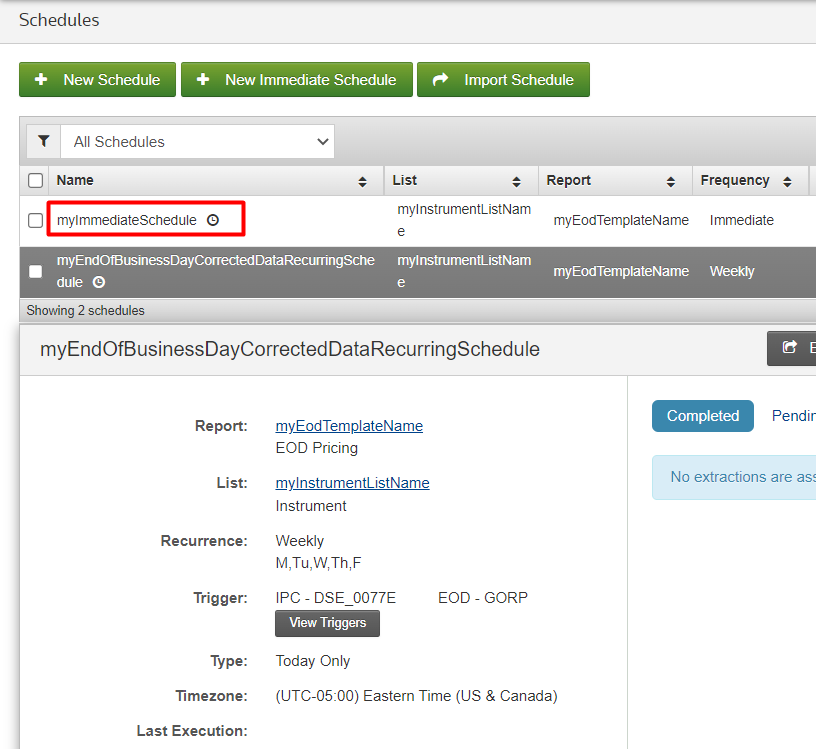
Let us display the result of this operation in the DSS web GUI: click on DATASCOPE SELECT top left, then on Schedules:
We find our schedule, as defined:

If there are many and you can’t find it, sort the entries by clicking on the Creation Date column header.
As a second example, let us define a schedule for a triggered extraction of the current day data. Recurrence is set to weekly, Monday to Friday.
The extraction is triggered by data availability, extended to include error corrections availability (price corrections are sometimes distributed after market close, and stored in the DSS server database), with a limit to the wait time (till 23:15 on the same day). That means the schedule will only be triggered, by the DSS server, when data and error corrections are available at the end of the day. These server side mechanisms are transparent to the end user, which makes programming quite easy.
Again, we refer to our instrument list and report IDs, and we define the output file name. A schedule ID is returned:
Step 1: define an extraction schedule and set some of its properties, in memory:
Schedule eodSchedule = new Schedule
{
Name = "myEndOfBusinessDayCorrectedDataRecurringSchedule",
TimeZone = "Eastern Standard Time",
Recurrence = ScheduleRecurrence.CreateWeeklyRecurrence(
new[] { DayOfWeek.Monday, DayOfWeek.Tuesday, DayOfWeek.Wednesday,
DayOfWeek.Thursday, DayOfWeek.Friday }),
//Wait for the latest end of day data before running the extraction:
Trigger = ScheduleTrigger.CreateDataAvailabilityTrigger(
true, //Limit to today's data
ExtendedTriggerInformation.CreateEndOfDay(
true, // Error Corrected
false), // Delta
DataAvailabilityTriggerTimeout.Create(
HourMinute.Create(23, 15), //Extract if data does not arrive by 11:15 PM ...
0)), //... on the same day
ListId = instrumentList.ListId,
ReportTemplateId = eodReportTemplate.ReportTemplateId,
OutputFileName = "myEndOfBusinessDayCorrectedDataRecurringExtractionOutput.out"
};
Step 2: create the extraction schedule, using the extraction schedule definition, on the DSS server, a schedule ID will be returned:
extractionsContext.ScheduleOperations.Create(eodSchedule);
DebugPrintAndWaitForEnter("Returned recurring extraction schedule ID: " +
eodSchedule.ScheduleId + "\nCheck the DSS GUI...");
The result of this operation can again be seen in the DSS web GUI, where we find our second schedule, as defined. We see the template, list, recurrence and trigger:
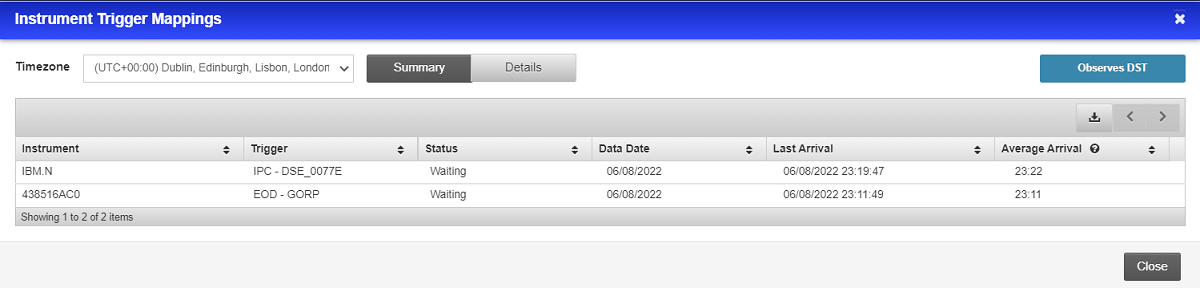
By clicking on the View Triggers button, we see the triggers, of which there might be several (here we have only one as the bond has expired). That is because the DSS server automatically generates one per exchange, as their price correction delivery times differ. Once the corrected prices have been distributed and stored in the DSS server database, the schedule triggers and the data is extracted.
Statistical arrival times are also displayed, to give us an idea when data will become available:
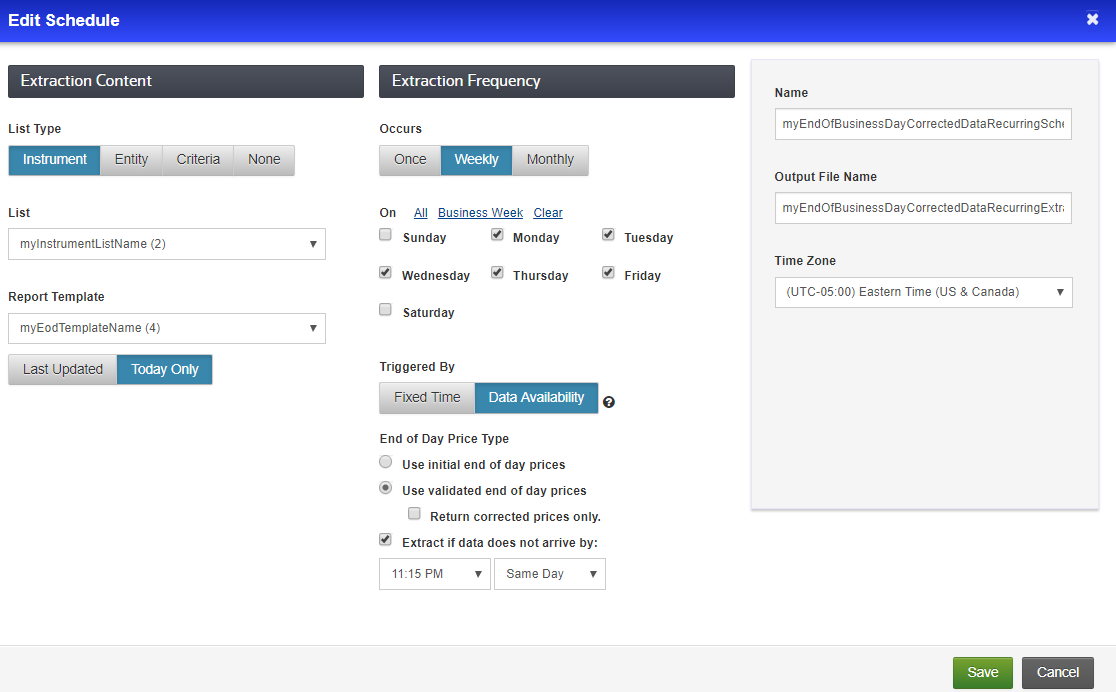
After closing the triggers window we can click on the Edit button. This displays the schedule details, allowing us to check that everything went as planned:
Extracted data
The extracted data is stored in files, on the DSS server. The DSS web GUI allows us to manually display, preview and download these files: click on DATASCOPE SELECT top left, then on Extracted Files:
Here we find the resulting files, generated by the scheduled extractions. They might not all be here, one must wait for the schedules to run:

If there are many and you can’t find it, sort the entries by clicking on the Creation Date column header.
Using the action buttons on the right, the data contents can be previewed or downloaded. There are also 2 notes files, we will explain their purpose in the next tutorial, and retrieve their contents in Tutorial 4.
The data can also be retrieved via the API. We do not do that in this tutorial, but we will in the next ones:
- Tutorials 3 and 4 demonstrate data extraction in a context similar to this tutorial.
- Tutorials 5, 6 and 7 show a streamlined approach to data extractions.
Both approaches are valid, and delivered as examples of what can be done.
Deleting instrument lists, report templates, extraction schedules
Our last operation in this tutorial will be to cleanup.
The purpose of this tutorial is to demonstrate manipulating DSS just like through the DSS GUI, so we will stop here and cleanup what we created. We therefore delete our instrument list, report template and schedules:
extractionsContext.InstrumentListOperations.Delete(instrumentList.ListId);
extractionsContext.ReportTemplateOperations.Delete(eodReportTemplate.ReportTemplateId);
extractionsContext.ScheduleOperations.Delete(immediateSchedule.ScheduleId);
extractionsContext.ScheduleOperations.Delete(eodSchedule.ScheduleId);
In the context of these tutorials deleting these items is important, because in this example code their names are hard coded. Running the code a second time would fail if cleanup was not done, because one cannot create 2 items with the same name.
Also note that the second schedule never ran; it was just created to demonstrate different schedule types.
In real life you will probably want to re-use these items instead of deleting them. Deleting is easily done manually using the DSS web GUI, but if you wanted to do it programmatically at a later stage, you would have to store the required Ids.
As mentioned above in Basic operations: explanations - Important note on DSS programming approaches, it is also possible to use higher level API calls and dispense with creating instrument list, report template and schedules stored on the DSS server.
Full code
The full code can be displayed by opening the appropriate solution file in Microsoft Visual Studio.
Summary
List of the main steps in the code:
- Authenticate by creating an extraction context.
- Create an array of financial instrument identifiers.
- Create an instrument list.
- Append the array of financial instrument identifiers to the instrument list, to populate it.
- Define a record template.
- Create the report template, using the defined template.
- Create extraction schedules.
- Cleanup.
Building and running the code
This is the same as what was done in Tutorial 1.
Build
Open the top menu BUILD, and click on Rebuild Solution. This will check your code for errors, and prepare it to run.
In the lower part of the screen you should get a success message.
If there are errors, they will be displayed and highlighted in the code. Errors must be corrected before the code can run.
Run
Click on  to run the code.
Code run results
Successful run
After running the program, and pressing the Enter key when prompted, the final result should look like this:
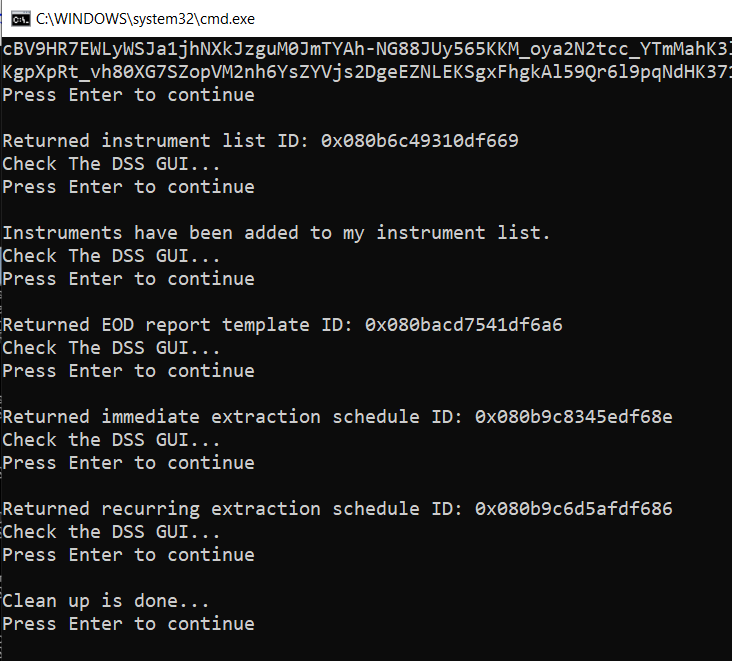
Intermediary results are discussed at length in the code explanations in the previous section of this tutorial.
Press Enter one final time to close the pop-up and end the program.
Potential errors and solutions
If the user name and password were not set properly, an error will be returned. See Tutorial 1 for details.
If the program attempts to create an instrument list that has the same name as that of an instrument list that is already stored on the DSS server, an error will be generated.

Similar errors will arise for report template or extraction schedule that has the same name as an existing one.
Possible causes:
The most probable cause is that you ran the tutorial, and interrupted it before the end. In such a case the final cleanup is not done, the created instrument list, report template and schedules are not deleted. As stated before in the code explanations, deleting these items is important, because in this example code their names are hard coded, so running the code a second time will fail if cleanup was not done, as one cannot create 2 items with the same name.
It could also be possible that, by pure chance, you have an instrument list, report template and / or schedule name that has exactly the same name as one of those in this tutorial.
To solve this:
If the tutorial run was interrupted before the end:
- Stop the program by closing the popup, or click on the stop button (red square top right of Microsoft Visual Studio):

- Manually connect to the DSS web GUI, and, if they exist, manually delete any of the following items created (and not deleted) by this tutorial:
- Instrument list myInstrumentListName
- Report template myEodTemplateName
- Schedules myImmediateSchedule and myEndOfBusinessDayCorrectedDataRecurringSchedule
- Run the code again.
If you have an instrument list, report template and / or schedule name that has exactly the same name as one of those in this tutorial:
- Stop the program by closing the popup, or click on the stop button (red square top right of Microsoft Visual Studio):
- Change the offending name in the code of this tutorial, in Program.cs
- Build and run the code again.
Understanding the refactored version
The refactored version is located in directory \DSS REST API\Tutorial 2\Refactored
To view the entire code, navigate to that folder and double click on restapi_set_runtime.sln to open the solution in Microsoft Visual Studio.
Explanations
DSS client helper class file: DssClient.cs
We enhanced the DSS client helper class, with several methods, all related to the DSS API. Several of the tutorials use these, and you could also re-use them in your own projects.
At the top of the code we find the required using directives for the DSS REST API:
using DataScope.Select.Api.Extractions;
using DataScope.Select.Api.Extractions.SubjectLists;
using DataScope.Select.Api.Content;
using DataScope.Select.Api.Extractions.ReportTemplates;
using DataScope.Select.Api.Extractions.Schedules;
using DataScope.Select.Api;
The extraction context is set to private, as the main program does not access it:
private ExtractionsContext extractionsContext;
The first new method creates a new (empty) instrument list, taking as input parameter the instrument list name, and returning the instrument list:
public InstrumentList CreateInstrumentList(string instrumentListName)
{
InstrumentList instrumentList = new InstrumentList { Name = instrumentListName };
extractionsContext.InstrumentListOperations.Create(instrumentList);
return instrumentList;
}
The second one populates an instrument list by appending an array of instrument identifiers, taking as input parameters the array of instrument identifiers and the instrument list name. It does not return anything. This method can be called several times if required, to populate an instrument list in several increments. Duplicate instruments are discarded:
public void AppendIdentifiersToInstrumentList(
IEnumerable<InstrumentIdentifier> instrumentIdentifiers, InstrumentList instrumentList)
{
extractionsContext.InstrumentListOperations.AppendIdentifiers(
instrumentList, instrumentIdentifiers, false);
}
The third method combines the two preceding ones:
public string CreateAndPopulateInstrumentList(
string instrumentListName, IEnumerable<InstrumentIdentifier> instrumentIdentifiers)
{
InstrumentList instrumentList = CreateInstrumentList(instrumentListName);
AppendIdentifiersToInstrumentList(instrumentIdentifiers, instrumentList);
return instrumentList.ListId;
}
Note that instead of the instrument list, it returns the instrument list ID, if required you could retreive the instrument list from its ID using the following API call:
instrumentList = extractionsContext.InstrumentListOperations.Get(instrumentListId);
The fourth method creates a report template for EOD (End Of Day) pricing, taking as input parameters the report template name, the output format and an array of field names. It returns the report template ID:
public string CreateEodReportTemplate(
string reportTemplateName, ReportOutputFormat reportOutputFormat, string[] contentFieldNames)
{
EndOfDayPricingReportTemplate reportTemplate = new EndOfDayPricingReportTemplate
{
Name = reportTemplateName,
OutputFormat = reportOutputFormat
};
reportTemplate.ContentFields.AddRange(contentFieldNames);
extractionsContext.ReportTemplateOperations.Create(reportTemplate);
return reportTemplate.ReportTemplateId;
}
Side note: in Tutorial 4 we will create a separate method for another report template, intraday pricing.
The fifth method creates a schedule for an immediate extraction, taking as input parameters the schedule name, the instrument list ID, the report template ID and the output file name. It returns the schedule ID:
public string CreateImmediateSchedule(
string scheduleName, string instrumentListId, string reportTemplateId, string outputFileName)
{
Schedule schedule = new Schedule
{
Name = scheduleName,
TimeZone = TimeZone.CurrentTimeZone.StandardName,
Recurrence = ScheduleRecurrence.CreateSingleRecurrence(DateTimeOffset.UtcNow, true),
Trigger = ScheduleTrigger.CreateImmediateTrigger(true),
ListId = instrumentListId,
ReportTemplateId = reportTemplateId,
OutputFileName = outputFileName
};
extractionsContext.ScheduleOperations.Create(schedule);
return schedule.ScheduleId;
}
The sixth method also creates a schedule, but this one is a recurring EOD schedule, which waits for corrected end of day data to be available. The inputs and output are the same as for the previous schedule creation method:
public string CreateEndOfBusinessDayCorrectedDataRecurringSchedule(
string scheduleName, string instrumentListId, string reportTemplateId, string outputFileName)
{
Schedule schedule = new Schedule
{
Name = scheduleName,
TimeZone = "Eastern Standard Time",
Recurrence = ScheduleRecurrence.CreateWeeklyRecurrence(
new[] { DayOfWeek.Monday, DayOfWeek.Tuesday, DayOfWeek.Wednesday,
DayOfWeek.Thursday, DayOfWeek.Friday }),
//Wait for the latest end of day data before running the extraction:
Trigger = ScheduleTrigger.CreateDataAvailabilityTrigger(
true, //Limit to today's data
ExtendedTriggerInformation.CreateEndOfDay(
true, // Error Corrected
false), // Delta
DataAvailabilityTriggerTimeout.Create(
HourMinute.Create(2, 0), //Time Out - wait 2 hours
0)), //Trigger Timeout Day Offset - 0 days
ListId = instrumentListId,
ReportTemplateId = reportTemplateId,
OutputFileName = outputFileName
};
extractionsContext.ScheduleOperations.Create(schedule);
return schedule.ScheduleId;
}
The last three methods delete an instrument list, report template or schedule, taking their ID as input. They do not return anything:
public void DeleteInstrumentList(string instrumentListId)
{
extractionsContext.InstrumentListOperations.Delete(instrumentListId);
}
public void DeleteReportTemplate(string reportTemplateId)
{
extractionsContext.ReportTemplateOperations.Delete(reportTemplateId);
}
public void DeleteSchedule(string immediateScheduleId)
{
extractionsContext.ScheduleOperations.Delete(immediateScheduleId);
}
Main program file: Program.cs
At the top of the code we list of using directives has been reduced, because we use less API calls:
using DataScope.Select.Api.Content;
using DataScope.Select.Api.Extractions.ReportTemplates;
The extraction context is not exposed, as the main code does not access it.
To create the array of instrument identifiers, we call a helper method:
IEnumerable<InstrumentIdentifier> instrumentIdentifiers = CreateInstrumentIdentifiers();
This helper method is not specific to DSS, so we delcare it in Program.cs, after the main code:
static IEnumerable<InstrumentIdentifier> CreateInstrumentIdentifiers()
{
IEnumerable<InstrumentIdentifier> instrumentIdentifiers = new[]
{
new InstrumentIdentifier
{
Identifier = "IBM.N",
IdentifierType = IdentifierType.Ric,
UserDefinedIdentifier = "EQUITYTEST"
},
new InstrumentIdentifier
{
Identifier = "438516AC0",
IdentifierType = IdentifierType.Cusip,
UserDefinedIdentifier = "BONDTEST"
}
};
return instrumentIdentifiers;
}
To create and populate the instrument list, we call our new DSS client helper method:
string instrumentListId = dssClient.CreateAndPopulateInstrumentList(
"myInstrumentListName",
instrumentIdentifiers);
To create the array of field names, we call a helper method:
string[] requestedFieldNames = CreateRequestedFieldNames();
Again, as this helper method is not specific to DSS, we declare it in Program.cs, after the main code:
static string[] CreateRequestedFieldNames()
{
string[] requestedFieldNames = { "Instrument ID", "Security Description",
"Universal Close Price Date", "Universal Close Price" };
return requestedFieldNames;
}
To create the two schedules, we call our two new DSS client helper methods:
string immediateScheduleId = dssClient.CreateImmediateSchedule(
"myImmediateSchedule",
instrumentListId,
reportTemplateId,
"myImmediateExtractionOutput.csv");
string recurringScheduleId = dssClient.CreateEndOfBusinessDayCorrectedDataRecurringSchedule(
"myEndOfBusinessDayCorrectedDataRecurringSchedule",
instrumentListId,
reportTemplateId,
"myEndOfBusinessDayCorrectedDataRecurringExtractionOutput.csv");
To clean up, we call our new DSS client helper methods:
dssClient.DeleteInstrumentList(instrumentListId);
dssClient.DeleteReportTemplate(reportTemplateId);
dssClient.DeleteSchedule(immediateScheduleId);
dssClient.DeleteSchedule(recurringScheduleId);
Full code
The full code can be displayed by opening the appropriate solution file in Microsoft Visual Studio.
Build and run
The refactored version is located in directory \DSS REST API\Tutorial 2\Refactored
The actions described above for the learning version are applied similarly to the refactored version. Proceed to:
- Open the solution in Microsoft Visual Studio.
- Reference the DSS SDK.
- View the C# code: open both DssClient.cs and Program.cs code files.
- Set your user account in Program.cs.
- Build and run. The results will be exactly the same.
Conclusions
We have seen that using the API, we can create an instrument list, a report template, and schedules, like we could do in the DSS web GUI. In other words, the API allows us to do programmatically what can be done manually in the DSS web GUI.
We have also seen that the DSS web GUI is very useful to help us check our code.
Now move on to the next tutorial, which:
- Looks at instrument list validation.
- Performs a data extraction on the DSS server, and displays the data on screen.