LSEG DataScope Select - REST API
| Last update | Nov 2023 |
Tutorials introduction purpose
This is an introduction to the DSS (LSEG DataScope Select) REST API, and its two series of tutorials.
It also includes a few comments on creating custom projects for use with the .Net SDK.
Table of contents
- Introduction to the DSS REST API
- Extraction data and notes
- Scheduled or On Demand: 2 approaches
- Instrument validation
- Overview of the tutorials
- .Net SDK tutorials content
- Different methods to create a custom .Net project
- REST API tutorials content
- Request tuning and best practices
Introduction of the DSS REST API
There are two DSS APIs:
- The new DSS REST API.
- The previous DSS SOAP API, described here.
What are SOAP and REST ?
A Web service, in very broad terms, is a method of communication between two applications over the Internet.
Web services are of two kinds: SOAP and REST.
SOAP (Simple Object Access Protocol) defines a standard communication protocol specification for XML based message exchange. SOAP can use different transport protocols such as HTTP (HyperText Transfer Protocol) or SMTP (Simple Mail Transfer Protocol).
REST (REpresentational State Transfer) defines a set of architectural principles for data transmission over a standardized interface (such as HTTP). REST does not contain an additional messaging layer and focuses on design rules for creating stateless services. A client can access a resource using its unique URI (Uniform Resource Identifier), and a representation of the resource is returned.
Web services that use a REST architecture are called RESTful APIs (Application Programming Interfaces) or REST APIs. When accessing RESTful resources with the HTTP protocol, the URL of the resource serves as the URI, and the standard HTTP verbs GET, PUT, DELETE, POST and HEAD are the standard operations that are performed on that resource. REST is popular for cloud-based APIs, and Web services.
Capabilities of the DSS REST API
- It can programmatically control the DSS web GUI. When we create, via the API, instrument lists, report templates or schedules on the DSS server, they will also show up in the DSS web GUI (Graphical User Interface). That is the case for tutorials 2 - 4. We can therefore use the DSS web GUI to check and debug some aspects of our code. Note: when using high level API calls that directly generate extractions, nothing will show up in the DSS web GUI. That is the case for tutorials 5 - 7.
- The new DSS REST API has a different architecture from the previous SOAP API, delivering several advantages. It overcomes some limitations of the previous API, like the 1000 entries limit on instrument lists, the absence of triggers and embargo handling.
- It mirrors the DSS web GUI, including its extraction limit. Extraction limits vary depending on the type of requested data, from 500 to 150000 instruments. As an example, the limit for an End of Day request is now 75000 instruments (150000 after chain expansion). Refer to the LSEG DataScope User Guide for all the details on the limits that apply by extraction type. For very large instrument lists, extraction limits can be overcome through looping. See tutorial 7. There are fewer loops as this is done on large chunks, so client processing is optimized.
- The DSS REST API now handles triggers on extractions, like waiting for the data to be available before attempting to extract it. See tutorial 2.
- It now also handles embargoes, which are delays applied before data is made available to a user which does not have authorization for real-time data. See tutorial 4. Note that authorizations are set per exchange, and embargo delays are not the same for all exchanges.
- The DSS REST API condenses code. In the previous version we first validated an instrument list, and then did an extraction. With the DSS REST API we can do it in 2 steps as before, or in 1 single step, with a combined validation and extraction. See tutorial 3.
Advantages of the DSS REST API over the DSS SOAP API
- RESTFUL APIs are generally speaking easier to work with, developers often prefer REST over SOAP. This can be debated, but in general REST APIs are very popular and in high demand.
- The RESTFUL API simplicity makes it easier to work with, especially with smaller devices that have a subset of capabilities.
- It has a lot of functionality and is much more “fluent” for a developer to work with.
- It also supports JSON (Java Script Object Notation) for backend parsing. JSON parsing is fast and incurs little overhead on the servers. Some languages have pretty mature XML parsers, making them slightly faster than JSON. But DSS has a custom JSON serializer that is fast and incurs very little CPU and memory overhead on the servers, so the backend is pretty efficient using JSON.
- It has better browser support, and REST reads can be cached.
- Generally speaking, REST has better performance and scalability. Anecdotally, 85% of the Amazon calls are to the REST version of their API. Considering their huge client base, that tells us something about the appeal of REST APIs.
Availability of the DSS REST API
The DSS REST API is available to all DSS customers, no specific user access permissions are required.
The only requirement is a valid DSS account (user name and password).
Extraction data and notes
Extraction files
The result of an extraction is more than just data. DSS delivers:
- The extracted data itself.
- The extraction notes.
- The RIC maintenance note.
Extraction notes
This text file contains details of the extraction, including information on instrument expansion, applied embargoes, warnings, errors, quota messages, etc.
Note: instrument expansion occurs when the request is for a chain RIC, which will expand to all the constituent RICs. It also occurs for instrument codes like ISIN, Cusip or Sedol, all of which expand to all possible RICs. A request for a single code can therefore deliver results for many instruments.
It is strongly recommended to analyze this text file to detect issues.
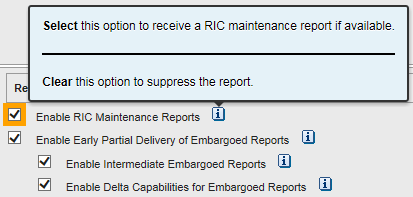
RIC maintenance note
It contains information such as instrument identifier name changes, which could have occurred during the time period covered by the request. Instrument identifiers can change name, for instance if a company changes its name, is bought or merges, or simply for normalization reasons. This is not a frequent occurrence. The probability of an instrument identifier name change is obviously higher if the request is for a time series over a long time period.
This file could be empty.
It is possible to select in the user preferences if the RIC Maintenance file should be generated or not:
Scheduled or On Demand: 2 approaches
Scheduled extractions
Scheduled extractions use instrument lists, report templates and schedules that are stored on the server, and visible in the web GUI. As they are persisted on the server, they can be re-used again and again.
Instrument lists define a list of instruments.
Report templates define the type of data and specific fields that one requires. A user report template is based on a standard report template, with a user defined set of data fields of interest, and some formatting options.
Schedules define when data should be extracted, and refer to an instrument list and a report template.
Instrument lists and report templates can be referenced by several schedules.
Instrument lists, report templates and schedules can be managed (created, updated, deleted) manually using the web GUI. They can also be managed using the REST API.
When a schedule triggers, a data extraction is launched. The resulting data is saved in a file on the server. The status of an extraction (pending, running, completed) can be checked manually, or using the API. The resulting data can be retrieved manually or using the API.
There are API calls that allow you to control the workflow just like you would using the GUI. In other words, the API allows you to mimic the web GUI.
It is also possible to mix the manual and API methods, like for example creating the instrument list, report template and schedule manually in the GUI, then regularly updating the instrument list using the API, and retrieving the data using the API.
The “GUI control call” tutorials create and use instrument lists, report templates and schedules. This is similar to what could have been done manually using the web GUI. What is created is stored on the server, but our samples and tutorials delete them at the end, to avoid cluttering up your environment.
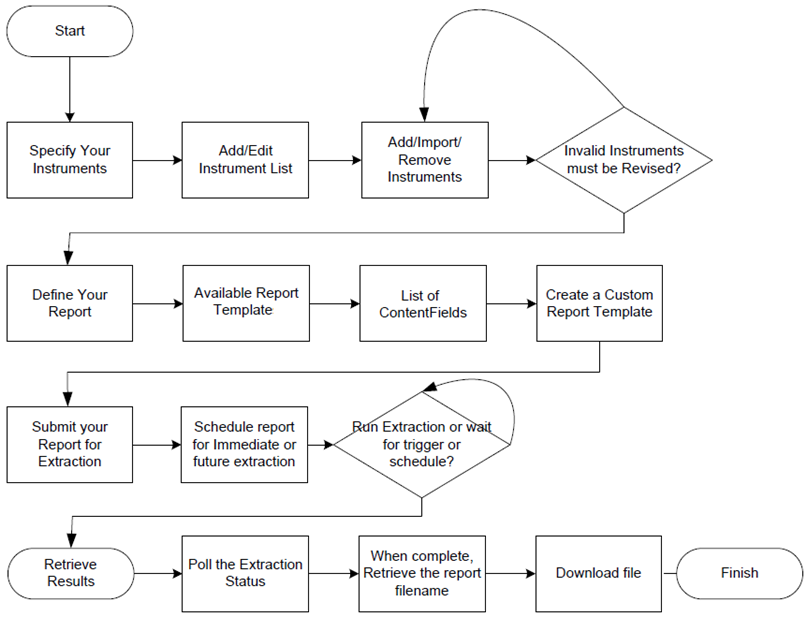
Workflow
A scheduled extraction requires 5 steps, illustrated by the following diagram.
- The first line is the instrument list creation.
- The second line illustrates the creation of a customized report template by choosing a default one and selecting the data fields.
- The third line shows the schedule creation, and waiting for the extraction request to be triggered.
- The last line is for polling the extraction status, and retrieving the data.
Details of these steps:
1. Create and populate an instrument list, which is saved on the server.
The list can be created, populated and modified manually using the GUI. It is also possible to import a CSV file.
The list can also be created, populated and modified using the API.
A list is persisted on the server until you decide to delete it.
Instruments are validated before being added to a list.
In this context the instrument search tool can be very useful, allowing you to find instruments using various criteria.
2. Define a report template, which is also saved on the server.
Report templates are created by choosing one from a list of available default templates, and customizing it by selecting which data fields should be part of the returned results.
Again, this can be done using either the GUI or the API.
Many default report templates are available, for a wide range of pricing, reference, analytics, entity, commodities, estimates, corporate actions and news data.
The list of available fields is specific to each report template; it can be displayed in the web GUI or queried through the API. You can include as many of the available fields you want in the template, but for obvious performance reasons it is best to select only those you require. When analyzing the list of fields for a specific report template, each data field has a description, which helps in choosing the right one. In case of doubt, the best method is to select all potential candidate fields during the prototyping phase, then check the returned results to determine which fields return the data you require, and finalize the field list. This prototyping can easily be done in Postman, without coding. This exercise needs only to be done once, as field lists will usually not require changes.
3. Define an extraction schedule, which is saved on the server.
It can be executed one single time, or run on a recurring basis.
It can be triggered at a specific time, or by data availability, like at market close, or after data corrections are available.
A schedule must refer to an existing instrument list and report template.
Combinations are of course possible; several schedules can be defined for the same instrument list, and the same or differing report template.
4. Check the status of the extraction, by interrogating the server.
5. Once it has completed, retrieve results from the server.
All these operations can be done using the GUI, or the API.
Files
When using a scheduled request, the extraction notes and RIC maintenance notes will be saved in files separate from the data. The names of the files (generated by a single extraction) share a common root, with differing extensions added. The root file name can be specified when creating a schedule; as this is optional, if none was specified the DSS server will automatically generate a (very complex) root file name.
Example file names, for a specified root file name myExtraction:
- RIC maintenance note: myExtraction.ric.csv
- Extracted data: myExtraction.csv
- Extraction notes: myExtraction.csv.notes.txt
On Demand extractions
On Demand extractions use simplified high level API calls that create extractions on the fly. They do not have their equivalent in the GUI.
Instrument lists and report templates are not stored on the server, cannot be reused later and cannot be seen using the web GUI.
Instrument lists are stored on the client, and passed as a parameter to the API call.
That said, as an alternative you can also use an instrument list that is saved on the server with an On demand extractions, as explained in REST tutorial 9.
The type of data (i.e. the default report template) is selected by the API call. The list of data fields of interest is passed as a parameter to the API call.
There is no schedule because these are On Demand requests.
The “On Demand” tutorials use these simplified high level API calls that create extractions on the fly.
Workflow
An On Demand extraction requires 4 steps:
- Create an instrument list, but this is managed entirely on the client, it is not saved on the server. Instruments can be searched using API calls, so automated workflows can integrate such capabilities.
- Submit an extraction request directly, specifying a data type, which, in fact, refers to a default report template. This covers steps 2 and 3 of the scheduled workflow, in one single API call. Even if the mechanism is different, we are referring to the same templates we saw previously. The request contains the instrument list, refers to a default template, and includes a list of data fields, specific to the template. If required, the list of available data fields can be queried using the API, thus facilitating automated workflows, but as stated before, for performance it is best to optimize the field list during the prototyping phase.
- Check the status of the extraction, by polling the server.
- Once it has completed, retrieve results from the server.
These operations can only be done using the API.
Note: nothing is persisted on the server, neither the instrument list nor the custom report template.
Extract,ExtractWithNotes or ExtractRaw?
An On Demand extraction can be made using different end points: Extract, ExtractWithNotes or ExtractRaw. The request body and header are the same, only the end point changes.
Note: in the examples that follow below, the query body is:
{
"ExtractionRequest": {
"@odata.type": "#DataScope.Select.Api.Extractions.ExtractionRequests.IntradayPricingExtractionRequest",
"ContentFieldNames": [ "RIC", "Ask Price", "Bid Price", "Trade Date" ],
"IdentifierList": {
"@odata.type": "#DataScope.Select.Api.Extractions.ExtractionRequests.InstrumentIdentifierList",
"InstrumentIdentifiers": [
{ "Identifier": "EUR=", "IdentifierType": "Ric" },
{ "Identifier": "GBP=", "IdentifierType": "Ric" }
]
},
"Condition": { "ScalableCurrency": true }
}
}
Extract end point (deprecated)
URL: https://selectapi.datascope.refinitiv.com/RestApi/v1/Extractions/Extract
Caveat: LSEG is going to remove the Extract endpoint from the LSEG DataScope Select REST API, to encourage more effective use of the API. The Extract endpoint is already deprecated, and it is planned to disable it. Although it was originally announced in this advisory and in PCN (Product Change Notification) 10132 that the Extract endpoint would be disabled in release 12.3 (in January 2019), that will not be the case, but it will probably happen in the future release.
If you use the Extract endpoint, you should plan to replace it with ExtractWithNotes.
The response is in JSON format, it contains the data in an object called value.
Example response:
{
"@odata.context": "https://selectapi.datascope.refinitiv.com/RestApi/v1/$metadata#Collection(DataScope.Select.Api.Extractions.ExtractionRequests.ExtractionRow)",
"value": [
{
"IdentifierType": "Ric",
"Identifier": "EUR=",
"RIC": "EUR=",
"Ask Price": 1.0706,
"Bid Price": 1.0704,
"Trade Date": "2022-05-25"
},
{
"IdentifierType": "Ric",
"Identifier": "GBP=",
"RIC": "GBP=",
"Ask Price": 1.2534,
"Bid Price": 1.2532,
"Trade Date": "2022-05-25"
}
]
}
Note: the IdentifierType and Identifier fields are automatically added to the results.
ExtractWithNotes end point
URL: https://selectapi.datascope.refinitiv.com/RestApi/v1/Extractions/ExtractWithNotes
The response, in JSON format, contains the data in an object called Contents, and has an additional object, Notes, containing the Extraction notes and RIC maintenance report. It is strongly recommended to analyze these notes to detect issues, and store them for a period of time, as they are required to open a Service Case if there are issues with the extraction.
Example response:
{
"@odata.context": "https://selectapi.datascope.refinitiv.com/RestApi/v1/$metadata#DataScope.Select.Api.Extractions.ExtractionRequests.ExtractionResult",
"Contents": [
{
"IdentifierType": "Ric",
"Identifier": "EUR=",
"RIC": "EUR=",
"Ask Price": 1.0706,
"Bid Price": 1.0702,
"Trade Date": "2022-05-25"
},
{
"IdentifierType": "Ric",
"Identifier": "GBP=",
"RIC": "GBP=",
"Ask Price": 1.2534,
"Bid Price": 1.2531,
"Trade Date": "2022-05-25"
}
],
"Notes": [
"Extraction Services Version 16.0.43633 (806c08a4ae8f), Built May 9 2022 17:21:07\r\nProcessing started at 05/25/2022 07:03:23.\r\nUser ID: 9008895\r\nExtraction ID: 2000000400839719\r\nCorrelation ID: CiD/9008895/AAAAAA.0806b995068dee2b/RA\r\nSchedule: 0x0806b995069dee2b (ID = 0x0000000000000000)\r\nInput List (2 items): (ID = 0x0806b995069dee2b) Created: 05/25/2022 07:03:23 Last Modified: 05/25/2022 07:03:23\r\nReport Template (10 fields): _OnD_0x0806b995069dee2b (ID = 0x0806b99506bdee2b) Created: 05/25/2022 07:03:20 Last Modified: 05/25/2022 07:03:20\r\nSchedule dispatched via message queue (0x0806b995069dee2b)\r\nSchedule Time: 05/25/2022 07:03:22\r\nNo prices needed currency scaling.\r\nReal-time data was snapped at 05/25/2022 07:03:23, it was scheduled to snap at 05/25/2022 07:03:22.\r\nProcessing completed successfully at 05/25/2022 07:03:23, taking 0.164 Secs.\r\nExtraction finished at 05/25/2022 06:03:23 UTC, with servers: x13q21, QSDHA1 (0.0 secs), QSHC19 (0.0 secs)\r\nNo embargo required for this report.\r\nUsage Summary for User 9008895, Client 65508, Template Type Intraday Pricing\r\nBase Usage\r\n Instrument Instrument Terms Price\r\n Count Type Subtype Source Source\r\n------- ----------------------------------- ---------------------------- -------------- ----------------------------------------\r\n 2 Money Market N/A N/A\r\n-------\r\n 2 Total instruments charged.\r\n 0 Instruments with no reported data.\r\n=======\r\n 2 Instruments in the input list.\r\nNo Evaluated Pricing Service complex usage to report -- 2 Instruments in the input list had no reported data.\r\nWriting RIC maintenance report.\r\n",
"Identifier,IdentType,Source,RIC,RecordDate,MaintType,OldValue,NewValue,Factor,FactorType\r\n"
]
}
ExtractRaw end point
URL: https://selectapi.datascope.refinitiv.com/RestApi/v1/Extractions/ExtractRaw
The initial response, in JSON format, does not contain the data. It contains an object called JobId (which is a string), and a Notes object, containing the Extraction notes and RIC maintenance report. It is strongly recommended to analyze these notes to detect issues.
Example response:
{
"@odata.context": "https://selectapi.datascope.refinitiv.com/RestApi/v1/$metadata#RawExtractionResults/$entity",
"JobId": "0x0806a3c65cddedf6",
"Notes": [
"Extraction Services Version 16.0.43633 (806c08a4ae8f), Built May 9 2022 17:21:07\r\nProcessing started at 05/25/2022 07:03:49.\r\nUser ID: 9008895\r\nExtraction ID: 2000000400839875\r\nCorrelation ID: CiD/9008895/AAAAAA.0806a3c65ccdedf6/RA\r\nSchedule: 0x0806a3c65cddedf6 (ID = 0x0000000000000000)\r\nInput List (2 items): (ID = 0x0806a3c65cddedf6) Created: 05/25/2022 07:03:49 Last Modified: 05/25/2022 07:03:49\r\nReport Template (4 fields): _OnD_0x0806a3c65cddedf6 (ID = 0x0806a3c65cededf6) Created: 05/25/2022 07:03:47 Last Modified: 05/25/2022 07:03:47\r\nSchedule dispatched via message queue (0x0806a3c65cddedf6)\r\nSchedule Time: 05/25/2022 07:03:49\r\nNo prices needed currency scaling.\r\nReal-time data was snapped at 05/25/2022 07:03:49.\r\nProcessing completed successfully at 05/25/2022 07:03:49, taking 0.288 Secs.\r\nExtraction finished at 05/25/2022 06:03:49 UTC, with servers: x13q24, QSDHA1 (0.0 secs), QSHC13 (0.1 secs)\r\nNo embargo required for this report.\r\nUsage Summary for User 9008895, Client 65508, Template Type Intraday Pricing\r\nBase Usage\r\n Instrument Instrument Terms Price\r\n Count Type Subtype Source Source\r\n------- ----------------------------------- ---------------------------- -------------- ----------------------------------------\r\n 2 Money Market N/A N/A\r\n-------\r\n 2 Total instruments charged.\r\n 0 Instruments with no reported data.\r\n=======\r\n 2 Instruments in the input list.\r\nNo Evaluated Pricing Service complex usage to report -- 2 Instruments in the input list had no reported data.\r\nWriting RIC maintenance report.\r\n",
"Identifier,IdentType,Source,RIC,RecordDate,MaintType,OldValue,NewValue,Factor,FactorType\r\n"
]
}
Workflow:
Compared to the other end points, the workflow is different from here.
The next step is to make a GET call, using the JobId, to this endpoint, which contains the JobId as parameter:
This call must include a header stating that we want compressed data: Accept-Encoding: gzip
If that header is included in the GET call, the response contains the data, in CSV format, compressed using gzip.
If the header is not included, the response will be in CSV format, not compressed.
Example CSV data:
RIC,Ask Price,Bid Price,Trade Date
EUR=,1.0705,1.0701,2022/05/25
GBP=,1.2533,1.253,2022/05/25
Choosing an endpoint
The end point defines the data format, the presence or not of extraction notes (we strongly recommend you use them), and the workflow.
One can therefore choose what is best suited to each specific use case.
Extract: Do not use this one, it is deprecated.
ExtractWithNotes: Convenient for small data sets, the JSON format is practical for programmatic treatment of the data.
ExtractRaw: Optimizes bandwidth for large data sets retrieval.
It is recommended to save the compressed data to disk, and then read it for further treatment.
Handling decompression on the fly can result in hard to debug issues, like missing data.
Note: when using the ExtractWithNotes endpoint, fields IdentifierType and Identifier fields are automatically added to the results. That is not the case with ExtractRaw. Take this into account when choosing the fields for the request.
Workflow change for medium to large data sets
One additional point must be taken into account.
In the above simple examples, there are only 2 instruments, the extraction is very quick and practically always completes in less than 30 seconds. All responses have HTTP status 200 OK.
If there are more instruments, the extraction might take longer. In that case the API returns a 202 Accepted response (it means the extraction has not yet completed) with an empty body. Among the response headers is an item called Location, whose value is an URL. This URL must be polled using a GET, at a reasonable interval (like once a minute), until a 200 OK is returned. This mechanism is described in the Async key mechanisms page.
Scheduled or On Demand ?
There is no good or bad way of doing things; it all depends on your use case. Scheduled extractions are typically used for data requests that are performed regularly. An example could be daily EoD (End of Day) data requests.
A few examples:
- For daily extractions with an unvarying instrument list, the instrument list, report template and schedule could be manually (or programmatically) created. The API would then be used to pick up extracted data on a daily basis.
- For daily extractions with a varying instrument list, the report template and schedule could be manually (or programmatically) created. The API would then be used to update the instrument list when required, and pick up extracted data on a daily basis.
- To service ad-hoc end user requests for specific data, On Demand extractions using the API are the easiest solution.
For scheduled extractions, it should be noted that manual changes to saved artefacts are advised to occur at least 15 minutes before the scheduled extraction time, or the changes can delay the results.
Instrument vallidation
Instrument validation options can be used to define the behavior of the API when validating instruments used in data extractions. The most common use case for this is to allow or disable historical instruments, like matured bonds, discontinued instruments or those that changed name (for instance RIC RTR.L). If historical instruments are not allowed then an extraction request will not return any data for them, and return a “Not found” error.
That said, there are other validation options to define what is to be done in other cases, like inactive instruments, open access instruments, which quote to use for dual-listed instruments, and more. These options can be viewed and modified in the General Preferences in the GUI:
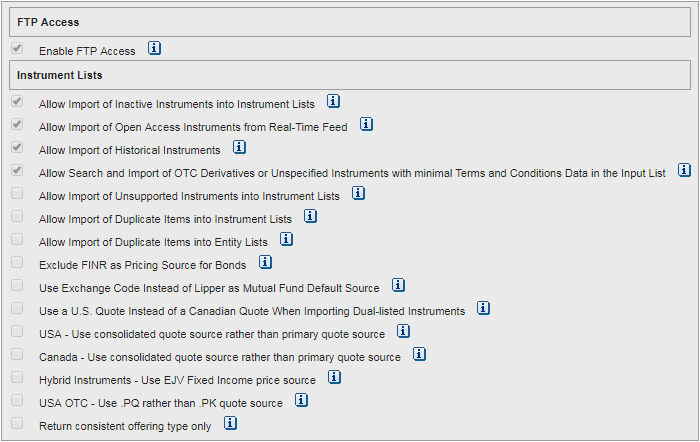
Important note: the preferences set in the GUI only apply to scheduled extractions; On Demand extractions ignore those settings, but the On Demand extractions API calls allow setting these values for individual requests.
To see an example of how this is done, please refer to the REST API Tutorial 4: On Demand price history extraction.
Overview of the tutorials
Before running the tutorials, go through the Quick Start.
3 sets of tutorials
There are 3 sets of tutorials:
- A single tutorial for programming without SDK.
- One set that uses the .Net SDK, for programming in C#.
- One set that shows the REST API HTTP requests and responses, for programming in other languages.
Programming without SDK Tutorial
This tutorial explains how to interact with the DSS REST API without using the .Net SDK. In other words, it gets you started for programming in the language of your choice. Even when programming with the .Net SDK, you might find some sections of this tutorial helpful, notably the best practices section.
It includes code snippets in Java and Python, but the principles demonstrated and explained in this tutorial can easily be extended to any other programming language.
Contrary to other tutorials which illustrate how to achieve a specific task (like retrieving a particular type of data), the aim of this one is to give you a feeling of the coding mechanisms you must master, before using them to achieve your own goals.
The purpose of this tutorial is to give you an understanding of the mechanisms, and how to get started.
This tutorial and the set of REST API Tutorials in pure HTTP complement each other.
The .Net SDK tutorials
Like the C# example application covered in the Quick Start, the series of tutorials covers programming in C# with the DSS REST API .Net SDK, in Microsoft Visual Studio.
The tutorials cover some (but not all) of the API calls, illustrating some typical use cases. Comments in the code and messages displayed on screen show progress through the code and explain the steps. The code can be modified to test and understand it better, and can be copied for re-use.
Each tutorial illustrates one or several key concepts. Some tutorials recommend using the DSS web GUI to check results.
Each tutorial is delivered in 2 versions: learning and refactored.
- The focus of the learning version is to illustrate the concepts and calls, while simultaneously being easy to follow. Its code is very much sequential.
- The refactored version has exactly the same functionality, but has been refactored, i.e. restructured to be more production oriented. Methods are split into 2 classes: DssClient.cs which contains methods that are directly related to working with DSS, and Program.cs which contains the main program and helper methods.
The tutorials contain only limited error handling, to avoid burdening it and hindering the learning process.
It is strongly recommended to follow these tutorials in order, without skipping any, for the following reasons:
- Code and use case complexity increase through the tutorials.
- Tutorials re-use calls and methods created and explained in previous tutorials.
Pre-requisites to run the .Net SDK tutorials
The following are required:
- Microsoft Visual Studio 2019
- A valid DSS user account. This consists in a user name and password, the same as those used to log into the DSS Web GUI.
- An internet connection to access the DSS server.
The REST API tutorials in HTTP
This series of tutorials covers programming over HTTP with the DSS REST API.
The tutorials are much more generic, and the calls illustrated in them can be reused in any programming environment that can make HTTP calls to a REST server. When writing these tutorials we ran the calls using a REST client application called Postman, but you can use any tool you like to experiment with this.
The tutorials cover some (but not all) of the API calls, illustrating some typical use cases. Each tutorial illustrates one or several key concepts. Comments in the tutorial explain the steps.
.Net SDK tutorials content
The tutorials cover coding in C# with the DSS REST API .Net SDK, in Microsoft Visual Studio.
.Net SDK Tutorial 1: Connecting to the DSS server
This is the starting point and a pre-requisite for all the other tutorials, which will use the same libraries.
In this tutorial we:
- Download and install a single copy of the .Net SDK libraries, for use by all the tutorials in this series.
- Create a small project to create the work context, connect and authenticate to the DSS REST server.
.Net SDK Tutorial 2: GUI control calls: Lists, reports, schedules
In this tutorial we look at basic programmatic GUI control. We:
- Create an instrument list, a report template and a schedule, on the DSS server. These are the 3 basic core operations. In this specific case we create:
- A report template for EoD (End of Day) pricing. A report template includes a list of data field names.
- An immediate schedule that runs once.
- An EoD recurring schedule that waits for the error corrected data to be available.
- Cleanup: delete them all when done.
.Net SDK Tutorial 3: GUI control calls: Validation, EoD extraction
In this tutorial we look at more programmatic GUI control. We:
- Create an instrument list, a report template and a schedule, on the DSS server. In this specific case we create:
- A report template for EoD (End of Day) pricing.
- An EoD recurring schedule that runs at a specific time.
- Check the data validation results for the instrument list.
- Launch a data extraction on the DSS server, wait for it to complete.
- Retrieve and display the data.
- Cleanup.
.Net SDK Tutorial 4: GUI control calls: Embargoes, note files
An embargo is a temporary block on the extraction of requested data, due to lack of permissions.
In this tutorial we handle embargoed extractions. We also look at the accompanying notes files generated by DSS when data is extracted:
- Create an instrument list, a report template and a schedule, on the DSS server. In this specific case we create:
- A report template for intraday pricing.
- A schedule that runs once at a specific time.
- Wait for the schedule to launch the data extraction on the DSS server, wait for it to complete, and handle partial / late deliveries that arise if it is under embargo.
- Retrieve and display all files (data and extraction notes).
- Cleanup.
.Net SDK Tutorial 5: On Demand: EoD extraction
In this tutorial we start using simplified high level API calls for On Demand extractions. We:
- Create an instrument list array, outside of the DSS server.
- Create an array of data field names, outside of the DSS server.
- Create and run an on demand EoD data extraction on the DSS server, wait for it to complete.
- Retrieve and display the data in JSON format, and the extraction notes (including maintenance notes).
- Cleanup is not required.
.Net SDK Tutorial 6: On Demand: EoD extraction, file I/O
In this tutorial we start productizing the code of tutorial 5. Added functionality:
- Populate a large instrument list array from a file.
- Write the received data and extraction notes (including maintenance notes) to files.
- Analyze the extraction notes.
- This sample contains 2 extraction requests: one with the ExtractWithNotes endpoint, the other with the ExtractRaw endpoint, to illustrate the differences between the two.
.Net SDK Tutorial 7: On Demand: EoD extraction, large instrument lists
In this tutorial we continue productizing the code of tutorials 5 and 6. Added functionality:
- Manage an instrument list larger than the extraction limit, using loops.
- This sample also contains 2 extraction requests, one with the ExtractWithNotes endpoint, the other with the ExtractRaw endpoint, to illustrate the differences between the two.
.Net SDK Tutorial 8: On Demand: Terms and conditions
In this tutorial we continue using the simplified high level API calls for On Demand extractions.
The use case is to cross reference instrument codes, i.e. retrieve several instrument codes (RIC; Cusip, ISIN, Sedol, etc.), for a list of instruments (with different instrument codes). For each input instrument code, only 1 RIC is returned (the primary RIC).
We:
- Create an instrument list array, and an array of data field names, outside of the DSS server.
- Create and run an on demand data extraction on the DSS server, wait for it to complete.
- Retrieve and display the data and the extraction notes (including maintenance notes).
- We also analyze the extraction notes.
.Net SDK Tutorial 9: On Demand: Composite extraction
- This tutorial is similar to Tutorial 8, but replaces the T&C (Terms and Conditions) extraction with a Composite extraction, which combines T&C and Pricing data. We retrieve a few composite fields, and cross reference instrument codes.
- This sample also contains 2 extraction requests, one with the ExtractWithNotes endpoint, the other with the ExtractRaw endpoint, to illustrate the differences between the two.
.Net SDK Tutorial 10: On Demand: Search by instrument
This tutorial is the first covering searches. It explains how to make a search request, using as criteria the instrument code. This is illustrated with two examples, which can be extended to other instrument codes:
- Search using the RIC.
- Search using the Organisation Id (OrgId).
Such a search can also be used to validate a list of instruments (as illustrated by the first example).
You can choose to have results in a different instrument code type (as illustrated by the second example).
.Net SDK Tutorial 11: On Demand: Search for equity
This tutorial explains how to make a search request for an equity instrument code, using as criteria the exchange and the ticker (other criteria are also available and briefly explained).
.Net SDK Tutorial 12: On Demand: Search for future or option
This tutorial explains how to make a search request for a future or option instrument code, using as criteria the strike price and expiration date (other criteria are also available and briefly explained).
Different methods to create a custom .Net project
If you are new to Microsoft Visual Studio you might find this section useful.
The actions in the lists below are not meant to be followed as part of the tutorials, whose practical part starts in the next tutorial, .Net SDK Tutorial 1: Connecting to the DSS server.
Before starting the practical tutorials, let us consider how you could proceed to create your own personal projects.
There are several alternatives. You could:
- Use one of the tutorial projects and modify it.
- Start a new project from scratch.
- Add DSS REST API connectivity to an existing project.
To start from scratch here is one of the ways you could do it:
1. Install the DSS REST API .Net SDK (see .Net SDK Tutorial 1: Connecting to the DSS server).
2. Open Microsoft Visual Studio.
3. Start a new project.
4. Select as template a Console Application in Visual C#:

5. Define its location and name
6. Reference the DSS REST API .Net SDK (see .Net SDK Tutorial 1: Connecting to the DSS server).
7. Start coding (possibly re-using copying code snippets from the DSS REST API C# example application and/or the tutorials).
To add DSS REST API connectivity to an existing project you would:
- Install the DSS REST API .Net SDK (see .Net SDK Tutorial 1: Connecting to the DSS server).
- Open your existing project in Microsoft Visual Studio.
- Reference the DSS REST API .Net SDK (see .Net SDK Tutorial 1: Connecting to the DSS server).
- Start coding (possibly re-using copying code snippets from the DSS REST API C# example application and/or the tutorials).
Now that you have a better idea of what the DSS REST API is about, and what the tutorials contain, you can proceed to the practical tutorials, which all use pre-built sample projects containing functional C# code.
REST API tutorials content
This series of tutorials covers programming over HTTP with the DSS REST API.
The tutorials are much more generic, and the calls illustrated in them can be reused in any programming environment that can make HTTP calls to a REST server. When writing these tutorials we ran the calls using a REST client application called Postman, but you can use any tool you like to experiment with this.
The tutorials cover some (but not all) of the API calls, illustrating some typical use cases. Each tutorial illustrates one or several key concepts. Comments in the tutorial explain the steps.
The On Demand extractions in tutorials 2-8 use the ExtractWithNotes endpoint, whereas tutorial 14 uses the ExtractRaw endpoint in a use case similar to that in tutorial 4.
This set and the Programming without SDK Tutorial complement each other.
REST API Tutorials introduction
This is an introduction to the REST API (pure HTTP) tutorials, covering two important topics:
- Using the REST API tutorials, and testing DSS REST requests, with a pre-built REST client application. This is a great way to easily test the DSS REST requests and responses, and get started with the following tutorials.
- Understanding the link between the C# example application and the REST API (pure HTTP) tutorials. The C# example application displays the HTTP requests and responses for the many use cases it illustrates. This knowledge can easily be re-used when programming HTTP requests, in any language.
REST API Tutorial 1: Connecting to the server
This is the starting point and a pre-requisite for all the other tutorials.
In this tutorial we:
- Connect and authenticate to the DSS REST server. The received token will be required as authentication for every request.
- Request user information, as a first example query, and as a mean to check our authentication token validity.
REST API Tutorial 2: On Demand End of Day extraction
In this tutorial we:
- Retrieve the available field list from the DSS server. This is only required if you do not know the exact names of the data fields you want to retrieve.
- Retrieve EoD (End of Day) data and the extraction notes (including maintenance notes) from the DSS server, using an on demand request to the ExtractWithNotes endpoint.
Handle a time out, where the request times out before results are available.
REST API Tutorial 3: On Demand intraday extraction, embargo
In this tutorial we:
- Retrieve the available field list from the DSS server.
- Retrieve intraday data and the extraction notes (including maintenance notes) from the DSS server, using an on demand request to the ExtractWithNotes endpoint. Intraday data is data from the current day.
- Handle embargoes on intraday data, i.e. when you are not permissioned for intraday data.
REST API Tutorial 4: On Demand price history extraction
In this tutorial we:
- Retrieve the available field list from the DSS server.
- Retrieve price history (i.e. time series) data and the extraction notes (including maintenance notes) from the DSS server, using an on demand request to the ExtractWithNotes endpoint. This data is data over a range of days.
Important note:
The legacy Timeseries Pricing extraction will be removed end February 2020, the more powerful Price History extraction replaces it. This tutorial, and the Postman collection, were updated in May 2019 to reflect this. If you are using the Timeseries Pricing call, you must modify your code. As part of the migration process, it is important to understand that, in some instances, field content extracted from the Timeseries Pricing report will be available under different field names in the Price History report. It is also possible that some previously populated values in the Timeseries Pricing report will be blank in the Price History report. This is due to data mapping changes. For more information, please refer to the Product Change Notification PCN 10897.
REST API Tutorial 5: On Demand corporate actions extraction
In this tutorial we:
- Retrieve the available field list from the DSS server.
- Retrieve corporate actions data and the extraction notes (including maintenance notes) from the DSS server, using an on demand request to the ExtractWithNotes endpoint. Corporate actions are events that affect the securities issued by the company. Examples: dividend or coupon payment, call (early redemption) or stock split.
REST API Tutorial 6: On Demand ownership data extraction
In this tutorial we:
- Retrieve the available field list from the DSS server.
- Retrieve ownership data and the extraction notes (including maintenance notes) from the DSS server, using an on demand request to the ExtractWithNotes endpoint. Ownership data is reference data on securities issued by the company.
- Handle a time out, where the request times out before results are available.
REST API Tutorial 7: On Demand T&C extraction
In this tutorial we:
- Retrieve the available field list from the DSS server.
- Retrieve T&C (terms and conditions) data and the extraction notes (including maintenance notes) from the DSS server, using an on demand request to the ExtractWithNotes endpoint. In this example we retrieve a few terms and conditions fields. The use case is to cross reference instrument codes, i.e. retrieve several instrument codes (RIC; Cusip, ISIN, Sedol, etc), for a list of instruments (with different instrument codes). For each input instrument code, only 1 RIC is returned (the primary RIC).
REST API Tutorial 8: On Demand composite extraction
In this tutorial we:
- Retrieve the available field list from the DSS server.
- Retrieve composite data and the extraction notes (including maintenance notes) from the DSS server, using an on demand request to the ExtractWithNotes endpoint. Composite data includes pricing and reference data. In this example we retrieve a few composite fields related to annualized dividends and the balance sheet. We also cross reference instrument codes, i.e. retrieve several instrument codes (RIC; Cusip, ISIN, Sedol, etc), for a list of instruments (with different instrument codes). For each input instrument code, only 1 RIC is returned (the primary RIC).
REST API Tutorial 9: On Demand extraction: instrument list
In the previous tutorials we created an instrument list on the fly. Here we show how to use a pre-existing one.
REST API Tutorial 10: GUI control calls: schedule an immediate extraction
This tutorial goes through the basics of programmatic GUI control. Instead of using an On Demand extraction, which is a simplified query, it performs a whole set of actions that could also be done manually in the DSS web GUI. For an explanation on these two approaches, look at section: GUI control calls and On Demand calls: 2 approaches.
This tutorial explains how to:
In this tutorial we again look at EoD data:
- Retrieve the available field list from the DSS server.
- Create an instrument list.
- Create a report template.
- Schedule an immediate extraction.
- Check the extraction status.
- Retrieve the extraction report.
- Retrieve the end of day data from the DSS server.
REST API Tutorial 11: Search by Instrument
In this tutorial we:
- Search the DSS server by using the instrument code. 2 examples are given, one by RIC, one by OrgId. This tutorial also illustrates how to validate a list of instruments, and how to return results in a different instrument code type.
REST API Tutorial 12: Search for an Equity
In this tutorial we:
- Search the DSS server for an equity, using as criteria the exchange and the ticker (other criteria are also available).
REST API Tutorial 13: Search for a Future or Option
In this tutorial we:
- Search the DSS server for a future or option, using as main criteria the strike price and the expiration date (other criteria are also available).
- Use a wildcard for the identifier.
REST API Tutorial 14: On Demand price history extraction, raw
This tutorial uses the ExtractRaw endpoint, in a use case similar to that in tutorial 4 (which used the ExtractWithNotes endpoint):
- Retrieve the available field list from the DSS server.
- Retrieve price history data and the extraction notes (including maintenance notes).from the DSS server, using an on demand request to the ExtractRaw endpoint. This data is data over a range of days.
Important note: read the note at the end of the section on REST API Tutorial 4: On Demand price history extraction.
.
Request tuning and best practices
Some requests can generate fairly large result sets.
To optimize the retrieval times, see the Best Practices and Limits document in the Development section under the Documentation tab.